Plotter cutter blade mount for 3D printer or CNC
cults3d
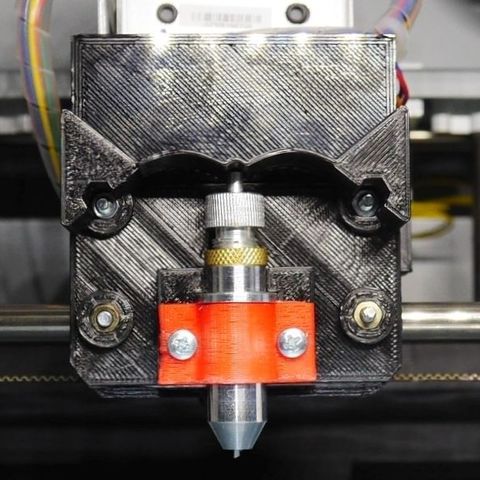
This is spring-loaded mount for Roland-compatible plotter blade holders, for cutting paper and vinyl. The spring is made of plastic, so use ABS. I am using this with this cheap blade holder. You may have to tweak measurements for another. The mount is designed to be mounted with four M3 screws to an auxiliary tool clip that mounts to your 3D printer's print-head or your CNC. I used this tool clip for my DaVinci 1.0a -- if you design your own tool clip, pay attention to screw hole positions. The design includes a strip that attaches with two M3 screws that holds the blade holder snugly in place and a cap (perhaps a little too tight). I used a cut-down light-adhesive Cricut cutting mat, clipped to the DaVinci's print bed with some quick-and-dirty clips. For software, I use a combination of Inkspace's HPGL export together with my own gcodeplot Python script package, which is designed to work with gcode-based 3D printers. One probably can make this work with the gcodetools extension for Inkspace, but I haven't been able to figure this out. Software Instructions Figure out the corner XY coordinates of your cutting area, by attaching the cutter and moving your printhead with your favorite control software. Make sure the printhead can move around the cutting area freely, without the attachments bumping anything. Clip your adhesive cutting mat to your print bed. Move the printhead down very carefully so the blade just makes contact with the cutting mat. Move printhead back. Put paper or vinyl on cutting mat. Convert your Inkspace file to paths. (Select All, Object | Object to Path). Make the page size match your cutting area size. Use Save As... HP Graphics Language File in Inkspace) to create an hpgl file. Make sure you use the second tab to set overcut and the distance of the tip of the cutting blade from the swivel point. Create gcode file using: python gcodeplot.py --area=x1,y1,x2,y2 filename.hpgl > filename.gcode where x1,y1,x2,y2 are the corner coordinates (in millimeters) of the cutting area. Send your gcode file to your 3D printer using favorite print utility. If you prefer, you can just send it directly with gcodeplot.py rather than saving the gcode to a file, if you have pyserial installed (pip install pyserial): python gcodeplot.py --area=x1,y1,x2,y2 --send=portname filename.hpgl (e.g., on my Windows laptop, portname was COM3). gcodeplot.py can also be used to adjust the exact blade z-positioning before printing, too. You to do that, do:python gcodeplot.py --area=x1,y1,x2,y2 --pause-at-start --send=portname filename.hpgl The script will initialize your device, and then give you a commandline where you can send some simple commands before drawing starts. For instance,z11.3 moves the head to the 11.3mm position. You can also do incremental moves with z+increment. Thus, to move the head down by half a millimeter, do z+-0.5. You can also move to a safe height above the work with:zsafe and to the pre-defined work-surface with:zwork Finally, once you've figure out where you want the print head to be for safe work, do:work=z and resume your work with:c
With this file you will be able to print Plotter cutter blade mount for 3D printer or CNC with your 3D printer. Click on the button and save the file on your computer to work, edit or customize your design. You can also find more 3D designs for printers on Plotter cutter blade mount for 3D printer or CNC.