Pneumatic/Hydraulic Cylinder
thingiverse
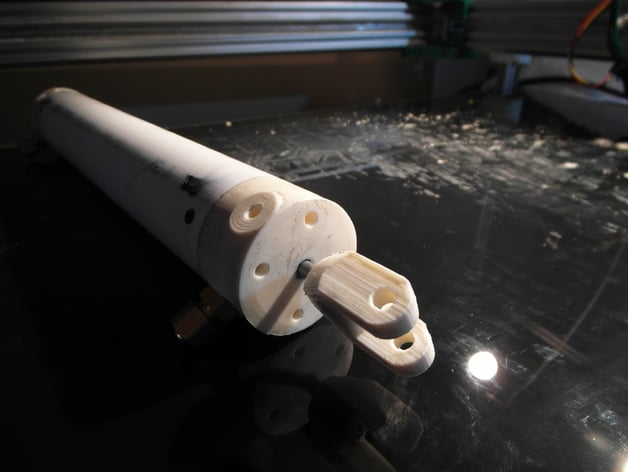
This is an operational pneumatic/hydraulic cylinder. The main goal with this was to make a cheap and easy to produce cylinder for use on interesting projects. It's also a proof of concept. I've used central vacuum tubing as it's very cheap ($6.50/12ft section) and is rigid. Other pipe can be used and the OpenSCAD files have variables at the beginning to customize the parts. There are mounting holes (optional) on the front and back faces along with (again, optional) the sides of both the front and back. This was developed and built using my overly large 3d printer called Tiny. See https://ottersoft.ca/ for details and news. Instructions Materials Required: one of each part a length of shaft (current files for 1/4" drill rod) see bellow for length 2 o-rings for the piston (i used 3/16" thick by aprox 1 1/2" diameter inside) 2 o-rings for the cylinder head (i used 1/16" thick by about 1/4" diameter inside) 2 1/4" tapered thread fittings to the hose you'll use 6 fasteners to pin the head and base in place 2 fasteners, one for the piston and the other for the rod end to pin them in place some E6000 or Shoe Goo to seal/glue parts together oil or lubricant The tube length needs to be 52mm longer than the full stroke (this will be 52mm shorter than the cylinder length) Print one of each part as solid as you can. A good option is either 100% infill or 30% with minimum 6 outside layers and 6 top and bottom layers. I also suggest going with slightly smaller layer-height (i used 0.25 on a 0.5mm nozzle) because the end prints are stronger. The piston and rod end both have holes for drilling through the shaft on one side. Drill through that hole and through the shaft with a small drill bit (1/8" or 2mm for instance) then pull the shaft out and drill for a close fit on the fastener you're using. Also drill the plastic to just under the size of the fastener to allow threading. O-rings need to be seated on the piston and inside the shaft hole in the cylinder head. The ones in the head can be a bit tricky but I found that inserting the rod til just shy of the ring and then shoving the o-ring in place works. Before assembling, the cylinder tube needs to be prepared. Slide the cylinder base and head onto either end of the tube and line up the fitting holes to where you need. There are marks along the edge of those two parts which point to where the holes will be located on the tube. The holes are 10mm in so scribe that distance. Drill with a small bit to start then widen for a tight fit with the head of the fastener you're using. If you have countersunk fasteners this is a good time to use them. Test the piston to see how well if fits. If it doesn't enter the piston easily, you may need to take a small round-file and make the o-ring seats a little deeper. The base can be attached permanently so glue as well as fasten it onto one end. Pass the rod through the cylinder head while it's out of the cylinder and then glue and fasten the piston onto the end of the rod. Lubricate and slide into the tube. If the system works correctly, you can glue and fasten the head in place. Insert the fittings, remove some and glue, then tighten them down completely. Test, tweak and enjoy!
With this file you will be able to print Pneumatic/Hydraulic Cylinder with your 3D printer. Click on the button and save the file on your computer to work, edit or customize your design. You can also find more 3D designs for printers on Pneumatic/Hydraulic Cylinder.