Pocket Van De Graaff generator
thingiverse
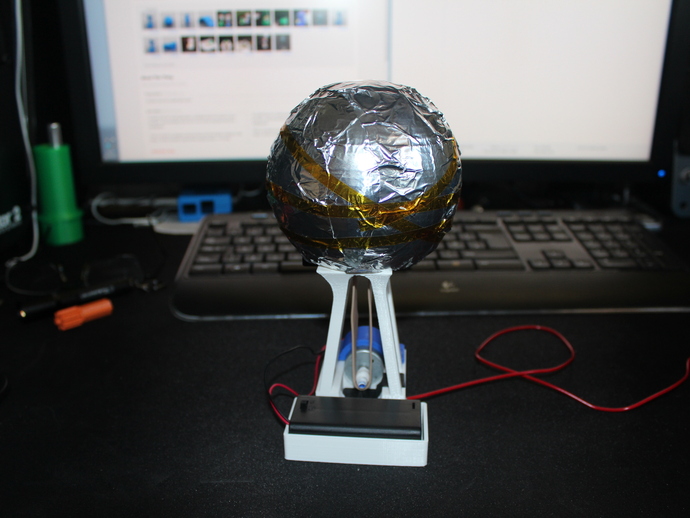
A small Van De Graff generator, probably best not used in your pockets, and probably best not to run it near delicate electrical equipment. ####### Version 4 ####### May 2013 This version uses ABS conductive filament from Rainbot3D.com, which greatly simplifies the top and bottom electrostatic combs. The combs are completely printed, so no messing about bending and shaping wires. This also makes the parts much more reproducible and consistent. The plastic has a resistivity of about 100 Ohm-cm. As printed, with 10% infill, I was measuring around 150 Kohms for each comb. As we are dealing with very small currents this is acceptable. The bottom comb is in two parts, which acts as a clamp for the earth wire. The top comb has a "shelf" such that the tin foil wrapped sphere rests on it to provide the electrical contact. I had hoped to print the sphere with the conductive filament but I think the resistivity was too high. The only wire needed now is the earth wire, I usually hold this while shocking myself. Holder for battery pack added to the base. All parts printed on my Rep2 in PLA, except the combs which were printed on my thing-o-matic mk6. Instructions Parts: 1 Rubber band, I got a pack of 89mm long by 12.7 mm wide from Staples. 1 32 mm fuse, don't worry about the rating, it's just to form a glass rotor. 1 PTFE tape, to wrap around the printed rotor that fits on the motor spindle. 1 3V Motor, 25 mm diameter body by 30 mm body length. I got mine from Maplin, if you need to adjust for a different motor size I have included the 123D design files. 2 M3 x 19 screws 2 M3 bolts. Aluminium foil to wrap the bowl in. Wire, not sure what gauge it is but it's about 2mm in diameter. The materials for the belt pulleys were taken from the Triboelectric effect table http://en.wikipedia.org/wiki/Triboelectric_effect. The top pulley is glass, using a 32 mm fuse, and the bottom rotor is PTFE tape, over a printed rotor with a bulge in it to make the rubber band self centre. Instructions. Print out one each of Base, Bowl, Clamp and Rotor. The rotor should press fit onto the motor shaft. Wrap the rotor with the PTFE tape several times. Bolt the motor into the base using the clamp and the screws and nuts. Strip the ends of the wire, you need one long piece ( ~ 1m) and one piece about 20 cm. The 20 cm wire should be stripped of insulation about 5mm one end and 7-8 cm the other end, the 5 mm end goes through the guide in the top of the base ( see photograph), and the ends bent down to form the electrostatic comb. The long stripped end is to make contact with the bowl. The 1 m length should be stripped of insulation for about 5 mm and then pushed through the guide in the base to form the bottom electrostatic comb. Note that the combs should not touch the rubber, they should be 2-3 mm away from the rubber surface. The other end of the 1 m cable goes to ground, I have mine wrapped around bare metal on a central heating radiator. Wrap the Bowl in aluminium foil and push it inside the bowl so it can make contact with the short wire. Smooth the foil as much as possible over the bowl, sharp edges will cause charge leakage. Fire up the motor and enjoy the sparks to your fingers. I would welcome any suggestions to improving this thing.
With this file you will be able to print Pocket Van De Graaff generator with your 3D printer. Click on the button and save the file on your computer to work, edit or customize your design. You can also find more 3D designs for printers on Pocket Van De Graaff generator.