Polar Alignment Tray with 3 Options
thingiverse
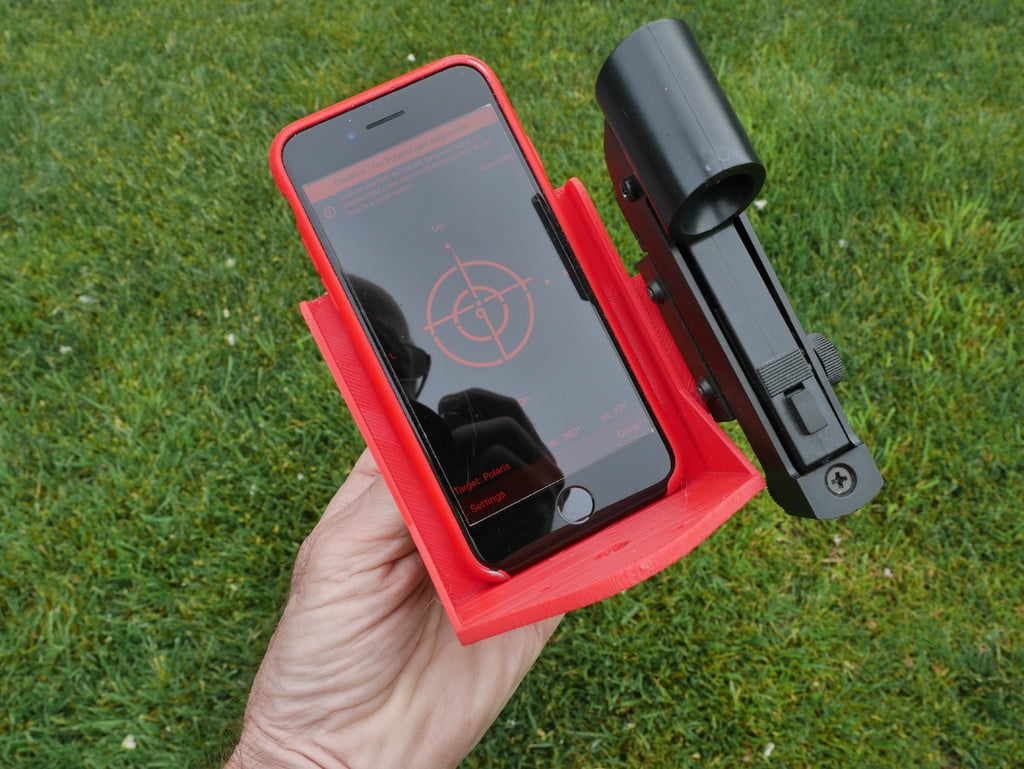
Aligning an equatorial telescope mount to the earth's polar axis is a critical task required for accurate tracking. There are many ways to do this with modern telescope mounts including polar scopes and software solutions using telescope cameras. However many low end mounts do not provide an accurate method for polar alignment. This tray assembly solves that problem by providing three different methods to do a polar alignment. It is made of two parts, a tray and a dovetail, that are screwed together with #4-40 x 1/2 inch screws and nuts. The dovetail is designed to fit into a standard Vixen telescope mount such as that used on the Explore Scientific G11, EXOS2 or iEXOS 100 (and many other brands) mounts. The tray is designed to hold an iPhone such as the iPhone 7,8,or 10 small or large version (82mm maximum width). The tray also has a feature to hold a red dot finderscope such as that made by Celestron. In addition, it has mounting holes for holding a QHY PoleMaster electronic polar scope. A brief explanation of the alignment technique for each option is given below. For each technique the tray is installed in the mount Vixen dovetail grip with the telescope removed. The mount is then homed, leveled and pointed as close to north as possible with the elevation set to the users approximate latitude. iPhone technique (preferred method): Download the app "Polar Scope Align Pro". Bring up the app and select the 3 dots appearing at the bottom right corner of the main page screen. Then select the sun icon just above the 3 dots on the bottom right. This displays a circular target and as you rotate and elevate the iPhone, a crosshair will appear when the phone is aligned with the earth's polar axis. Place the iPhone in the tray and align the mount to the polar axis using the adjustment features on the mount. Red dot finder technique: Attach the Red dot finder to the small dovetail on the right side of the tray. (I'm assuming that the Red dot finder has been previously aligned to the axis of the telescope). Turn on the power to the red dot and look through the finder. Adjust the mount so that the red dot falls on Polaris. QHY PoleMaster technique: Mount the QHY PoleMaster on the rear wall of the tray using the 3 holes provided. I believe it uses M3 screws. The cable should go to the right as shown in the picture above. Follow the instructions provided with the PoleMaster to adjust the mount. Using any of the techniques above should get you within a degree or so of perfect alignment which is adequate for most applications.
With this file you will be able to print Polar Alignment Tray with 3 Options with your 3D printer. Click on the button and save the file on your computer to work, edit or customize your design. You can also find more 3D designs for printers on Polar Alignment Tray with 3 Options.