Polaroid pack to 6x9 120 conversion
thingiverse
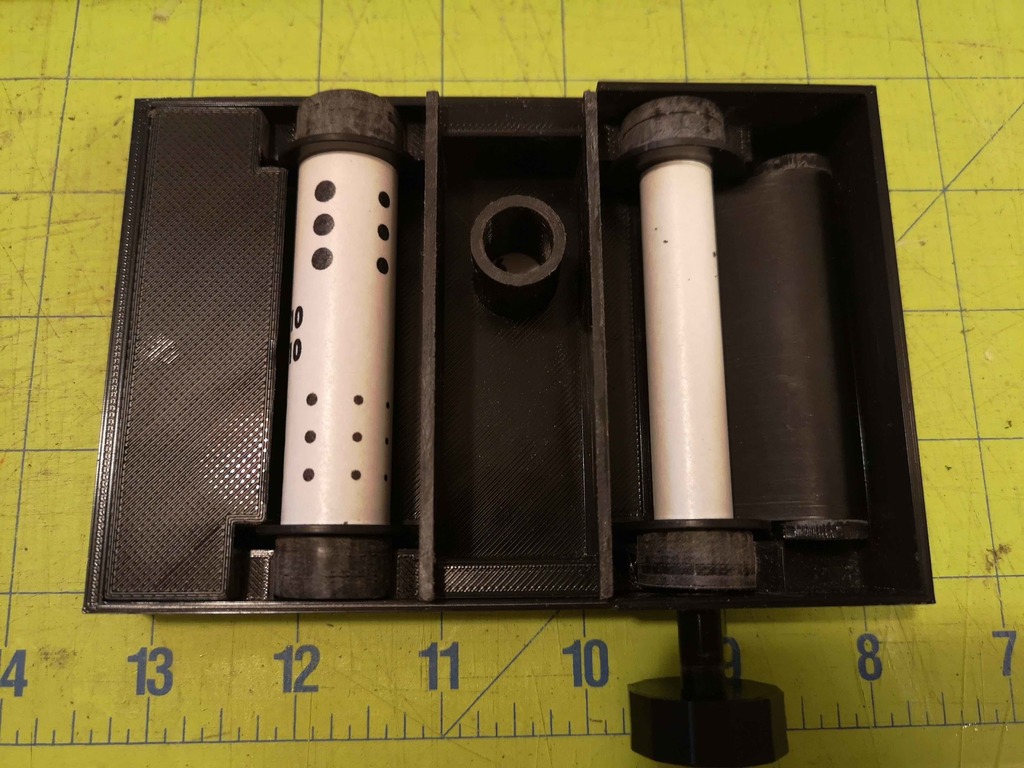
These parts help convert a Polaroid 100 series pack film camera to use 120 film in 6x9 format. Print 3 spools and one of everything else. To use, you will need to file the guide hole in the base to 7mm. Be sure the knob shaft lines up with the spool drive adapter (with the receiving hole in it). You'll likely need to clean up the drive spool so the knob fits into it. The base is printed with close tolerances, so you may need to sand down the edges to make the pack fit inside the camera. Width should be 89.5mm. You will likely need to smooth out the U shaped spool adapter holders on the edges to allow the adapters to spin freely, which was the case with the base printed on an Ender 3 v2 at .2 resolution and a .4 nozzle. The drums on both ends of the pressure plate need to be sanded down to 600 grit to reduce friction. All the spool adapters will need sanding/smoothing to rotate with the minimum of friction. The cover will likely need cleaning up to fit in the base. This is the light baffle to ensure light doesn't strike the film from the door hinge. The back of the Polaroid camera should be plain (no development timer) and needs to be modified: removing the rollers, roller springs, a groove for the knob shaft filed, and a peep hole for the film counter drilled, as well as grooves cut for the film spool. This will permanently modify the back so it will not longer be able to use pack film. Details at on Instagram @hackaninstant. Alternatively, you can try using the back provided, which has been updated to correctly align the hole in the back. You may need to file down the hinges/latching hooks to fit. The last step for completing the back is to cut a piece of black craft foam the diameter of the peep hole shaft and gluing it inside the hole of the back to ensure a light seal. When the pack is installed and the door closed, no pressure should be on the peep hole or light baffles, or it will introduce friction in the film movement. If there is too much friction, try pulling the film through manually without the spools engaged. If there's lots of friction, try shimming the bottom edges of the pressure plate to provide clearance between the pressure plate and the base. Although the base has a 1.5mm shim, that may not be enough. You may experience problems with the knob breaking under pressure. I ended up making a steel shaft out of a 1/4" bolt, using a dremel to cut the drive slot into the end. Then, used the existing PLA knob, heated up the hex end of the bolt, and sank it into the plastic. The best way to load film is to string the film across the base onto the take up spool, then insert the pressure plate, making sure the film is perfectly centered under the pressure plate. Then, flip the spools into the slots, insert the knob, then the cover on the left side, and take up the slack before inserting it into the camera. If you experience a light leak at the peep hole, cover it with hockey tape and uncover it while advancing the film out of direct sunlight. Or, you can try putting an ND filter over the hole. Alternatively, you can print the peep hole frame and door and glue it onto the back of the back. This is not a project for the faint of heart. If you manage to get this far, consider converting the shutter to manual shutter speeds with a resistor array, instructions at http://polaroids.theskeltons.org/manuale.htm
With this file you will be able to print Polaroid pack to 6x9 120 conversion with your 3D printer. Click on the button and save the file on your computer to work, edit or customize your design. You can also find more 3D designs for printers on Polaroid pack to 6x9 120 conversion.