Pooper Scooper
prusaprinters
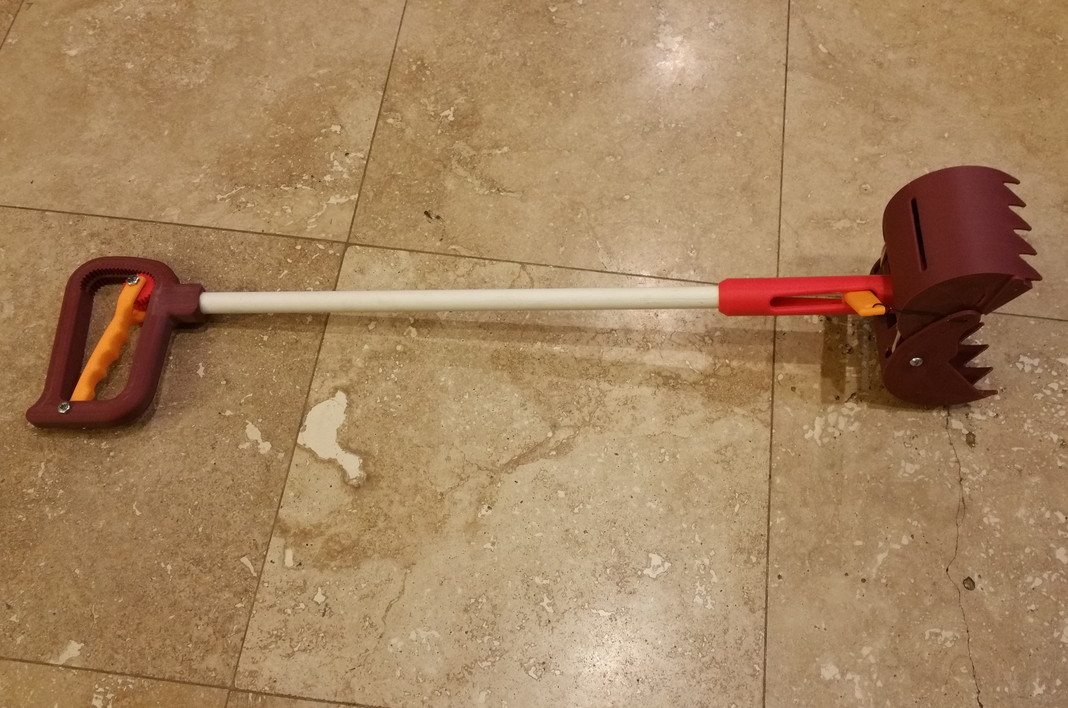
<p>Pooper Scooper</p> <h3>Print instructions</h3><h3>Category: Pets Print Settings</h3> <p><strong>Printer Brand:</strong> Solidoodle</p> <p><strong>Printer:</strong> <a href="http://amzn.to/2nz3pIE">Solidoodle 4</a></p> <p><strong>Rafts:</strong> No</p> <p><strong>Supports:</strong> Yes</p> <p><strong>Resolution:</strong> 0.3mm layer height</p> <p><strong>Infill:</strong> 50% (90% for hinge)</p> <p><strong>Notes:</strong></p> <p>I used supports for the scoop and grip. PRINT LIFT.STL FIRST! You will need insert it into the hinge.stl print midway through the print.</p> <p>Update: Got tired of replacing rubber bands so I found an expansion spring at the local hardware store and instead used that after cutting to size and bending loops on the ends. Works great!</p> <h3> Post-Printing</h3> <p><strong>Parts List</strong></p> <p>Additionally, you will need:<br/> heavy cord<br/> wire<br/> 2 bolts (1/4" 4-1/2")<br/> 1 bolt (1/4" 1-1/2")<br/> 1 bolt (1/4" 1") (optional)<br/> 2 rubber bands [UPDATE: replaced with expansion springs]<br/> 1/2" PVC pipe 2-3 ft<br/> 2 6-32 threaded rods cut to ~170mm (optional but recommended for strength)</p> <p><strong>Step 1</strong></p> <p>Print the lift first. About halfway through the hinge print, pause the print, drop the lift in place, and resume.<br/> print two scoops and one each of all the rest. The scoop and grip will both need supports. I printed all except the hinge with 50% infill and 99% infill on the hinge for strength.</p> <p><strong>Step 2</strong></p> <p>Attach one scoop to the hinge using the long bolts. Ensure it moves freely (drill out the hole in the hinge if necessary) and make sure the bolt does not extend past the far end.</p> <p><strong>Step 3</strong></p> <p>Carefully aligning the two scoops and hinge, attach the second scoop using the other bolt. If connected with the gear teeth properly aligned they should move together staying square to the riser on the hinge.</p> <p><strong>Step 4</strong></p> <p>Cut two lengths of wire and bend a hook as shown</p> <p><strong>Steps 5&6</strong></p> <p>connect the wires from the lift to each scoop as shown.</p> <p>Ensure the scoops fully close when the lift is ~1cm from the top of the slot.</p> <p><strong>Steps 7 & 8</strong></p> <p>Attach the rubber bands as shown using a wire scrap to fish it through the provided channels.<br/> [UPDATE] My rubber bands would last only a month or so before they became brittle and broke so I have since found a pair of expansion springs that fit the holes at the local hardware store. No problems since.</p> <p><strong>Step 9</strong></p> <p>Tie a knot in the end of the cord and fish through the hinge and lift as shown. Knot should come to rest at the bottom of the lift (passing through the larger hole in the bottom of the hinge).</p> <p><strong>Optional step</strong></p> <p>Now is a good time to insert the two 6-32 170mm threaded rods into the two holes in the hinge. They should insert fairly easily. Once you are sure they fit, dip in acetone and reinsert (if printing with ABS) to glue in place. If printing with other materials, cement or other glue should work.</p> <p><strong>Step 10</strong></p> <p>Feed the cord through the PVC pipe and press the pipe into the hinge. Should be a tight fit.</p> <p><strong>Step 11</strong></p> <p>Feed the cord through the grip and gear. Pulling the scoops slightly closed, tie a loose knot in the cord (you may have to re-tie to get the length right once fully assembled).</p> <p>The hole in the grip has been made slightly over sized since prints tend to be weak along layer boundaries and would crack if significant force was required to insert the PVC pipe. So adhesive will be required. I used silicone.</p> <p><strong>Step 12</strong></p> <p>Attach the two short bolts to the lever and gear as shown. The second bolt at the pivot point is optional since the lever is sufficiently constrained once the gear is attached.</p> <p><strong>Try It!</strong></p> <p>You will probably need to adjust the cord length by re-tying the knot at the gear. Once satisfied, trim the excess and you are done!</p>
With this file you will be able to print Pooper Scooper with your 3D printer. Click on the button and save the file on your computer to work, edit or customize your design. You can also find more 3D designs for printers on Pooper Scooper.