Portable Hypocycloid Drawing Kit
prusaprinters
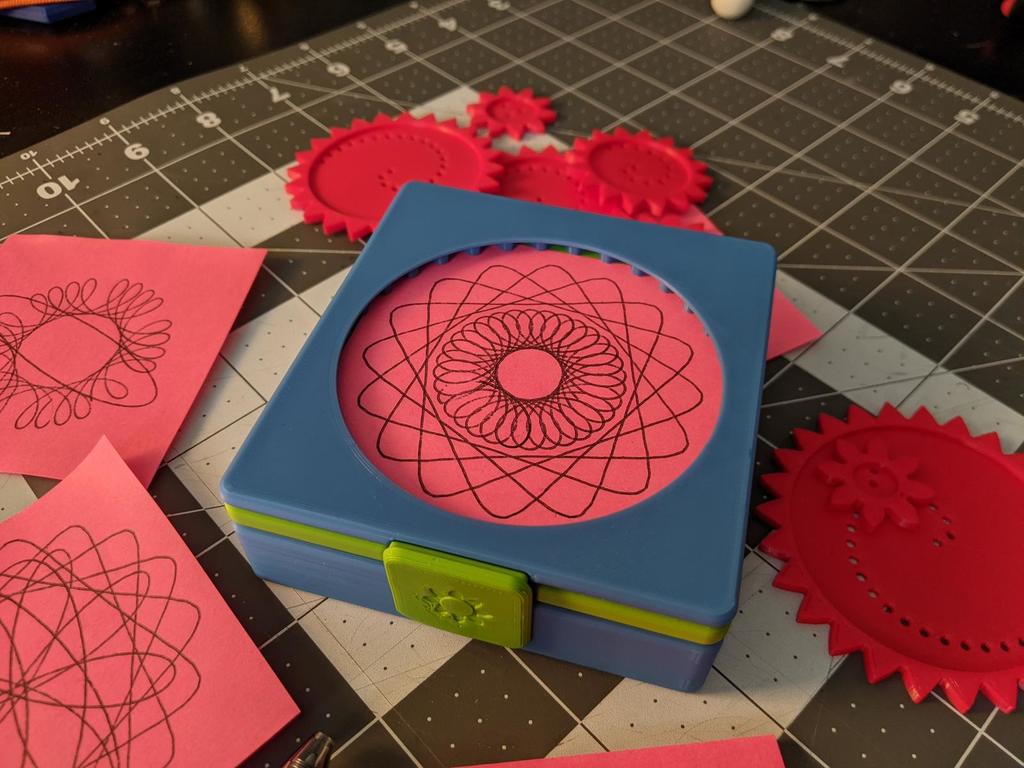
<p>Have you ever wanted draw repeating geometric patterns at <i>any</i> time in <i>any</i> place?</p><p>No? Well, let's pretend you did...</p><p>This handheld print conveniently combines a drawing platform with a case for the gears and paper. It easily fits into a bag, pocket, or purse. As long as you have a pen, you're good to draw!</p><p>The base is designed with multiple levels. The bottom level holds the paper, the drawing gears, and, if you can find one, a small pen. The next level provides a flat, secure drawing surface; you can even make art while walking! The top level has the stationary gear teeth and holds the paper in place.</p><h3>Paper and Pen</h3><p>This kit is designed to use Post-It Notes as paper. It requires no paper cutting, and your finished pieces of art are already self-adhesive!</p><p>Almost any standard ballpoint pen can be used. A BIC pen was used for sizing, but the design works with every pen that I tested.</p><h3>Printing</h3><ul><li>Nozzle: 0.4 mm</li><li>Layer Height: 0.2 mm</li><li>Infill: at least 15% (20% or more recommended)</li><li>Vertical Shells: 3</li><li>Top/Bottom Layers: 5</li><li>Supports: No</li></ul><p>You'll need to print one <i>top</i>, <i>middle</i>, <i>bottom</i>, and <i>latch</i>. You can print as many gears as you want.</p><p>I added a new version of the top with 31 teeth (<strong>Top-V2.stl</strong>). It's untested, but should create more complex patterns.</p><p>For the <i>middle</i> layer, I suggest using 6 top/bottom layers and an infill of 25% at least. This will create a better drawing surface.</p><p>The hinge is simply a length of <strong>1.75mm</strong> filament. Make sure to cut one end to a steep angle.</p><h3>Assembly</h3><ol><li>Snap the <i>latch</i> into the holes on the front of the <i>bottom</i>.</li><li>Place the <i>middle</i> on top of the <i>bottom</i>. Be sure to pay attention to orientation: the square indent should be facing up.</li><li>Place the <i>top</i> on the <i>middle</i>. Be sure to line up the hinge.</li><li>Insert a straightened piece of <strong>1.75mm</strong> filament into the side of the hinge. Rotate the filament as it's being forced in.</li><li>Trim the excess filament from the hinge.</li><li>Lift the <i>top</i> and <i>middle</i> parts. Place gears and Post-Its paper into the <i>bottom</i>.</li></ol><h3>Tips</h3><p>If the surface texture of the <i>middle</i> part is creating a texture in the drawing:</p><ul><li>Reprint the part with "ironing" enabled</li><li>Use an extra Post-It note or two</li></ul><p>For the hinge assembly:</p><ul><li>The hinge is meant to be stiff. It can hold the case open.</li><li>You can <i>lightly</i> sand down the filament if it's too stiff.</li><li>Rotating the filament as it's inserted helps.</li><li>Cutting the end of the filament to a sharp angle helps too.</li><li>Make sure the case stays closed while inserting the filament.</li></ul><p>Make sure the entire case is snapped closed before drawing!</p>
With this file you will be able to print Portable Hypocycloid Drawing Kit with your 3D printer. Click on the button and save the file on your computer to work, edit or customize your design. You can also find more 3D designs for printers on Portable Hypocycloid Drawing Kit.