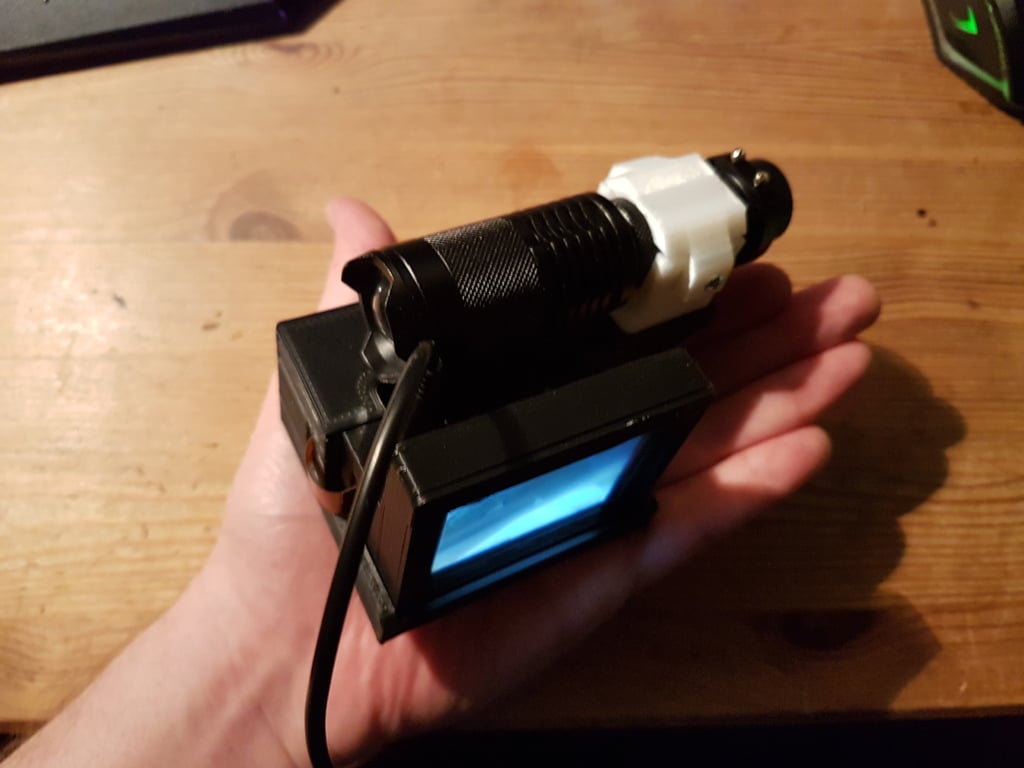
Portable RPI ZERO W Nightvision/Surveillance Cam with IR/IR-7W (Torch) -- Raspberry PI Zero W IR Nachtsicht Kamera mit Überwachungsfunktion

Portable RPI ZERO W Nightvision/Surveillance Cam with IR/IR-7W (Torch) -- Raspberry PI Zero W IR Nachtsicht Kamera mit Überwachungsfunktion

thingiverse

!!!!!!!!!!!!!!!!!!!!!!!!!!!!!!!!!!!!!!!!!!!!!!!!!!!!!!!!!!!!!!!!!!!!!!!!!!!!!!!!!!!!!!!!!!!!!!!!!!!!!!!!!!!!!!!! NEW and usable for this Projekt: https://www.thingiverse.com/thing:3422950 !!!!!!!!!!!!!!!!!!!!!!!!!!!!!!!!!!!!!!!!!!!!!!!!!!!!!!!!!!!!!!!!!!!!!!!!!!!!!!!!!!!!!!!!!!!!!!!!!!!!!!!!!!!!!!!! I designed this case to have an indoor/outdoor surveillance system (also requires the flashlight and 18650 battery) that is small, portable, and has a live display. You can either install this cam with a Raspbian Img I created by me, on which everything is preconfigured (everything updated until 17.01.2019). All you have to do is start a SoftAP with the following data on your mobile phone and then you can set all camera settings via your browser (Motioneye GUI): * SSID: Nightconnect * Password: raspiIRnight First motioneye login: admin / 416666 <-- you should change this after the first login! * Then you should connect to your cam via an app like Putty or JuiceSSH (user: "pi",pw: "416666", and first run a "sudo apt update && sudo apt upgrade -y". * Then "sudo raspi-config" once to set a new password. * That was it. Now you have a night vision small camera with just ~0.7A @5V (3.5W@ full load) with TFT touch display plus flashlight (if used). With the 7W IR torch distances of about 50m are realistic. But then you should choose a module with a telephoto lens. With my fisheye lens about 20-25 meters (with flashlight on) were realistic. Tested without flashlight in rooms up to 30m² (outside the tiny Cam LED's are almost useless). EDIT: I don't take any responsibility for whatever!!! Limitations: * Only 320x240@15-18 frames (the camera module can do much more, but the display and the computing power of the Zero limit the fun) in TFT live mode. * When your video is recording, the frame rate drops to ~5fps (but more than enough for surveillance purposes, I usually use 1fps). * You can also just shoot pictures, which reduces the CPU load enormously. What we need: https://tollgreef.de/wp-content/uploads/2019/04/NightTFTtouchCameraMotioneyeDesktop.zip md5 checksum: 0cc0f0158ed2e8d6d7f0bb6c68950b72 Hardware: 1x Raspberry Pi Zero W https://shop.pimoroni.de/products/raspberry-pi-zero-w 1x cb30 Cam/IR Module https://www.ebay.de/itm/CB30-Zooming-Fisheyes-Wide-Angle-Night-Vision-Cam-Vedio-For-Raspberry-Pi-Zero/302850111145?ssPageName=STRK%3AMEBIDX%3AIT&_trksid=p2060353.m2749.l2649 1x Torch 850nm/IR 7W https://www.ebay.de/itm/OSRAM-Infrared-IR-850nm-7w-Night-Vision-Zoom-LED-Flashlight-Torch-Lamp-18650/162615314022?ssPageName=STRK%3AMEBIDX%3AIT&_trksid=p2060353.m2749.l2649 1x 2,4" (touch)TFT 320x240 https://www.ebay.de/itm/2-4inch-TFT-LCD-Touch-Screen-Display-Touch-Pen-300x240-SPI-for-Raspberry-Pi-EB/372451631586?ssPageName=STRK%3AMEBIDX%3AIT&_trksid=p2060353.m2749.l2649 1x 18650 LiPo https://www.ebay.de/itm/1x-New-Genuine-Original-Panasonic-NCR18650PF-3-7V-2900mAH-Battery/322548513304?hash=item4b1963ba18:g:MBkAAOSwxxVZiZoB:rk:13:pf:0 1x countersunk head screw & nut m5-m6 2x screw 2,8mm x 6mm Software (only needed if you self install): 1x latest Raspbian https://www.raspberrypi.org/downloads/raspbian/ 1x LCD_Show TFT driver https://github.com/goodtft/LCD-show 1x Motioneye Surveilence GUI https://github.com/ccrisan/motioneye/wiki 1x Midori Browser to start in https://www.midori-browser.org/ * If the interest is big enough, a 2x 3400mah 18650 Accu Adapter will follow (the space for a Stepup Coverter is already provided in the case). https://www.ebay.de/itm/2pcs-MT3608-DC-2A-Step-Up-Power-Module-2v-24v-to-5v-9v-12v-28V-Boost-Converter/153156371666?hash=item23a8d4c4d2:g:PIQAAOSwSj9bhId5:rk:2:pf:1&frcectupt=true * Depending on your interest I'd also have an 800x600 HDMI touch display, and a RPI3 here with which you could build the whole thing again in fast with higher resolution and frame rate (but also with much higher power consumption)! Just leave a comment... !!! Coming soon: 12x zoom adapter for the camera module (~ March, ordered in China) !!! Have fun, liked, and share your Makes... Greetings SG * If you want to boot the small display into the desktop (all settings for desktop and console are already done in the image), you can easily change it via raspi-config! * I had hotend problems, so some parts look really scary (but the STL's are all ok and everything fits 1a) * The manual instructions to install yourself (if you don't trust my image) are nearly finished. So it follow tonight or tomorrow... * Shopping links will follow today or tomorrow! .-.-.-.-.-.-.-.-.-.-.-.-.-.-.-.-.-.-.-.-.-.-.-.-.-.-.-.-.-.-.-.-.-.-.-.-.-.-.-.-.-.-.-.-.-.-.-.-.-.-.-.-.-.-.-.-.-.-.-.-.-.-.-.-.-.-.-.-.-.-.-.-.-.-.-.-.-.-.-.-.-.-.-.-.-.-.-.-.-.-.-.-.-.-.-.-.-.-.-.-.-.-.-.-.-.-.-.-.-.-.-.-.-.-.-.-.-.-.-.-.-.-.-.- Dieses Gehäuse habe ich entwickelt um ein Überwachungssystem für in/outdoor (benötigt zusätzlich die Taschenlampe u. 18650 Akku) zu haben, das klein, portable, und mit einem Live Display ausgestattet ist. Ihr könnt Euch diese Cam entweder mit einem von mir erstellten Raspbian Img auf dem alles vorkonfiguriert ist installieren (alles bis zum 17.01.2019 upgedated). Dazu braucht ihr wenn ihr alles zusammengesteckt habt nur noch auf Eurem Handy einen SoftAP mit folgenden Daten starten, um danach via Browser alle Settings der Kamera machen zu können (Motioneye GUI): * SSID: Nightconnect * Password: raspiIRnight Erster Motioneye login: admin / 416666 <-- umbedingt nach dem ersten Login ändern! * Danach solltet ihr Euch über eine App wie Putty od. JuiceSSH mit Eurer Cam verbinden (user: "pi",pw: "416666", und zuerst ein "sudo apt update && sudo apt upgrade -y" ausführen. * Jetzt einmal "sudo raspi-config" um ein neues Passwort zu setzen. * Das war es dann auch schon. Nun habt ihr eine Nachtsichtfähige kleine Kamera mit gerade einmal ~0,7A @5V (3,5W@ Volllast) mit TFT touch Display plus der Taschenlampe (wenn benutzt). Miter der 7W IR Taschenlampe sind Distanzen von ca. 50m realistisch. Allerdings solltet ihr dann ein Modul mit Teleobjektiv wählen. Mit meinem Fisheye Objektiv waren ca. 20-25 Meter (mit Taschenlampe an) realistisch. Ohne Taschenlampe in Räumen bis 30m² getestet (draußen nützen die winzigen Cam LED's nahezu nichts) . EDIT: Ich übernehme keinerlei Haftung für was auch immer!!! Einschränkungen: * Nur 320x240@15-18frames Pixel (das Kameramodul kann Deutlich mehr, aber das Display und die Rechenleistung des Zero begrenzen den Spass) im TFT Livemodus. * Wenn Ihr Videos aufzeichnet bricht die Framerate auf ~5fps ein (für überwachungszwecke aber mehr als genug, ich verwende normalerweise 1fps). * Ihr könnt aber auch nur Bilder schießen, was die CPU Last enorm verringert Was wir benötigen: https://tollgreef.de/wp-content/uploads/2019/04/NightTFTtouchCameraMotioneyeDesktop.zip md5 checksum: 0cc0f0158ed2e8d6d7f0bb6c68950b72 Hardware: 1x Raspberry Pi Zero W 1x cb30 1x Torch 1x 2,4" (touch)TFT 320x240 1x 18650 LiPo 1x Senkkopf Schraube & Mutter 2x Schraube 2,8mm x 6mm Software(nur bei eigener Installation notwendig): 1x latest Raspbian https://www.raspberrypi.org/downloads/raspbian/ 1x LCD_Show TFT driver (script) https://github.com/goodtft/LCD-show 1x Motioneye Surveilence GUI https://github.com/ccrisan/motioneye/wiki 1x Midori Browser to start in https://www.midori-browser.org/ Wenn das Interesse groß genug ist folgt noch ein 2x 3400mah 18650 Akku Adapter (den Platz für einen Stepup Coverter ist im Gehäuse schon vorgesehen). https://www.ebay.de/itm/2pcs-MT3608-DC-2A-Step-Up-Power-Module-2v-24v-to-5v-9v-12v-28V-Boost-Converter/153156371666?hash=item23a8d4c4d2:g:PIQAAOSwSj9bhId5:rk:2:pf:1&frcectupt=true Je nach Interesse hätte ich auch noch ein 800x600 HDMI touch Display, und einen RPI3 hier mit dem man das Ganze noch mal in schnell mit höherer Auflösung und Framerate (dafür aber auch mit deutlich höherem Stromverbrauch) bauen könnte! Hinterlasst einfach einen Kommentar... !!! Demnächst: 12x zoom Adapter für das Kameramodul (~ März, in China geordert) !!! Habt Spass, liked, und teilt Eure Makes... Gruß SG * Wenn ihr in den Desktop (alle Settings für Desktop und Konsole habe ich im Idas kleine Display booten möchtet, könnt ihr das ganz einfach über raspi-config umstellen Ich hatte Hotend Probleme, daher sehen einige Teile arg gruselig aus (die STL's sind aber alle i.O. und alles passt 1a) * Die manuelle Anleitung zum selber installieren (wenn ihr meinem Image nicht trauen solltet) schreibe ich noch gerade fertig. Folgt also heute Abend oder morgen... * Shopping Links folgen noch heute oder morgen! '''''''''''''''''''''''''''''''''''''''''''''''''''''''''''''''''''''''''''''''''''''''''''''''''''''''''''''''''''''''''''''''''''''''''''''''''''''''''''''''''''''''''''''''''''''''''''###################################################################### '''''''''''''''''''''''''''''''''''''''''''''''''''''''''''''''''''''''''''''''''''''''''''''''''''''''''''''''''''''''''''''''''''''''''''''''''''''''''''''''''''''''''''''''''''''''''' 1. Write Raspbian with disk image writer on micro sd 2. Create ssh file and move it to the boot partition 3. Install paragon ext2fs, mount second partition and edit it under /etc/wpa_suplicant.conf ... with: country = DE <- (set here your country) ctrl_interface=DIR=/var/run/wpa_supplicant GROUP=netdev update_config = 1 network = { ssid = "Your_SSID" psk = "your_password" key_mgmt = WPA-PSK } 4. Install Putty and ssh into your raspberry 5. sudo raspi-config 5.1 localization set timezone 5.2 advanced file expand 5.3 advanced memsplitt 256mb 5.4 interfaces camera on / spi on 5.5 change pi password 5.6 boot options Desktop / CLI -> console autologin 6. sudo apt update && sudo apt upgrade -y 7. sudo nano /boot/config.txt set resolution to 320x240 @boot (only if you want to use the desktop) change: framebuffer_width = 320 framebuffer_height = 240 8. wget https://github.com/goodtft/LCD-show sudo rm-rf LCD show git clone https://github.com/goodtft/LCD-show.git chmod -R 755 LCD show cd LCD show / sudo ./LCD24-show wait for reboot 9. install motioneye: sudo su apt-get install ffmpeg v4l-utils apt-get install libmariadbclient18 libpq5 wget https://github.com/Motion-Project/motion/releases/download/release-4.1.1/pi_stretch_motion_4.1.1-1_armhf.deb dpkg -i pi_stretch_motion_4.1.1-1_armhf.deb apt-get install python-pip python-dev libssl-dev libcurl4-openssl-dev libjpeg-dev libz-dev pip install motioneye mkdir -p /etc/motioneye cp /usr/local/share/motioneye/extra/motioneye.conf.sample /etc/motioneye/motioneye.conf sudo nano /etc/motioneye/motioneye.conf port 2 80 mkdir -p /var/lib/motioneye cp /usr/local/share/motioneye/extra/motioneye.systemd-unit-local/etc/systemd/system/motioneye.service systemctl daemon-reload systemctl enable motioneye systemctl start motioneye pip install motioneye -upgrade systemctl restart motioneye Motioneye settings (RPI IP) / admin first login / camera type = local camera / camera = VideoCore Camera / advanced settings / 10. sudo apt-get update && sudo apt-get install -y midori matchbox 11. sudo nano startMidori.sh (#!/Bin/sh) "without the cleats" xset -dpms # disable DPMS (Energy Star) features. xset s off # disable screen saver xset s noblank # do not blank the video device matchbox-window-manager & midori -e fullscreen -a http://localhost: 8081 12. sudo chmod + x startMidori.sh 13. sudo xinit ./startMidori.sh 14. sudo nano /etc/rc.local add: (/bin/sleep20 && FRAMEBUFFER = /dev/fb1 xinit/home/pi/startMidori.sh) & 15. sudo nano /boot/config.txt file 16. dtoverlay=tft9341:rotate=270, change to: dtoverlay=tft9341:rotate=270,speed=42000000,fps=25 17. sudo reboot Have fun... SG

Download Model from thingiverse

With this file you will be able to print Portable RPI ZERO W Nightvision/Surveillance Cam with IR/IR-7W (Torch) -- Raspberry PI Zero W IR Nachtsicht Kamera mit Überwachungsfunktion with your 3D printer. Click on the button and save the file on your computer to work, edit or customize your design. You can also find more 3D designs for printers on Portable RPI ZERO W Nightvision/Surveillance Cam with IR/IR-7W (Torch) -- Raspberry PI Zero W IR Nachtsicht Kamera mit Überwachungsfunktion.