Portable TS-80 Soldering Iron Battery Case (fits into the Stanley 014725R organizer)
prusaprinters
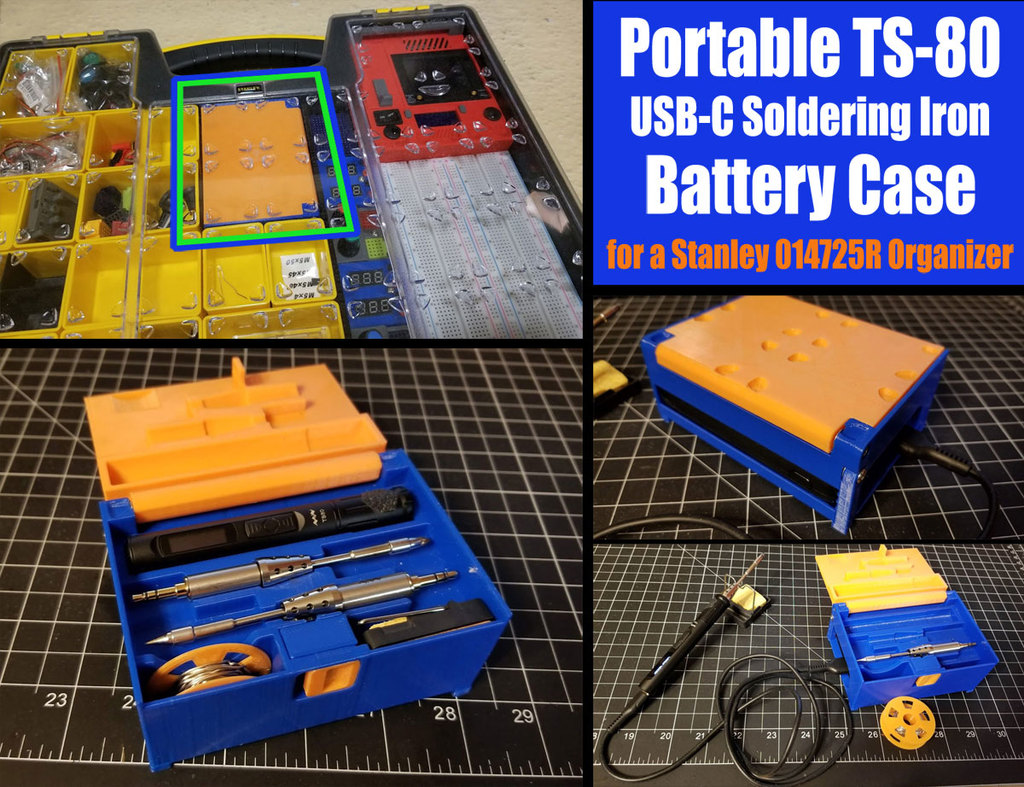
<p>Update: 7/17/2020 - I noticed that there is a newer version of the TS-80 (same name) that has a flaired out end which would not fit this case. The older version which is pictured has a consistent diameter on the barrel, and these are still available on Ebay. I don't have the new version so I don't currently have plans to update the model but the STEP files are here for anyone that does want to remix it for the newer version of the TS-80.</p> <p>I recently picked up a TS-80 soldering iron and am really impressed by it. The TS-80 is an awesome little USB soldering iron (USB-C actually). It can be powered off a QC 3.0 battery or charger, and heats up pretty quick (not quite as quick as the TS-100, but still faster than any of my other soldering irons).</p> <p>I've used this setup quite a bit recently and it has been my go-to soldering setup now since it is so quick to use. I only had one hiccup with the battery which has not re-occurred. I have used this setup, and the battery about a half dozen times now (for probably 10-20 minutes each time) without further problems.</p> <p>You can find a matching solder fume extractor (same size and also fits in a Stanley Organizer) at the link below:</p> <p><a href="https://www.thingiverse.com/thing:4816285"> Solder Fume Extractor for a Stanley 014725R Organizer</a></p> <p>Since I have been making several things to work with the Stanley 014725R organizer case, I decided to make a case for the TS-80 that would also work with that organizer. This case will hold the TS-80 along with the following:</p> <p>MINI T-stand Zirconia Ceramics Soldering Iron Stand Holder for TS100</p> <p>Anker PowerCore Speed 10000mAh, Qualcomm Quick Charge 3.0 Portable Charger</p> <p>Update 12/3/2020: The above linked Anker powercore 10000 has been superseded by a newer model - the Anker Powercore II 10000 (linked below). I do not have one of these, but I do have a remix that is not yet tested here:</p> <p><a href="https://www.thingiverse.com/thing:4742838">https://www.thingiverse.com/thing:4742838</a></p> <p>Quick note on the battery pack, there are several other Anker chargers that look similar, but will not work since they are only 5v output. The one linked above is the "<strong>Anker PowerCore Speed 10000</strong>" which has QC 3.0 and will power the iron (it outputs up to 12v). I've had good luck with this battery for the most part, but have had a couple of times when I needed to fully charge it up to work with the iron. I've run the ts-80 for about 10-15minutes off the Anker QC 3.0 battery, and not had a problem with it yet. The TS-80 appears to pull between 8-9V from the pack and heats up in about half a minute or so. Update 12/30/2020 - after using this setup about 50 times at least, it has been reliable and has worked for most jobs. Since the iron heats quickly it is not a big deal to unplug it when not in use which extends the working time too, I haven't timed it but am sure it has run much longer than 15m. I have used this intermittently for several hours on some jobs soldering up over a dozen strings of LEDs and associated wires without a problem.</p> <p>This will require the following hardware:</p> <p>M3x6mm screw (1)<br/> M3x8mm screw (1)<br/> M3x10mm screw (1)<br/> M3x30mm screw (2)<br/> M3 washers (3)<br/> M3 inserts (5)<br/> A spring from a pen (1)</p> <p>Regarding the pen springs, I specifically used some I bought on Ebay (search for "spring spare ball pen part 424"). They would be the type used for a retractable ball point pen.</p> <p><strong>(Jan 30, 2019) The case and lid were slightly re-worked slightly and updated - these are the 4S1E versions. I have printed the case and can confirm it works fine. I did not reprint the lid since the changes to that part are are so minor that there is no need to re-print it. The change was only to move the M3 insert from the lid to the case, which I think will keep the hinge screws from backing out. The pics posted right now are an earlier revision but you would need to look very close to see the changes.</strong></p> <p><strong>(Feb 15, 2020) I posted a remix which extends the case so a 3' USB cable and extra spool of solder can be stored in the case. The remix is untested however.</strong></p> <p><a href="https://www.thingiverse.com/thing:4164450">https://www.thingiverse.com/thing:4164450</a></p> <p>The STP file is also included for remixing.</p> <h3> Print Settings</h3> <p><strong>Notes:</strong></p> <p>I used PLA at 0.2mm resolution and 25% infill.</p> <p>In order to get prints close to the dimension of the model, it helps to calibrate the extruder and the flow (Cura).</p> <p>The parts are<strong>not oriented for printing</strong>, but if you check the pics you can see how I printed some of the parts. I'd suggest using tree supports, since they will save a lot of frustration. Otherwise the parts should be oriented so they use minimal supports. I included a model of the case with an integrated support, which I printed and does seem to help, but even this model still will require supports (I suggest using tree supports with this also).</p> <h3> Post-Printing</h3> <p>The M3 inserts should probably be installed first, I used clear Gorilla Glue, but they can also be heat set. Anywhere a screw will go, an insert will also be used. There will be 2 used in the hinge, one for the case latch (the part that holds the battery in), one in the base of the latch case and one in the latch "button". These will be tight but I got them in without too much trouble.</p> <p>To assemble the latch, first clean any "elephant foot" off the small parts, then install the slider with the rounded end, it should drop in without any sticking or friction. Next install the second slider part which is an angled block with a peg, the spring will sit on the peg, and then thread the spring into the well in the latch case. When both sliders and the spring are installed, the latch case can be installed in the case.</p> <p>Next install the button which has the M3 insert, using a 6mm screw. The screw head will seat fully in the latch slider (the first one which was installed), and it will go through the slider into the button's M3 insert. It should be tight but not so tight it binds the button up, so back it off if needed (some loc-tite is a good idea for this screw). If the button will not work (it will not slide), check that the screw head is fully seated.</p> <p>Once the latch is assembled, there is a 10mm screw that needs to be installed in the base to hold the latch case to the case.</p> <p>The other screws are pretty self explanatory, they are the two 30mm screws for the hinge (I also installed two m3 washers between the case and lid on these screws). The last screw is used for the "arm" that holds the battery in the case. This will be the 8mm screw. This also uses a M3 washer. Loctite is a good idea on the hinge screws but not the 8mm screw for the battery latch or "arm".</p> <p>The lengths of the screws are not absolute, it is possible to get away with shorter or longer screws in some cases, but these are what I used.</p> <h3> How I Designed This</h3> <p>This was designed with ViaCAD V9</p> Category: Electronics
With this file you will be able to print Portable TS-80 Soldering Iron Battery Case (fits into the Stanley 014725R organizer) with your 3D printer. Click on the button and save the file on your computer to work, edit or customize your design. You can also find more 3D designs for printers on Portable TS-80 Soldering Iron Battery Case (fits into the Stanley 014725R organizer).