Power Monitor
thingiverse
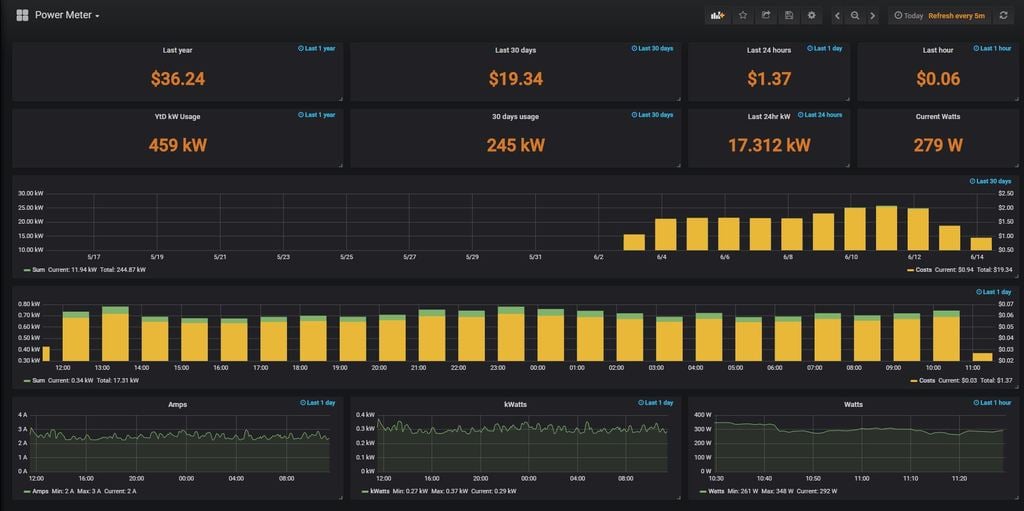
This is an inline power meter i built to monitor and track the usage of my server rack. It was built with an Adafruit Feather HUZZAH ESP8266 and an NCD.io current monitor. In its current design (pun), there is only enough room for the 97% single channel or 95% dual channel. When ordering these units, you can specify the current range. It is highly recommended to use a current rating as close to the amount of amperage that will be used. The fasteners used were 12 stainless steel 6/32 x 1/2 inch (can be longer) and 12 stainless steel nyloc nuts. The box is designed to allow the nuts to fit into sockets only requiring a screw driver to tighten each one down. Nuts and fasteners were purchased at a local hardware store. I would recommend the same as they are far more expensive on Amazon. I have also included the json file from Grafana. Edit: There is now a single and double version of the lower box. Code used https://github.com/icemansid/PowerMonitor Feather used https://www.adafruit.com/product/2821 Single channel monitor https://store.ncd.io/product/1-channel-on-board-97-accuracy-70-amp-ac-current-monitor-with-iot-interface/ Dual channel monitor https://store.ncd.io/product/2-channel-on-board-95-accuracy-20-amp-ac-current-monitor-with-iot-interface/ Feather interface for NCD.io https://store.ncd.io/product/feather-to-iot-adapter-for-particle-and-feather-modules/ Power supply used in this design N/A - the ones i used is no longer available. I will have to order another one and re-design the mount. The link below is the one i will be testing with. PS Update - There are 2 designs available. If you can find the smaller power supply elsewhere, use the small power supply version. Otherwise, the links below are compatible. DROK AC to DC 12V Power Converter Module https://www.amazon.com/gp/product/B00RUW55E2/ref=oh_aui_detailpage_o02_s00?ie=UTF8&psc=1 GEREE AC to DC Converter 85 ~ 265v AC to DC 12V https://www.amazon.com/gp/product/B00RDTOSFE/ref=oh_aui_detailpage_o01_s00?ie=UTF8&psc=1 Connectors used https://www.amazon.com/gp/product/B008X0WKJI/ref=oh_aui_detailpage_o03_s00?ie=UTF8&psc=1 https://www.amazon.com/gp/product/B01ISO2T1C/ref=oh_aui_detailpage_o05_s00?ie=UTF8&psc=1 Cable used (output side) Input cable is a standard PC power cord. https://www.amazon.com/gp/product/B00066HQ50/ref=oh_aui_detailpage_o03_s00?ie=UTF8&psc=1 Cable used (input size) - this is for up to 15 amps. If you are going to push more than 15, you really need to step up and redesign for 20+ amps. https://www.amazon.com/Tripp-Lite-Computer-IEC-320-C13-P007-003/dp/B00JT0DG94/ref=sr_1_3?ie=UTF8&qid=1528996820&sr=8-3&keywords=computer+power+cord+12awg
With this file you will be able to print Power Monitor with your 3D printer. Click on the button and save the file on your computer to work, edit or customize your design. You can also find more 3D designs for printers on Power Monitor.