Power Usage and Generation Display
thingiverse
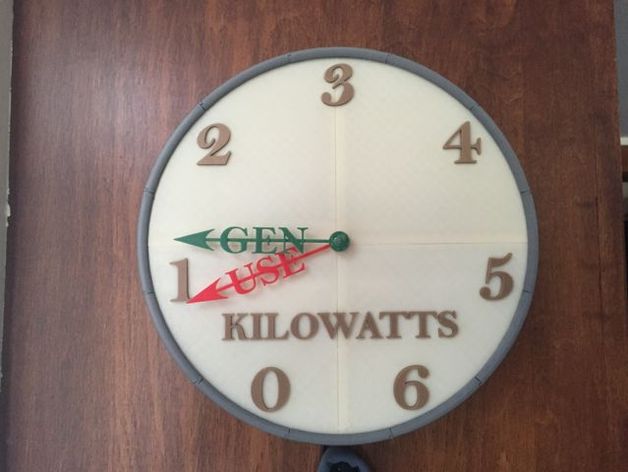
This is a dial which displays the electrical consumption and solar generation in my home in real time. This takes data from our eGauge energy meter (http://www.egauge.net/) to get the current power being used in the home and the current power being generated by our solar panels, then uses an Arduino and a pair of servos to move the hands to indicate the current power levels. If you don't happen to make this, you can also view the output of our eGauge at http://egauge14368.egaug.es This project was inspired by the fact that having the eGauge has made my whole family more aware of how much electricity we use, and much more careful about turning things off to save energy. But the usual output of the eGauge is entirely web-based, so I would have to turn on a computer or iPad to view our power usage. This gives us a way to see what the electrical usage and generation is at all times without having to turn on a screen. Instructions Some of the details of this project are very specific to our own eGauge installation, so if you want to make something similar you will need to modify the Arduino sketch. Most of the key things which need to be changed are stored as global variables or #defines at the beginning of the sketch. Also, this project requires soldering and hooking up the Arduino and other components, so if you're not comfortable doing that, this is probably not a good project for you. In addition, the dial is designed to go from zero to six kilowatts, which is a good range for my home, but your mileage may vary. You may want to design your own dial with a different range. To build this you will need the following electronics in addition to the 3D printed parts: An Arduino Uno compatible board. I used SparkFun's RedBoard, https://www.sparkfun.com/products/12757 An Arduino WiFi or Ethernet shield. The sketch is written for SparkFun's CC3000 WiFi shield, https://www.sparkfun.com/products/12071 . If you use a different network shield, you will have to modify the sketch appropriately. I used a Pololu servo controller, https://www.sparkfun.com/products/8897 , to drive the servos. This was because the Arduino Servo library conflicts something awful with the CC3000 library. In retrospect, however, I probably could have just driven the digital out pins on the Arduino directly without using the library, so if you want to save $17.95 by rewriting part of the code this is probably a good place to do it. You will need two standard-size servo motors. I used https://www.sparkfun.com/products/11884 . You will need a handful of M3 screws to mount the electronics. In addition, you will need to print one of each part except: Print two of the Gear Holder Print four of the Servo Mount Print ten of Rim1 Remove the servo horn from each servo, and screw in one of the servo gears to each servo. Then, using the mounting hardware which came with the servos, mount the servos to the servo mounts. The 3D printed parts all basically slide or fit together, with the gear holders, servo mounts, and arduino mount sliding into grooves on the back side of the face. The hands need to be glued to the ends of the gear/shafts after the shafts are passed through the gear holder and the hole in the face. When completed, there should be a large gear on each servo which meshes to a smaller gear which moves a hand. The servos plug into the servo controller, which has power, serial, and reset jumpers to the Arduino. The WiFi shield mounts on the Arduino. A couple of other project notes.... The meter works by making an HTTP request from the eGauge every couple of seconds, and the eGuage responds with an XML file containing current usage and generation. Fortunately, the HTTP interfaces on the eGauge are very straightforward and easy to figure out using tools like Firebug. If I was doing this over, I might try using Raspberry Pi instead of Arduino. The Arduino has very limited memory, and parsing XML in the Arduino's memory footprint is a challenge. Also the Arduino doesn't deal gracefully with network errors, so if it gets kicked off the WiFi (for example, when someone turns on the microwave), it may need to be reset. As built, the hands on the gauge jump abruptly every time they update. This isn't quite as satisfying as I'd like, so an interesting challenge could be to figure out a way to get the hands to move smoothly between updates (keeping in mind the very limited power of the Arduino). It would also be interesting to build it with four hands, so there would be a big hand and a little hand for the generation and usage. This would give a lot more precision, but also mean adding several gears and a lot of mechanical complexity.
With this file you will be able to print Power Usage and Generation Display with your 3D printer. Click on the button and save the file on your computer to work, edit or customize your design. You can also find more 3D designs for printers on Power Usage and Generation Display.