PowerBot 3D Printer
thingiverse
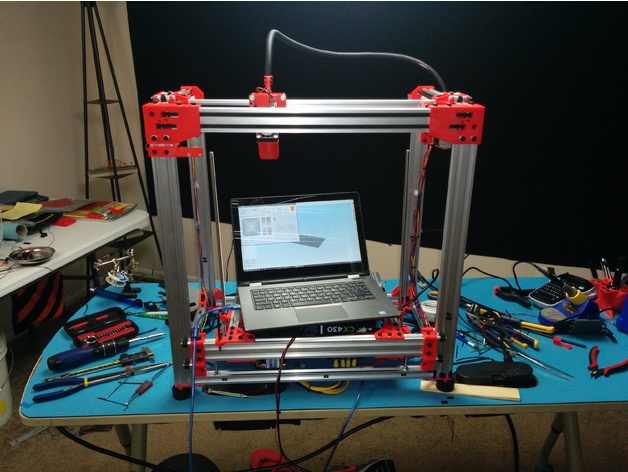
This is my own modified version of the D-Bot printer. I've designed/modified a part or two myself, and some other parts are ones I found off Thingiverse. (If I forgot to or miscredited a model, let me know!) This build comes in at around $750-$800. I wanted to spec this printer to be able to print exotic materials at high accuracy with little to no compromises and maximum reliability. I've been filming my progress building this 3D Printer on my YouTube channel Power Playground! Check out the 3D Printer VLOG video playlist: https://www.youtube.com/playlist?list=PLMjfntGK5aY5IezSYz-a1cjPudUg71Mld Original Part Sources: D-Bot Printer: http://www.thingiverse.com/thing:1001065 D-Bot 3-Wheel Titan Carriage: http://www.thingiverse.com/thing:1833149 D-Bot 3-Wheel Titan Carriage Backer: http://www.thingiverse.com/thing:1833172 3-Wheel H-Bar Left: http://www.thingiverse.com/thing:1833099 3-Wheel H-Bar Right: http://www.thingiverse.com/thing:1833260 D-Bot 3-Wheel H-Bar Backer: http://www.thingiverse.com/thing:1833072 3-wheeled Z guide: http://www.thingiverse.com/thing:1802733 Adjustable bed holders: http://www.thingiverse.com/thing:1716262 Double beefy corner: http://www.thingiverse.com/thing:1859281 Mini Smart LCD Case: http://www.thingiverse.com/thing:320117 Ramps 1.4 Enclosure - http://www.thingiverse.com/thing:1352320 V-Slot Tubing Clip: http://www.thingiverse.com/thing:1232213 T-Nuts for cable organization/LCD mounts http://www.thingiverse.com/thing:1064782 Dbot 8mm z rod system: https://www.thingiverse.com/thing:2241762 All credit for the original C-Bot design goes to cfeniak. Thanks to those who contributed at http://www.openbuilds.com/threads/c-bot.726/ The changes made from the original D-Bot are as follows: - Overhauled the carriage system to use 3 wheels per carriage instead of 4 (Easier to tension) - Replaced the bowden extruder setup with a direct drive e3d Titan extruder setup - Beefed up the build platform carriage, added in adjustable bed holders, and implemented Anti Backlash nuts for the Z acme lead screws - Upgraded stepper motor drivers and added an LCD/SD card reader - Reduced the amount of special hardware needed - Some other things I am forgetting at this time :P Future Changes: - Modify H-Bar and Extruder blacking plates to allow room for the aluminum shim/spacer - Modify H Bar belt pulley pathways to have the corner chamfered/filet to allow easier installation of GT2 belts - Change LCD mount - Make some minor changes to the marlin firmware for the e3d extruder/hotend and the DRV 8825 stepper drivers Build Guide/VLOG + Change log 3D Printer VLOG Change Log 12/12/16 - Found a rear frame clip for the extruder wiring 12/23/16 - Improved Z-Endstop Screw Holder and Added a bracket to attach the 40mm fan duct to the titan carriage backing plate 1/26/17 - Updated the marlin firmware for accurate steps per mm, e3d v6 pid settings, and bang-bang bed temp settings for older relays (Among other changes) 3/7/18 - Updated firmware to be able to be compiled in later versions of the Arduino IDE (as well as tweaked the Z steps per mm) Switched the 2 motor Z lead screw system to a 3 lead screw belt train system to be used with 60 tooth GT2 pulleys, replaced 2 VWheels with 3x 8mm linear rods. Updated all the endstops, bed PWM/Relay Mount and a few other models I have probably forgotten to list here. Also updated the BOM since I have swapped out a few parts and am using aluminum brackets to hold the frame together now.
With this file you will be able to print PowerBot 3D Printer with your 3D printer. Click on the button and save the file on your computer to work, edit or customize your design. You can also find more 3D designs for printers on PowerBot 3D Printer.