Powered Hit and Miss Engine Kit
thingiverse
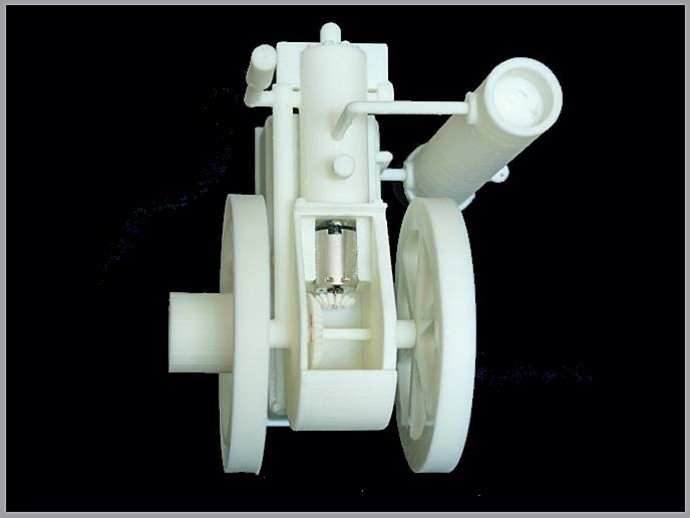
As I finished modeling the Fairbanks-Morse hit and miss engine, http://www.thingiverse.com/thing:113398, I kept thinking it should be running. The 1/16 scale model is surely big enough to house a small electric motor and a battery pack. So back to the drawing board (or is that the “CAD Pad�) See it run at: http://youtu.be/0-gTHz5ukeY Well, it is still a tight fit. The motor must be mounted normal to the flywheel axis. So we need bevel gears to couple the motor with the flywheel. I hollowed out the gear box, and gave it a separate, glue on cover. Separated the base and found room to install the switch and battery back. Now the engine is just looking for something neat to power!!! Instructions Print and clean up the parts. Push the small bevel gear onto the motor shaft. Should fit tight enough, otherwise touch with super glue. Install the motor running the wires down through the base. Before proceeding, I finish the moving parts to reduce friction by rubbing them with a tissue doused with acetone. (This is an ABS model.) The axle, both hub surfaces and the bearing faces of the flywheels. Let it dry for a while. Now slide the axle through one hub and into the big bevel gear, bevel facing inward. With the axle evenly between the wheels, daub the very ends with glue. (I use a slurry of ABS dissolved in acetone.) Then attach to two flywheels so they spin freely. Don't let the glue get on the wheel to hub bearing surface. Let it sit a bit. Now, adjust motor and drive gear to mesh. It may be useful to run the motor to assure the best fit. Also check the polarity to be sure the flywheels rotate top forward. When satisfied, I like to carefully dab a bit of glue at the axle to gear joint to solidify the location. Glue the base to the engine. String the wires from the motor. Solder the positive to one post of the toggle switch and the positive wire of the battery holder to the other switch post. You will need to minimize the wires prior to soldering. Splice the negative wire from the motor to the negative wire from the battery holder. Remove all the nuts and washers from the switch stem. You can use all the space inside. Insert the switch through the front hold in the base and attach with one of the nuts. Now dress the wires and press the battery holder into the base. Test it. If it all works, glue the top on the engine. Now make something to power! Non printed parts: 1.5V-3V N20 Small DC Motor N20 Heli/Toy/RC 1.5V-3V N20 Small DC Motor N20 Heli/Toy/RC (on-line. These are motors used in toy helicopters, etc. about $2.) One Cell, AA Battery Holder (Radio Shack) SPST Micromini toggle switch. (Radio Shack 275-0624)
With this file you will be able to print Powered Hit and Miss Engine Kit with your 3D printer. Click on the button and save the file on your computer to work, edit or customize your design. You can also find more 3D designs for printers on Powered Hit and Miss Engine Kit.