Powerful CTC Fan Duct
thingiverse
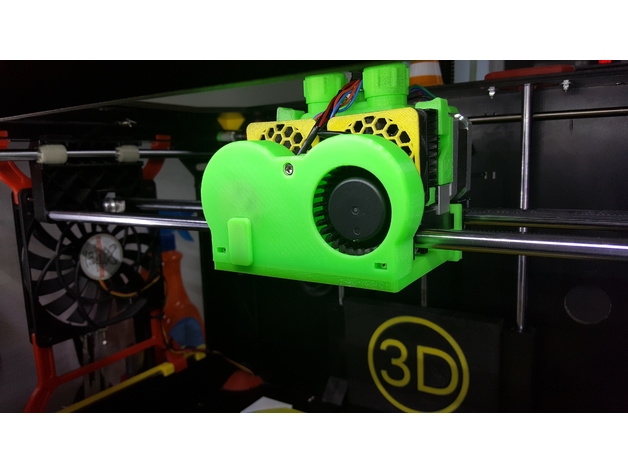
I highly recommend to refer to the NEW DESIGN which works a lot betterhttp://www.thingiverse.com/thing:2263781 If you are making this thing and are happy with it I kindly ask to give it a shout! ================================================================== Update 2017 Feb. 4th Old files removed. Final versiones uploaded. Modificationes: substantial noise reduction by changes around the fans and inlets (less fan-stall/resonance, works like a charm now) support brackets to prevent bending extended duct (to the rear) added. One certainly would have to rework the section for the clip depending on print-quality. There is also a small lid for the cables at the front included. It is not really neccessary, one might use it as one sees fit. Use styrofoam-glue too to fix it at its place... Already printed parts are 100% comptible to the new ones. Take care to fix the fans not too tight to the lower part, especially not the edge. It is just microns between smooth running and howling... One more experience to be shared! Keep your hotends well isolated. It took me days to find out why my "Marvins" melted away. I 1st thought it to be the duct. It turned out that removing the isolation was the reason... ================== First I want to say that I designed this thing with the greatest respect and gratefulness for http://www.thingiverse.com/thing:537918 which made many a good print possible in the first place. And still I thought I needed some more cooling power which lead to http://www.thingiverse.com/thing:1886734 This one proofed me beeing on the right way, and I gave the 3D-Marvins http://www.thingiverse.com/thing:215703 a try. But those little fuc..rs would not come out as I wanted them to. Although this weird little ship http://www.thingiverse.com/thing:763622 got way better than before I was not entirely satisfied. My latest duct uses two radial fans and proofed to be worth the effort. The whole idea is about maximum cooling power with as less weight as possible and the weight as near to the carriage for less vibration. It sits well on the carriage and powerfully cools under both the nozzels. At the rear end it may come in contact with the heat-cartridges but it turned out that they make just a small imprint without affecting the function at all. (spacers added Dec. 3rd.) What you need is, some M3 screws and nuts and two fans like the ones in the picture. Of the fans I think they are quite common ones. And you can get them for just a few bucks. To cover all needs I attached even the FreeCad files for those who want to use other ones and need to adjust some dimensiones. Disassembling mine got a bit hairy (1st one destroyed). It turned out I had to cut the fans base exactly outside of the sticker using a sharp knife. I actually lost some hydraulics... I recommend to use styrofoam glue to attach them for this glue does not solve PLA and altough it is quite strong it even can be disassembled. At the bracket one might have to rework at the chamfered edges but it is intended to sit somewhat tight, one would even have to press a little bit on top to get the screw in. Warning! The opposing rotary-direction of the fans brings lot of airflow but causes some kind of audible resonance. In other words... This thing whines like a fighter jet at start-run! Print Settings Printer: CTC Dual Rafts: No Supports: No Resolution: 0,2 Notes: 10% Infill for the duct, NO SUPPORTS. Even some fails of the first roof-layer proofed to be no problem. There is enough space in the duct. 30% Infill for the bracket and the cover.
With this file you will be able to print Powerful CTC Fan Duct with your 3D printer. Click on the button and save the file on your computer to work, edit or customize your design. You can also find more 3D designs for printers on Powerful CTC Fan Duct.