PowerMac G5 AIO Mounting bracket for Corsair H100i, H80i, H60 (2012)
thingiverse
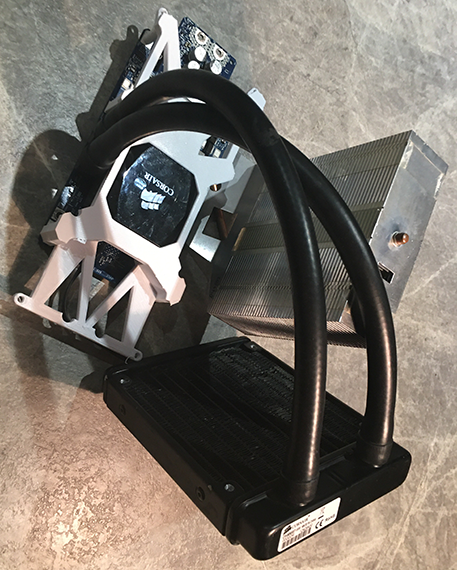
(THIS THING IS JUST A BRACKET AND DOES NOT DISCLAIM IN ANY WAY HOW THE USER SHOULD MOUNT THEIR AIO RADIATOR AS OF NOW.) (DISCLAIMER: This project is still under development and any damages done to your PowerMac and or CPU card are on you.) (INSTALLATION IMAGES, WILL BE PROVIDED if not already, I will be working away in Photoshop to annotate the images needed, so be patient.) This bracket allows the original G5 heatsink to be replaced with a Corsair H60 (2012), H80i, H100I AIO. This bracket only works on Late 2005 PCI-E models with Dual core Processors. This has not been tested on a dual processor configuration but should work with 2 AIOs fitted as shown in the diagram in the title. Mounting holes on the processor card use wood screws with a 3mm diameter by 15mm tall, and a head size of around 5mm, the plastic standoffs help prevent overtightening as they bottom out around 2.3mm, which provides adequate mounting pressure to the CPU and helps prevent the CPU Die from cracking from too much mounting pressure, along with reducing PCB bending. All external screws utilise the standard G5 heatsink screws. The AIO CPU block friction fits into the central cut-out. The four mounting pegs positioned around the bracket are to arrest any twisting forces during installation and use, this makes alignment of the bracket and CPU card easier and less risky then bare mounting the cooler. Steps for installation: NOTE: Before installation of this bracket, please remove all screws (EXCEPT THE VRM SCREWS IF YOU PLAN ON KEEPING THE VRM ATTACHED DURING INSTALL, READ NEXT NOTICE FOR MORE DETAILS) and standoffs from you CPU Daughtercard, YOU MAY leave the VRM heatsink attached during installation. The AIO MUST have the metal Intel and or AMD bracket removed from the fitting cut-out before use on this CPU bracket. NOTICE: The VRM was installed by removing the VRM cooling bracket from the heatsink retaining clips, this is only available on the 2.3Ghz heatsink from my knowledge, A 3D printable bracket will be developed. IMPORTANT: Your Corsair H60/H80i/H100i AIO's cold plate must be modified in the manor shown in the title images. Failure to modify the cooler cold plate will result in clearance issues with the inductors on the CPU Daughtercard. Step 1: Use a cleaning agent of choice to remove any thermal compound from the G5 CPU and the AIO cold plate if need be, The thermal surfaces (CPU and AIO Cold plate) should ideally be cleaned spotless before install. Step 2: Position the AIO tubes towards the outer edge of the bracket, then press the CPU block firmly into the cut-out in the bracket. The AIO block should press firmly from the underside of the CPU bracket until flush with the underside of the bracket. Step 3: Before mounting the cooler MAKE SURE Thermal paste is applied to the CPU die with an application method of you choice. (The thermal paste spread MUST BE guaranteed to cover the full Die or you will kill your CPU.) Step 4: position the bracket taking note that the open V shaped end faces towards the 12V POWER LUGS at the REAR of the CPU Daughterboard. Align the plastic pegs AS SHOWN in the PROVIDED PICTURE above in the title, push gently until the pegs come through the board and MAKE SURE the bracket is held firmly in place with your hand to ensure there is no misalignment. Step 5: After 3mm wood screws of spec are chosen, refer to the provided annotation in the title images for their placement. For tightening the screws it is recommended that screws are tightened in diagonals in an X pattern to ensure even thermal paste spread and pressure across the CPU Die. Step 6: Slot the CPU Daughterboard back into the system, make sure that even insertion pressure is used when pressing on the CPU socket to prevent accidental damage. Once in place secure the card using the socket fasting hex bolts (cylindrical ones with the metal clip) first to prevent the Daughtercard from becoming loose while installing. The exterior screws can then be fastened in the places of the original heatsink as usual around the perimeter. (Your CPU Daughtercard and AIO with bracket are successfully installed) 12V PUMP POWER, The pump on the AIO MUST be powered from either a voltage tap off the Daughtercard or from a Sata cable to fan header adapter. It may be possible to wire the AIO into the existing liquid cooling connector on the motherboard, however I have not tried this. 12V AIO FAN POWER, Similar to the pump the AIO fan must be powered for effective dissipation of heat, how you control the speed of the fan or what type of fan is up to you. AIO MOUNTING WITHIN THE CHASSIS, This has not yet been figured out by me and I will devise a solution to this problem when possible. Dimensions: Length: 210mm Height: 34.5mm Width: 90mm
With this file you will be able to print PowerMac G5 AIO Mounting bracket for Corsair H100i, H80i, H60 (2012) with your 3D printer. Click on the button and save the file on your computer to work, edit or customize your design. You can also find more 3D designs for printers on PowerMac G5 AIO Mounting bracket for Corsair H100i, H80i, H60 (2012).