Powerswitch for Combat Robots
thingiverse
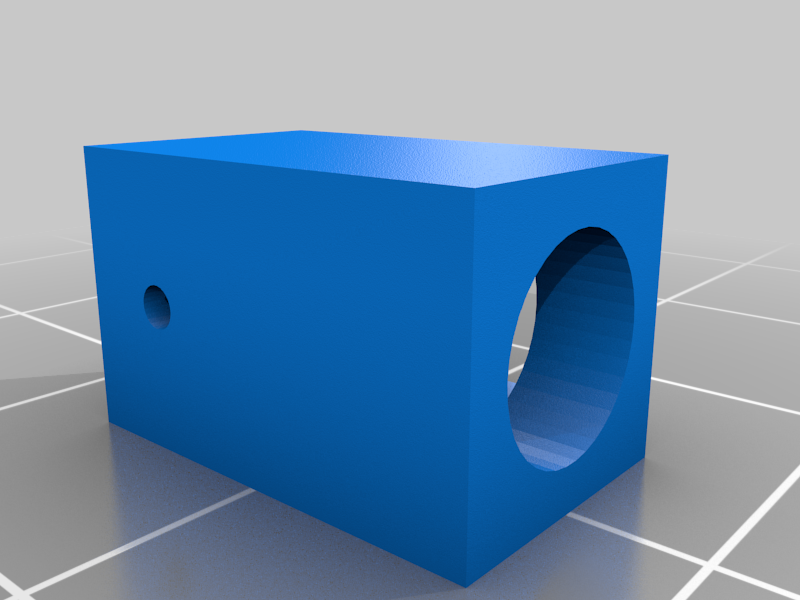
Mini power switch for 150g & 450g combat robots. - Use M3x8mm RST bolt and brass/RST M3 nuts for contacts. Updates: - Changed distance of nuts to match metric threads in bolt. This allows to start thread making from top slot with help of threaded nut and match casing and bottom slot nuts threads together. - Added small hole to backside for to ease nut removal from bottom slot. - Made nut slots little bit looser (Wanted to have tight slot, but slot was to tight with PLA and ok with nylon, so made compromise with looseness). Instructions: - Top nut without threads is for battery's side cable and shouldn't have any contact when bolt is loosened. - Bottom nut is always connected to bolt. - Solder cables to nuts before putting them into switch! - Don't use switch made from PLA with high drain brushless motors, it melts from the heat caused by high current. Install: 1. Make threads to casing with bolt, by using nut with threads in top pocket as guide. 2. Mark nuts top surface sides with permanent marker, to make later sure from the soldered surface. 3. Take bolt and nut away, this threaded nut is inserted laterwards into bottom slot. 4. Drill 4mm hole in to top slots nut (Not the one with markings). 5. Sand/file both nuts top surfaces, so that solder will stick. 6. Solder wires. 7. Place them in to slots and insert bolt. 8. Tighten bolt and measure with multimeter that it works. 9. To make sure that current is not moving loosen bolt round or two and measure it again. 10. Done Checkout my Combat robot related Youtube channel from: https://www.youtube.com/channel/UCvCGzPUm8HC7Auvylf9Q51A
With this file you will be able to print Powerswitch for Combat Robots with your 3D printer. Click on the button and save the file on your computer to work, edit or customize your design. You can also find more 3D designs for printers on Powerswitch for Combat Robots.