Printable Drive Train Module
thingiverse
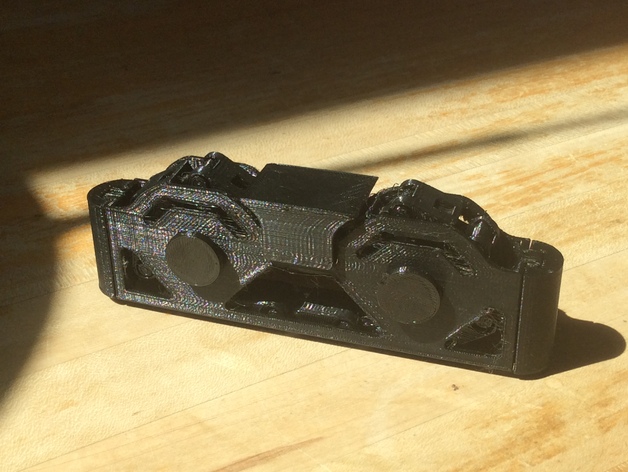
This is a fully 3D printable drive train module. Students often want to create robots and the like with a 3D printer, but can often find moving parts daunting in the assembly of a robot, particularly a drive train. In order to alleviate this concern, I have created this module, which requires, per module: 2 Case Halves 2 Case Clips (likely edited; more on that later) 4 Basic Axle Attachments (likely 3 edited; more on that later) 2 Sprockets (so-called edited - ignore this) 1 Final Chain Loop 1 Chain Tensioner None of the above require supports; all fit on a 6" x 6" x 6" (156 mm x 156 mm x 156 mm) print bed. Consistent bridging of 30 mm is required; some strands may need to be clipped otherwise. Editing of the axle attachments is required to create a functioning module. While this can easily be done (the program Blender can edit .stl files; numerous others can also be used. The circular end has a diameter of 20 mm), the motor that a student may attach could be one of any, so it is not very helpful to make a motor attachment. Let it be noted, however, that the motor used must be relatively strong. The clips technically do not need to be edited; it would likely just be easiest if they were. The editing can be used as a subsection of a project, or could be done by a teacher for a custom motor mount that fits the motor to save time. 8/18/16: Instructions and pictures have been added. Apologies for the upside down one. Assembly Step 1: Gather All the Pieces Amass all of the pieces shown directly below. Any edited pieces may require more or less; it all depends on the edits you make. For a base module however, such as a demo print, all of the below pieces are required and no more. This will be enough to assemble one module. The pieces required. Step 2: Put in the first Axles and Sprockets The first things you need to put together are the first axles and sprockets. Get one of the two frames, along with both sprockets. Pick 2 of the axles that you have, edited or not, and slide them through the two circular holes in the frame piece. Rotate the axles and the sprockets so that they press fit together. If the axles don't stay in the sprocket, you can either edit them so that there is a smaller clearance and reprint them, or you can reprint them at a higher speed and as such a lower resolution. If they don't fit to begin with, print at a higher resolution or edit them for higher clearance. A frame half with two axles. Step 3: Putting in the Chain Circle the chain around the sprockets. Make sure the chain turns loosely at all points. As for the teeth of the sprockets, I've found they work just as well in the slots in the chain links and the gaps between the chain links. Direction doesn't seem to make a huge difference, either. Step 4: Attaching the second Case Half Place the second case half over the original. With the exception of the axles, both halves should be mirror images of each other. Slide the clips over each end; it should be a tight fit. These will be what holds the halves together. Step 5: Attaching the final axles and the chain tensioner Look through the holes where the axles will go. Try to align the axle d-shaft with the sprocket hole; it's unlikely that you'll get it off the bat. Try turning it in the socket; with a little luck it should pop in. Do this with both axles. Next, slide the chain tensioner down over the top. The sprockets are going to turn a small amount; don't hold them in place. THe nubs on the arms of the tensioners should catch in the horizontal slot. If they don't, try moving the tensioner around a bit. If it still doesn't, take it off and snip off any intervening edges. Once it does slide into the slot, congratulations! The module is done.
With this file you will be able to print Printable Drive Train Module with your 3D printer. Click on the button and save the file on your computer to work, edit or customize your design. You can also find more 3D designs for printers on Printable Drive Train Module.