Printable Frostruder MK2
thingiverse
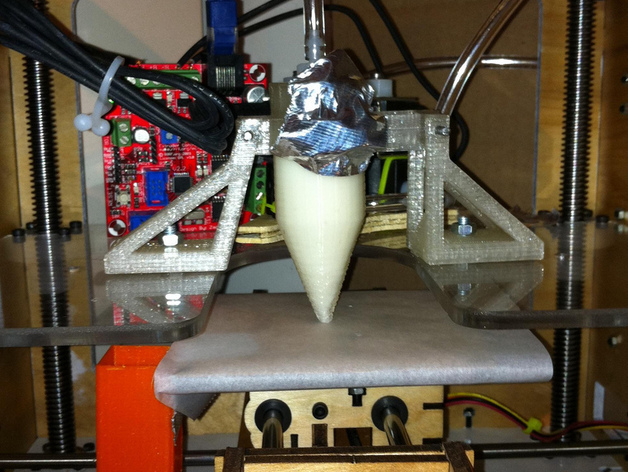
I wanted to explore the frontier of frosting extrusion, but I didn\'t have the money for a Makerbot Frostruder and an air compressor. So instead of buying one, I designed one. Chooch\'s design is nice, but it has too many printed parts and it doesn\'t use the standard 60cc syringe. The only way I could use the Makerbot 60cc syringe was to design a new mount. For less than the price of a Makerbot Frostruder you can make my printed Frostruder and buy an air compressor. The design consists of a syringe mount and a syringe. Part of the mount is thing #1912 so you\'ll need to print that as well as the files in this thing. Although the mount is important, the real innovation here is the printable syringe. I\'m not sure what the volume of it is, but it\'s enough for some light testing. You\'ll need a 1/8\" NPT tap to tap the plastic to connect the tube connector. Keep in mind that this is a very experimental design. It actually works quite well, but some of the tolerances in the parts are slightly off so you might need to use some force to connect stuff together. Instructions Print everything out. You will need one frostruder mount and optionally one syringe. It is optional because this design also accepts the standard Makerbot 60cc syringe. When printing the syringe, print it with 3 or more shells. This is important to making sure that you get good threads and a tight seal. The mount is modeled in OpenSCAD so it should be very easy to change the hole size to accept different syringes. In addition to the files here, you will need to print out a set of the mounts found here: http://www.thingiverse.com/thing:1912 Clean all the parts up and drill out the holes. The mounts have M3 holes and M5 holes. It should be pretty self explanatory which is which. Mount the extruder mounts (thing #1912) on the Z stage with some M5 bolts. The standard M5 extruder mounting bolts weren\'t quite long enough so I had to use some slightly longer ones. Attach the Frostruder mount included here to the extruder mounts using M3 bolts. Use whatever length you have handy. Depending on how your parts printed, you might be able to mount your extruder controller here. Mine was too tight and I didn\'t want to break my board so I didn\'t mount it there. If you are using the printed syringe, you will need to do some more preparation. First drill out the large hole to 21/64\". Then use your 1/8\" NPT tap to tap that hole. Make sure you tap it slowly and very well. You want really good threads on this. Next you will need to drill a hole on the other side that will be your nozzle. I used a 1/16\" drill bit and I used a drill press to get a nice straight hole. The next step is to setup the pneumatics. I bought the same type of solenoid that Makerbot uses. They are pretty expensive, but they work well and can be used at high pressures. You will need 5 or 6 of the 1/8" threads to 1/8" barbed connectors. They come in packs of 10 so just get one pack. You will only need one 1/8" barbed tee, so the other 9 that come in the pack will be unfortunately unused. And finally you will need a few feet of 1/8"ID 1/4"OD PVC or similar tubing. You will also need some way of connecting the tubing to your compressor. I used a quick connect plug connected to a 1/4" to 1/8" adapter connected to one of the 1/8" threads to 1/8" barbed connectors. See the pictures for how to connect everything together. It is basically the same as how Makerbot does it, except that I use an 1/8" connector to connect to the syringe instead of a rubber stopper. Next you need to connect the solenoids to the EC. This is exactly the same as how Makerbot does it. Consult the Makerbot wiki for this: http://wiki.makerbot.com/frostruder-mk2-assembly#toc31 For usage instructions see the Makerbot wiki: http://wiki.makerbot.com/frostruder-mk2-usage You will need to use a different method to fill the printed syringe. I filled up a pastry bag with my frosting and used that to fill my syringe through the threaded hole at the top. Then thread the connector onto the syringe. Then slide the syringe into the mount. You might need to use a piece of tape to secure it. That's it! Pretty simple eh?
With this file you will be able to print Printable Frostruder MK2 with your 3D printer. Click on the button and save the file on your computer to work, edit or customize your design. You can also find more 3D designs for printers on Printable Frostruder MK2.