Printable Gun
thingiverse
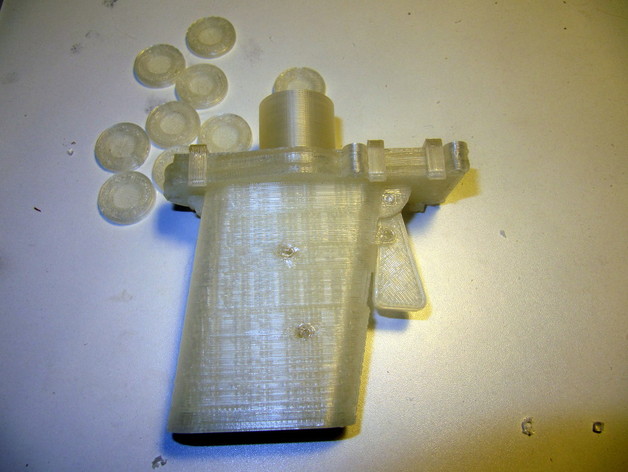
All those 3D-printable guns recently seem to be cheating, using nails and brass cartridges and such. Also, they appear quite dangerous to use. This inherently safe design remedies those drawbacks. The gun and ammunition are made entirely from printed parts, plus a few short pieces of 3mm filament. Fundamentally, it's a multi-shot, semi-automatic design with a smooth barrel and hardly any recoil. A few aspects of the design are parametrisable, including magazine capacity, barrel length and caliber. The default parameters in the OpenSCAD file are tuned for PLA. In tests, muzzle velocities up to 40Km/h have been achieved. http://www.youtube.com/watch?v=W1QqDUJZ7Hw Please note, this is not a firearm. No Terms of Use have been harmed in the making of this thing. Instructions Please note that I have replaced the gun.scad and gun_bits.stl files with a slightly updated version - a stronger inner lever. Second update: even more improved inner lever and reasonably dimensioned clamps. The 7 STL files are laid out for a 10x10cm build platform. It is highly recommended to print onto a smooth surface - the barrel interior depends on it. No support material is needed. The mainspring is the only critical part. Make sure that your slicer (e.g. Skeinforge) settings produce parallel strands of filament in the spring arms. Other things to watch out for are some of the hole surrounds. Skeinforge sometimes decides that if it can't fit 2 parallel strands into a gap it leaves a gap. Set fill/"extra shells" to 0 when printing gun_bits. To build, first assemble the trigger mechanism: BTW: What's the best way to inline pictures here? The double outer push rods are supposed to be rigidly linked to the filament axles (use a drop of glue), the inner parts form friction bearings with the filament. Note that the shorter end of the inner lever points up towards the barrel. The trigger mechanism is then inserted into the lower receiver. It's a somewhat challenging procedure: insert the pusher/rack part and slide it to the forward end. Insert the first tooth of the pinion segment into to first gap of the rack - it's hard but possible. Insert serpentine spring end into its location at the bottom of the handle. Insert pinion segment axle first, then followed by inner lever axle and trigger axle. This is how everything fits together: The picture and video (http://www.youtube.com/watch?v=PRZoxvdVePg) showing the trigger assembly inside the lower receiver was done with half a handle - the mechanism is not normally visible. Use 5 more pieces of filament to assemble the barrel, stacking guide (with mainspring) and magazine. For ease of disassembly, only glue the filament pieces to the lower receiver: Fill the magazine and enjoy. Make sure the smooth side of the 'bullets' faces down. It works upside down, but is more likely to jam. I'm sure this is obvious, but don't point at people or pets. Not suitable for very small children.
With this file you will be able to print Printable Gun with your 3D printer. Click on the button and save the file on your computer to work, edit or customize your design. You can also find more 3D designs for printers on Printable Gun.
