Printable Solidoodle Bed Leveling Needle Gauge
thingiverse
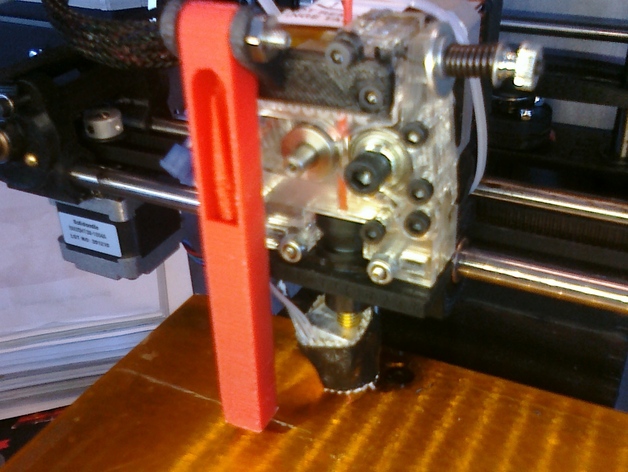
This is a printable depth gauge that mounts to the top of the Solidoodle2 extruder/print head, and can flip out of the way when not in use. It has an integral floating needle that moves back and forth when pressure is applied to the bottom probe end. Its pivoting mount may also be modified to hold felt tip pens and possibly other slim accessories. Instructions 1) Print and mount the extruder mounting bracket. It's designed to attach to the front of the print head using the uppermost hex screw, which is the most accessible because it has an exposed hex nut. The bracket fits around the head of two lower screws but does not require their removal. The Solidoodle printer appears to have more than one print head configuration, so the bracket might require modifications if yours is different. 2) Print the depth gauge. This is a difficult print, as the model is very tall and includes a needle suspended inside the gauge tube. To help, the stl file includes support fins and standoff feet to help stabilize during printing. I got good results using slicer and a 2mm brim. Insure your flow rate is properly calibrated, and do not add additional support, as that will jam the needle inside the enclosure. 3) Clean the gauge, removing the support fins and bottom support feet and brim. Carefully trim the bottom of the enclosure so the needle/probe extends about 2mm past the bottom. DO NOT CUT the flexible hinge inside near the bottom, as that suspends the needle/probe. 4) If necessary, free the top of the needle by carfully prying inside the top viewing window. It should move back and forth when pushing on the probe end. 5) Attach the gauge to the mount with a screw and nut 6) To use the gauge: lower the bed to make space and flip the gauge down to the vertical position. carefully raise the bed until it makes contact with the gauge and centers the needle lower the bed again to make space, counting the total distance moved move the head to a new position on the bed, then raise the bed back up the same distance previously moved. Do this one step at a time until the distance is reached or the needle is centered, whichever comes first adjust bed leveling screws until the gauge needle is centered at a consistent z-height in all head positions. Notes: it's probably best not to move the print head when the gauge is in contact with the bed flip the gauge up when not in use (printing) the gauge is designed extend a bit further down than the extruder nozzle, so the bed should not be fully raised, but instead be a few mm below its topmost position when taking measurements the gauge and mount are tested and designed to fit my printer. There is very little clearance on the back and front edges when printing with the gauge stowed. Your results may vary or need adjustment if your dimensions are different.
With this file you will be able to print Printable Solidoodle Bed Leveling Needle Gauge with your 3D printer. Click on the button and save the file on your computer to work, edit or customize your design. You can also find more 3D designs for printers on Printable Solidoodle Bed Leveling Needle Gauge.