Printable water cooling jacket for v6 type hotends.
thingiverse
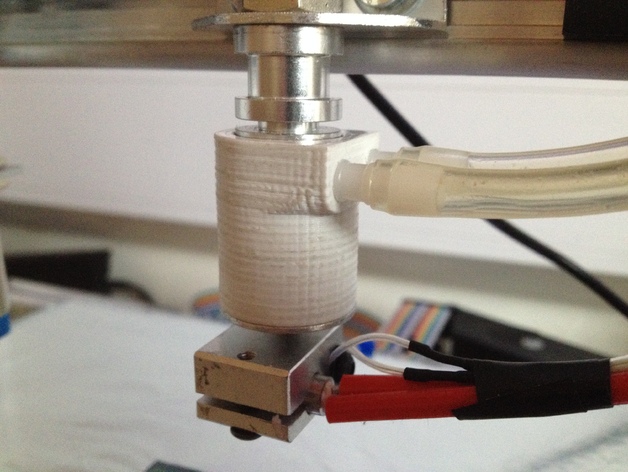
As the name says, this is a printable jacket to convert v6 type hotends to water cooled. It seals to the aluminium heatsink with two O rings so the position of the outlet water pipes can be adjusted (this also helps with dismantling). The printed material of the jacket hides behind the last cooling fin of the heatsink to protect it from the heat block and is water cooled (more insulation between the heat block may be needed). The principal is that if it can keep the filament down its centre cool enough to print then it can keep its self cool enough to survive. The intended use is for enclosed extruders that have a high internal ambient temperature or use high temperature filaments. If you have a 50 degree ambient inside your enclosure then you have to use 50 degree air to cool your heatsink. The water in theory could be just above freezing or maintained at a constant of your choice. Or as has been pointed out multi head setups where it reduces the need for lots of fans. Designed to be easy to print even with basic setup, filp the .stl 180 deg (X or Y axis) to print. To avoid leaks everything has to have tight tolerances. It is likley that you will have to do some clean up work on this print. Edits / Changes: New .stl file for jacket as wrong one uploaded. Photo & .stl for retaining clips added. A tool .stl added to help clean up the inside of the jacket if required. Notes: v6_jacket_V2_f.stl was 1.25 mm short in its overall length (my bad uploaded the wrong file) only 3 people downloaded this, sorry. v6_jacket_V3_f.stl is correct. Larger bracket is for k8200, will post .stl when confirmed it works as expected. Print tool, fit an m5 bolt through hole in the end & secure with a nut. Insert sand paper into slot an sand away. Instructions There is a .dxf file in the downloads that may answer some questions. How it works: The printed jacket slides onto the modified heatsink from the top (filament inlet end) and uses two O rings to seal onto it (20 & 18 mm). When assembled the jacket needs to be pushed downwards 0.25 mm to compress the O rings, this will be achieved in different ways depending on your application and mounting method. The simplest is a 1.5 mm thick ‘U’ shaped lock that slides into the gap between the little 16 mm fin and the mounting area. In my case (k8200) the mounting bracket will maintain the pressure (I’ll post a photo). The jacket is the same size as the last fin and hides behind it to stop it melting, that combined with the fact that both the jacket and the fin are cooled by the water should ensure it survival. What to do and what you need: The jacket has two 5 mm holes for water inlet and outlet. Decide, what size pipe you are going to use. Then how you are going to attach it to the jacket. I used plastic 3/8 pipe couplers cut in half and glued into the 5 mm holes. If your printing is good enough you may wish to print spigots. Modify the file and print. Mine used 600mm of 3mm and took about 2 mins (2.5mm layres, 4 perimeters to make most of it solid). You need two O rings, 20 x 1.5mm & 18 x 1.5 mm (softer the better, the red ones are really good). They must be 1.5mm, anything bigger will not work with these files. Now the heat sink. It has 12 fins, 1 is 16 mm dia we don’t do anything to this. The other 11 are 22mm, the middle 9 need to be removed and the top one needs to be reduced in size to 18 mm dia. The method is up to you, I used a bench grinder to remove most of the material then finished with a small file. IMPORTANT: don’t damage the top of the heat block end fin, the O ring has to seal on this. Use tape or even print a little guard to protect it. Once removed the top fin needs to be reduced to 18 mm. I scribed a line to work to, then ground most of the material off and finished with a file. Top tip: This fin needs to be 1 mm per side bigger than the rest of the bits at that end, I found a knife blade that was 1mm thick and used it to both protect the other parts but to ensure that the fin was 1 mm bigger and concentric. Now you have all the parts: fit the O rings onto the heatsink, then slide the jacket into place ensuring the O rings are correctly seated. Compress the O rings and fit the locking device (more details on that to follow). Connect up the water etc. I recommend that you run a test to ensure that this will work in your environment before printing. Warning: This item is made available for use by people modifying their printers. As every printer is different it is up to you to assess the risks involved in your application. In all, at sometime it will contain hot water which can burn and dammage electrical items. Please becarefull. Thanks to this guy for ideas: http://forum.e3d-online.com/viewtopic.php?f=7&t=66
With this file you will be able to print Printable water cooling jacket for v6 type hotends. with your 3D printer. Click on the button and save the file on your computer to work, edit or customize your design. You can also find more 3D designs for printers on Printable water cooling jacket for v6 type hotends..