Printed Filament Spindle (obsolete)
thingiverse
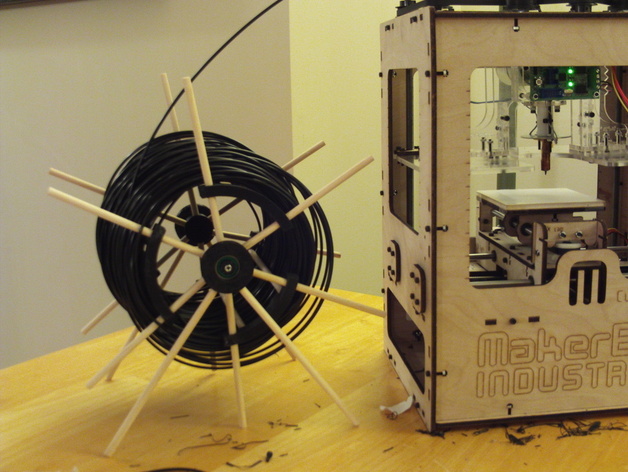
Replaced by http://www.thingiverse.com/thing:1652 I got tired of manually untwisting filament while my MakerBot prints. There are multple spindle designs on Thingiverse, but they all use laser-cut parts instead of printed parts. I don't own a laser cutter, but I do own a MakerBot (#238), so I decided to design a spindle that can be printed. This is the early result and somewhat flimsy. I'm releasing it in its current form in the hope that it will be useful even though I don't consider it complete. My to-do list includes tying the legs together and providing a way to prevent the filament from unspooling while it's not in use. Instructions STL and GCODE files This set of files is adjusted for my printer; the fit may or may not be correct on yours. Just in case, the part generation script (spindle.py) has many adjustable parameters. Part Counts 2 skate bearings. 2 M3x16 screws (you should have plenty left over from building your MakerBot). 2 M3 nuts. 12 1/4" x 6" dowels. These are the radial dowels. You may choose different length. 6 1/4" x 6" dowels. These support the filament. You may choose a different length. 4 1/4" x 7" dowels. These are the legs. These must be longer than the radial dowels. spindle_inner_ring (2). This is the part which holds 6 rods in a radial pattern. spindle_inner_ring_cap (2). This part helps lock spindle_inner_ring into the bearing. spindle_outer_ring (6). This connects the radial dowels to the filament support dowels. spindle_bearing_support (2). The legs connect to this. It holds the bearing. Assembly Press 3 radial dowels into a spindle_inner_ring. Skip a hole between each pair of dowels. Slide a spindle_outer_ring over each radial dowel. Orient each ring so that the holes for the filament support dowels face away from the spindle_inner_ring's bump. Slide 3 more radial dowels through the outer rings and press the dowels into spindle_inner_ring. Press a bearing onto spindle_inner_ring's bump. Press a spindle_inner_ring_cap into the other side of the bearing. Use a M3x16 screw and M3 nut to hold the bearing assembly together. Press 2 leg dowels into two consecutive holes of a spindle_bearing_support. Press the bearing into the spindle_bearing_support. Repeat 1-8 for the other side. Use the filament support dowels to attach the two sides together. Optional (part of step 10): press another dowel into the centers of the two inner rings. Expiremental CAD I used FreeCAD ( http://sourceforge.net/projects/free-cad/ ) to generate the parts. None of the parts are hand-drawn; I created a generation script which builds the parts and exports them to STL. The script makes it easy for you to adjust the parts for your printer. Part Generation Edit spindle.py and change outputPath to the directory you want your STL files to live. Keep your editor open. Start FreeCAD. You should see a window docked at the bottom with a tab named "Python console." If not, then use "View->Views->Report view" to open it. Paste the contents of spindle.py into the Python console. One of the parts should appear onscreen and a set of STL files should now be in the directory you specified. Note: there's no need to save the FreeCAD drawing. Treat the script as your drawing.
With this file you will be able to print Printed Filament Spindle (obsolete) with your 3D printer. Click on the button and save the file on your computer to work, edit or customize your design. You can also find more 3D designs for printers on Printed Filament Spindle (obsolete).
