Printed Painting - Experiment
thingiverse
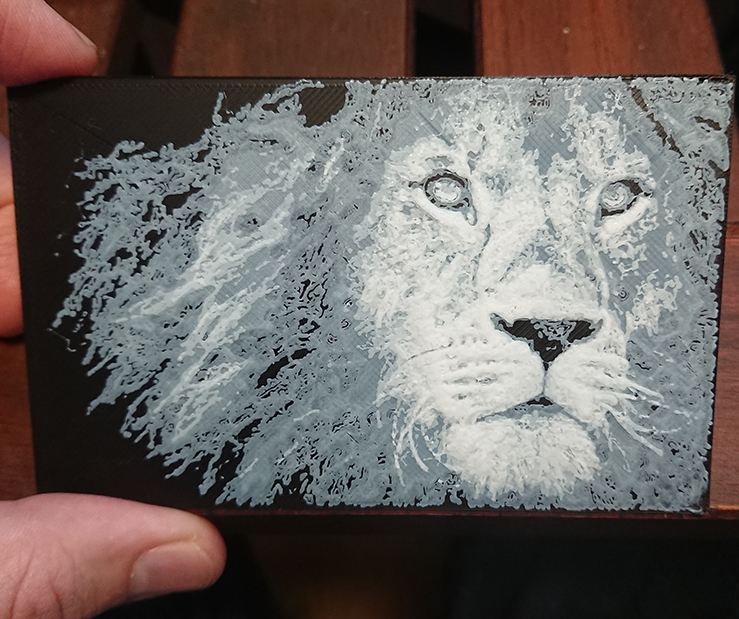
You can use this technique on any FDM printer, reqiures one pause layer/color change. I was earlier experimenting with very thin prints, when I noticed that I needed a few layers to cover up black plastic, which in turn gave me the idea to use this to print in gray-scale. PRINT INSTRUCTIONS 0.1mm lay height Start with a dark color. Use Post processing to put a pause in the layer just before the painting starts. And swap to a bright color. Put a waste block cube, close the printer origo to avoid blobs from the color change. MAKE YOUR OWN PAINTING Create a gray scale image, where the background is black and the lines are white. In Blender (3d modelling) -create a plane -Subdivide the plane about 25times. -Use the Displacement Modifier with the image as texture. Set "midlevel: 0" and adjust strength until the peaks are about 0.4mm high. -Apply the modifier. -Extrude the plane to a cube. OTHER NOTES The displacement modifier can be messy to work with. I have considered to create a software that generates a model instead. I tried using different layer thickness. Thin layers like 0.06 is to inconsistent. 0.1mm seem to be the sweet spot. The gray scale is not linear, the whiteness for each layer is about 50%, 75%, 80%, 95%. Once again, a custom software would be needed to represent the correct level of gray-scale. Would also be interesting to try use dots (like in old comics) to simulate darker gray colors.
With this file you will be able to print Printed Painting - Experiment with your 3D printer. Click on the button and save the file on your computer to work, edit or customize your design. You can also find more 3D designs for printers on Printed Painting - Experiment.