Printrbot Z Axis Stabilizer
thingiverse
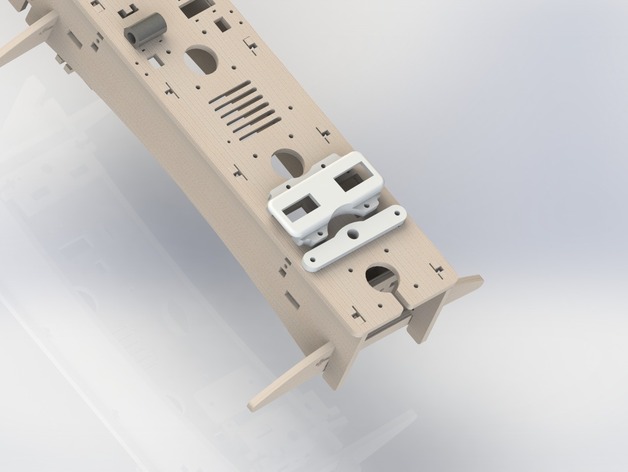
Print two of either the regular or low-profile Z stabilizers to reduce wobble on your Printrbot's Z-axis smooth rods. These stabilizers are compatible with the bed stabilizer upgrade found here: http://www.thingiverse.com/thing:43200. Designed for a Printrbot LC, a Printrbot Plus version is also available for 12mm rods, although it remains untested. Standard thickness is 0.25 inches, with a low-profile option at 0.20 inches; use the latter if your printing surface isn't raised by glass or leveling screws. The Z stabilizers have a volume of 0.4 cubic inches and an ABS weight of 0.01 pounds. To install, first remove the X carriage, Z axis smooth rods, and two pairs of screws in front and behind the rod hole. Test-fit the smooth rod into the stabilizer's center hole; it should be snug but manageable by hand. Scale down the print or adjust settings if necessary. Install the stabilizers with their bumps facing the Printrbot center, using two #6-32 x 3/4" screws for each. Don't tighten these screws until you reattach the X carriage for alignment purposes. Reinstall the rods and X carriage, tightening the screws before turning on the printer and zeroing the Z axis. If your X carriage hits the stabilizer, switch to the low-profile version. Be careful when handling smooth rods as mishandling can cause damage. For optimal results, use these Z stabilizers in conjunction with the print bed stabilizer upgrade found here: http://www.thingiverse.com/thing:43200.
With this file you will be able to print Printrbot Z Axis Stabilizer with your 3D printer. Click on the button and save the file on your computer to work, edit or customize your design. You can also find more 3D designs for printers on Printrbot Z Axis Stabilizer.