PrintRite DIY 3D Printer Fan Duct v3
thingiverse
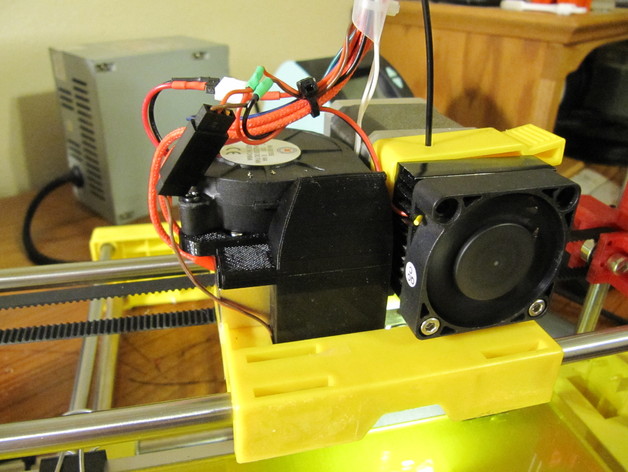
My fifth (and continually evolving) design for a fan duct for the PrintRite DIY 3D Printer. Includes adapters for either a 60mm fan or a 70x20mm blower. This design fits completely within the outline of the extruder carriage and extends below the carriage via the opening between the metal cross-bar and the front plastic piece to the right of the extruder fan/heatsink. It also does not obscure the view of the extruder nozzle. Included are 10 STL files: Lower Duct Scalable Shim 80x25 Blower Adapter 60mm Fan Adapter 2nd Lower Duct option with internal supports for shorter bridging during printing Flat 60mm Fan Adapter that does not have any overhangs to make it easier to print Flat 60mm Fan Adapter that has internal air channeling structures for (maybe) better airflow New Mk. III version of the Lower Nozzle that directs the air downward more to avoid cooling the print head and to provide more clearance above the print bed. (Added 12/14/2016) You'll need 2 M4 screws about 15mm long, plus appropriate screws to mount the fan of your choice to the adapter block of your choice. If printing the 60mm adapter with the internal air director, print it upside-down and drill out the main screw holes - it has to have a thin closed-off bridged over area in these screw holes to print upside down correctly. Let me know if you want me to design adapters for additional fan types, or feel free to do so yourself. I have uploaded a PDF with the dimensions of the top plate of the lower nozzle so you can easily design your own fan adapter. Instructions: Print the lower nozzle first and determine how much shim spacing will be required above the metal crossbar to get the bottom of the nozzle 1-2 mm above the print bed. Change the scaling on the Z-dimension of the shim to set the height. I needed 6mm. The STL file is 10mm high, so I scaled the Z to 70%. You may need to rotate the heater block around and change which end of the heater block the heater cartridge is inserted in. ( Loosen the small set screws to rotate the block and remove the cartridge) I have my heater cartridge with the leads coming out of the left rear of the heater block. You will need to remove the 2 M4 allen screws holding the cross bar down to get the duct in place. Replace the bar, install the shim under the duct's flange, and put the fan adapter on top, then add the M4 screws through all 3 pieces into the holes in the top of the metal cross-bar. If you plan on using a 60mm fan, remove the existing extruder fan and move it to the fan adapter. Mount the fan to the duct with some sheet metal screws. Install a new 60mm fan on the Extruder. Run a new pair of wires to supply constant 12V power to the new fan on the extruder. I'm pretty sure the Extruder fan should be running all the time to maintain the correct temperature gradient inside the nozzle, not varied as it is from the factory. I also used this 12V constant power to run a section of LED strip under the carriage. It gets dark under there.. If using a 70x20 blower, leave the 60mm extruder fan on the extruder, but cut the wires and connect the new blower to the wires that the extruder fan was powered by. Run new 12v constant power to the extruder fan. I highly recommend insulating the heater block a bit so the printer can maintain extruder temperatures while the fan is running. I wrapped mine in several layers of Kapton tape and my printer is now able to maintain the head temp within a few degrees of target temperature even with the rather powerful 70x20mm blower at 100% speed. Important Info for full fan speeds! I noticed that my blower did not run at full speed when the fan output was set to 100%. I discovered the problem in a design flaw in the control board. There is a 2K resistor in between the Atmega1284p chip and the NPN transistor that runs the fan, which is too high of a resistance to fully turn on the transistor. I bodged in a 220 ohm resistor between the Atmega1284p and the base leg of the transistor and voila! Full speed! The resistor is connected across R48, the incorrect value 20K ohm resistor. I take no responsibility for you blowing up your own boards, so proceed at your own risk if you want to make the same modifications.
With this file you will be able to print PrintRite DIY 3D Printer Fan Duct v3 with your 3D printer. Click on the button and save the file on your computer to work, edit or customize your design. You can also find more 3D designs for printers on PrintRite DIY 3D Printer Fan Duct v3.