Pro Boat Sprintjet Upgrade Parts
prusaprinters
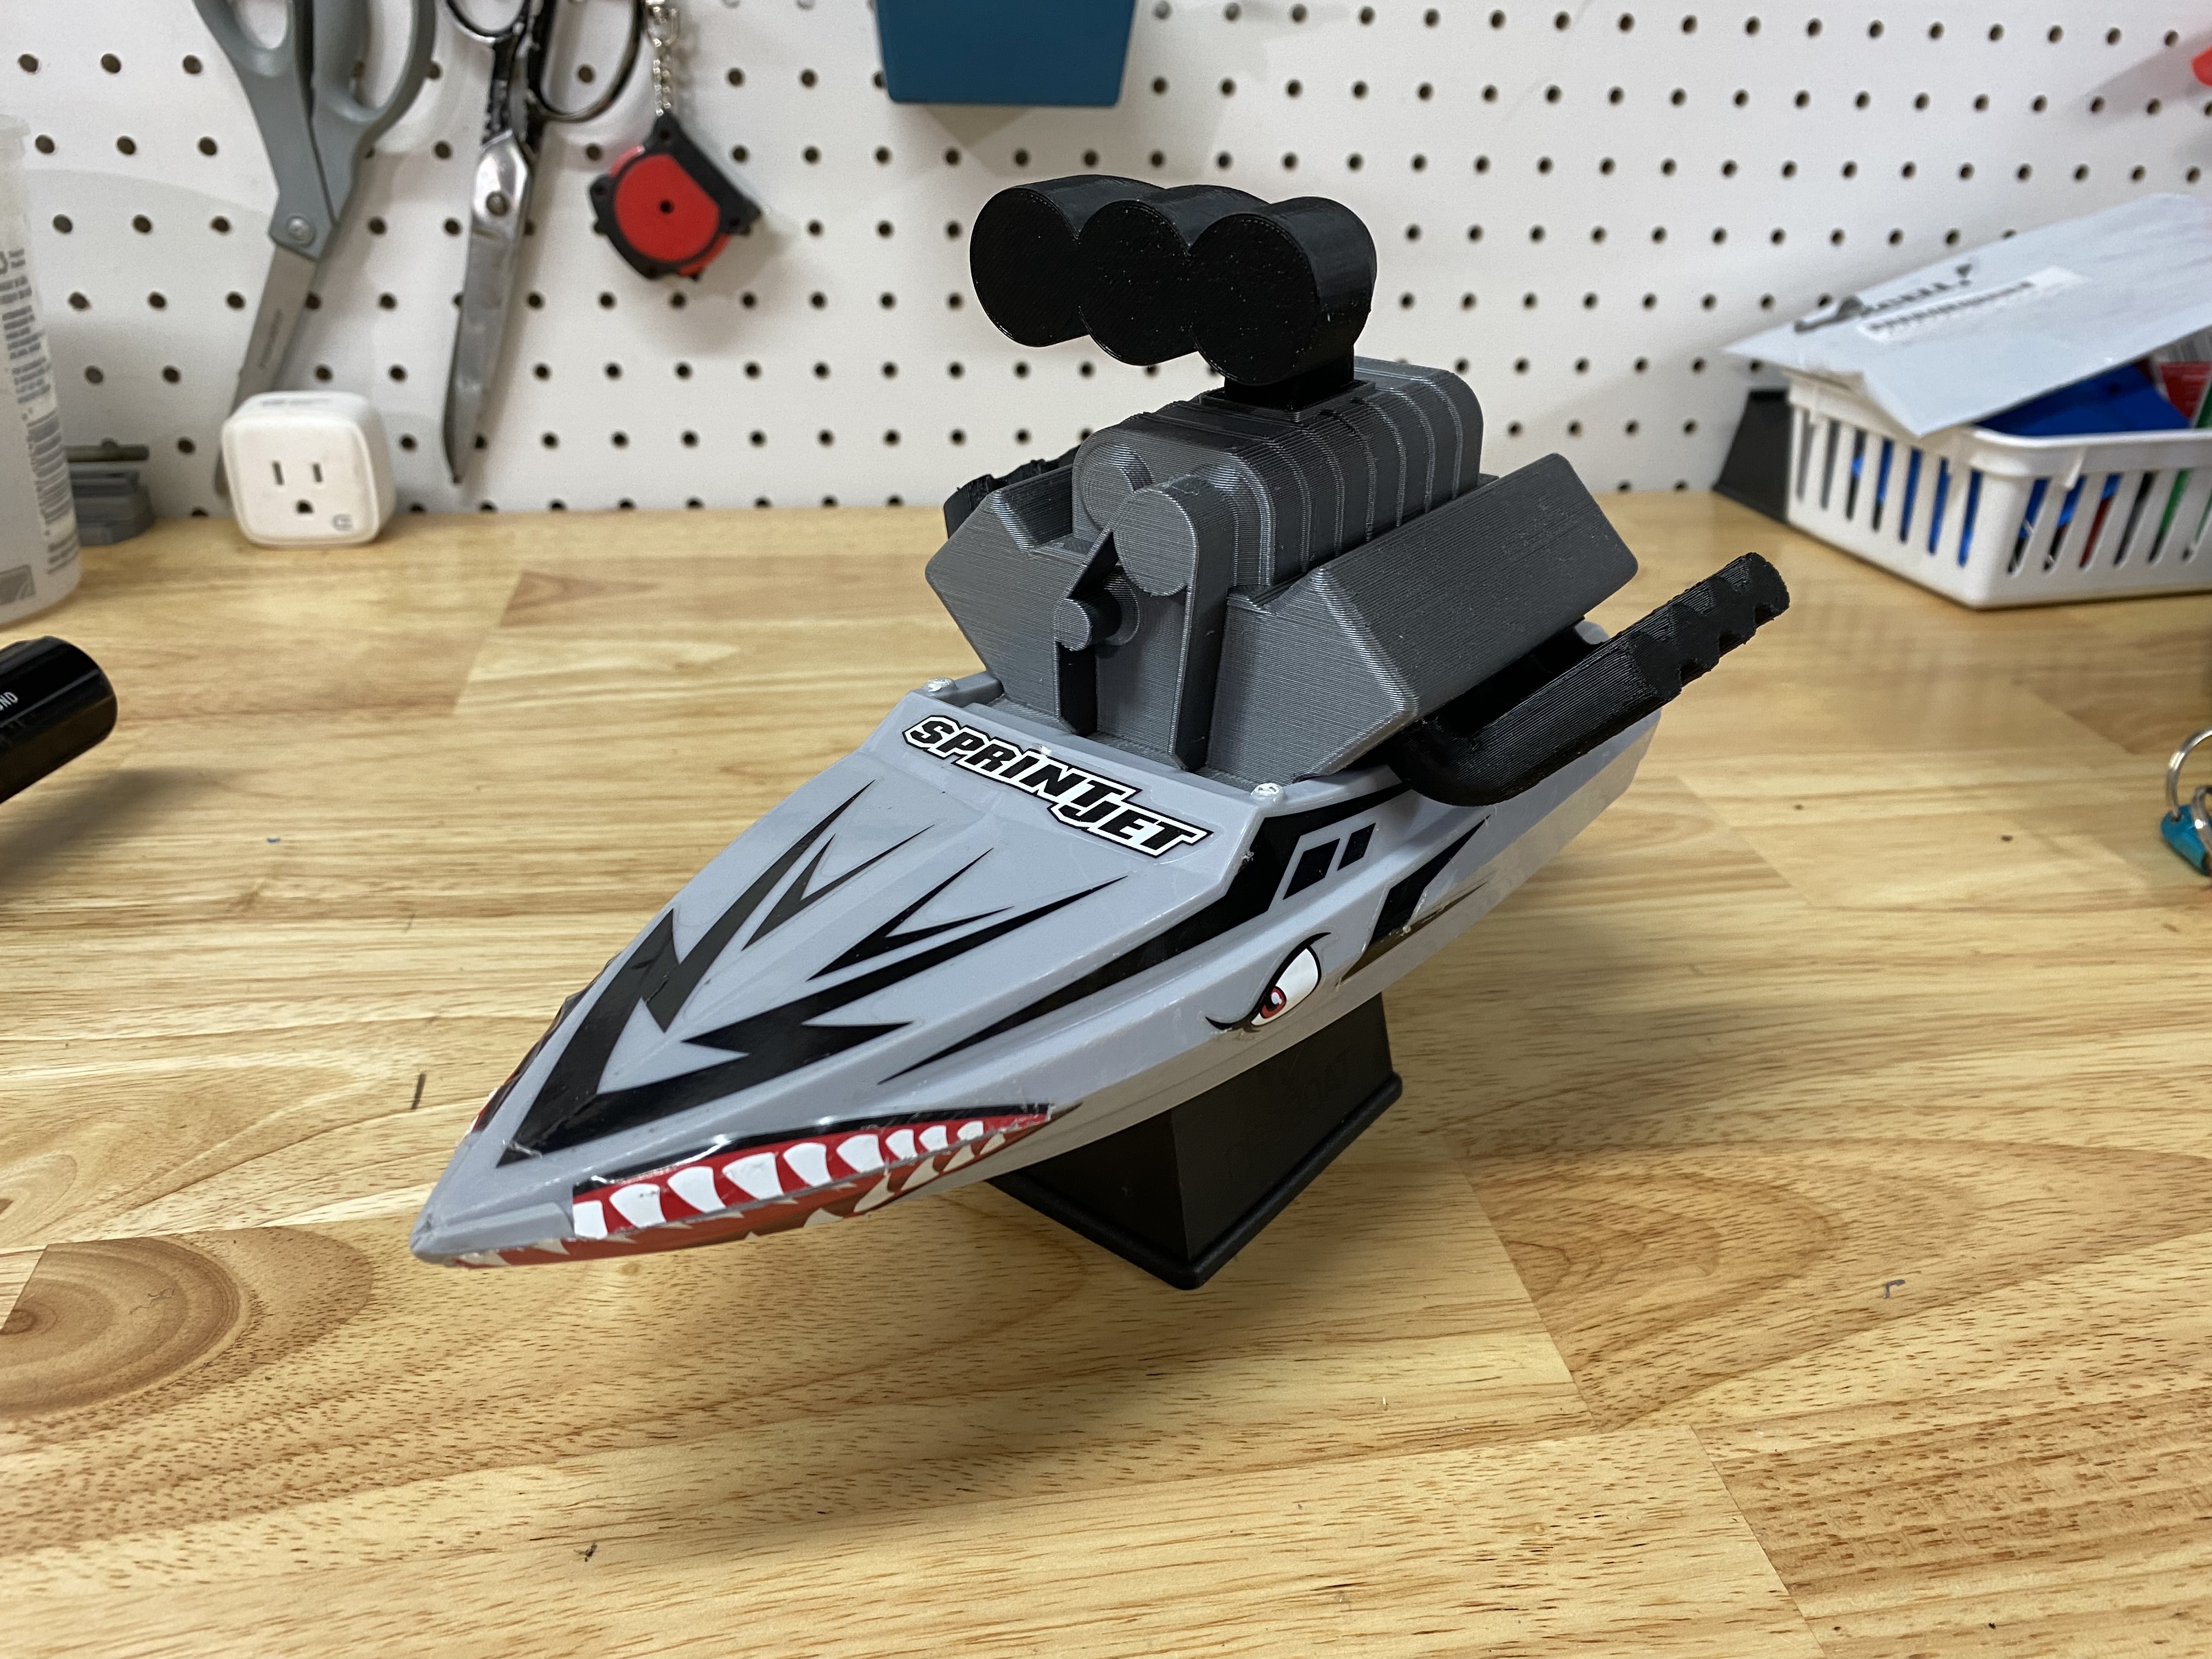
<h3>Overview</h3><p>I converted my son's Pro Boat Sprintjet 9" boat to run a 1806 brushless outrunner motor, standard RX41 receiver, & 20A BL ESC. I designed a few parts to optimize the performance with the new drive system. Here they are…</p><h5>3-Blade Impeller</h5><p>It has a 10mm pitch and 15 degree overlap. Shaft hole is undersized & I drilled out to 1.7mm, installed a 1.8mm shaft using a power drill on real slow speed. It's a twist/press fit and is currently holding up to 2S power <i>(3S as well as of 9/12)</i>. Diameter is maximized over stock to reduce clearance in pump, increasing efficiency.</p><p><i><strong>*I guessed on this one, I'm not a prop/impeller designer so I could be way off and I don't have test data to determine if performance is improved, but pretty sure it is</strong></i><strong>*</strong></p><h5>Optimized Nozzle</h5><p>I have printed several <a href="https://cults3d.com/en/3d-model/game/rc-mini-jet-boat">JTronics</a> boats and I like his nozzle design… I designed one that has a smaller primary diameter and exit diameter matching the stator. Easy to install & remove. Concentrates water nozzle stream, potentially increasing jet velocity & performance (if pump efficiency is good). Reduced primary diameter of nozzle keeps it from “catching” water like stock nozzle, improving high speed turning. <i>(further improved with Ride Plate below) </i> I will probably end up designing a similar stator as his to reduce the blow-by between stator and nozzle as well…</p><h5>Ride Plate</h5><p>Extends hull surface under nozzle to reduce affect of hook in the hull to reduce porpoising at higher speeds. Also reduces twitchy steering feel, reducing water coming from under the boat “catching” on nozzle when turning. Reduces tendency for snap oversteer/spin out when turning <i>(not sure what its called in boating world)</i>. Mounts using two bottom screws on stator.</p><h5>Battery Clearance Hatch</h5><p>Replacement hatch with more vertical clearance for a larger battery. Reuses the factory hatch stay, but I'm working on something that works better since there's not much finger clearance. Fits with factory rollbar if needed. I waterproof this by rubbing candlewax all over the outer surfaces and melting it in with a heat gun on low. I used ¼"Wx1/16T neoprene foam seal tape to mimic factory seal under the hatch. </p><h5>Cartoon-style Blown V8 Hatch</h5><p>This hatch was an exercise in a wild thought…its a Rat Fink cartoon style blown V8 that is shelled to provide additional battery clearance over the stock hatch. It's possible it may improve self-righting, but honestly it just contributes to the boat turning over from the raised center of gravity. The only performance gain from this is the potential for running a bigger pack that would have interfered with the original hatch. It looks pretty cool though…</p><h5>Extended Latch</h5><p>Replaces the stock upper part of the latch mechanism. The keyed slot is phased so the knob orientation works with both hatches I designed.</p><h5>Boat Stand</h5><p>Simple light weight boat stand that prints flat & assembles with glue. Print 2X each for one stand.</p><h3>Print Instructions</h3><p><i><strong>Impeller & Nozzle:</strong></i> Overture Digital Blue PETG at 0.1mm Detail, no support.</p><p><i><strong>Ride Plate:</strong></i> Overture Black PETG at 0.3mm layer, support on build plate.</p><p><i><strong>Battery Clearance Hatch:</strong></i> Overture Space Gray PETG at 0.3mm layer, support on build plate.</p><p><i><strong>Blown V8 Hatch, Blower Hat, Headers:</strong></i> Overture Space Gray & Black PETG at 0.3mm layer, support on build plate for blower hat & headers, everywhere for the hatch. Header is mirrored to produce opposite side companion. Hat & Headers are CA glued in place, then hatch waterproofed w/ candle wax & heat.</p><p><i>Extended Latch: </i>Overture Space Gray PETG at 0.2 layer, no support</p><p><i><strong>Boat Stand:</strong></i> Prusament Ultramarine Blue @0.3mm, no support</p><p><i><strong>Note: Any gcode files with “TL” in name have a pause for a GoPro Timelapse board. This moves the bed and print head after every layer. This adds time & affects quality due to slight oozing during pauses between layers. Don't use this gcode unless you have the </strong></i><a href="https://www.tindie.com/products/creative-electronics/timelapse-trigger-for-prusa-3d-printer-with-gopro/"><i><strong>Creative Electronics Prusa GoPro Timelaps Trigger</strong></i></a><i><strong> and you want to timelapse the print. You should be ok to use the 3mf file as long as you change the printer profile to your preference.</strong></i></p><p><i><strong>9/13/21 Update: - replaced XL Hatch with redesigned Clearance Hatch, updated wording throughout</strong></i></p><h5>Skunkworks: </h5><p>I'm working on an impeller to improve re-prime & multiple nozzle exit diameter sizes/angles.</p>
With this file you will be able to print Pro Boat Sprintjet Upgrade Parts with your 3D printer. Click on the button and save the file on your computer to work, edit or customize your design. You can also find more 3D designs for printers on Pro Boat Sprintjet Upgrade Parts.