(probably the best) Ender 3 Pro Dual Part Fan Mount
thingiverse
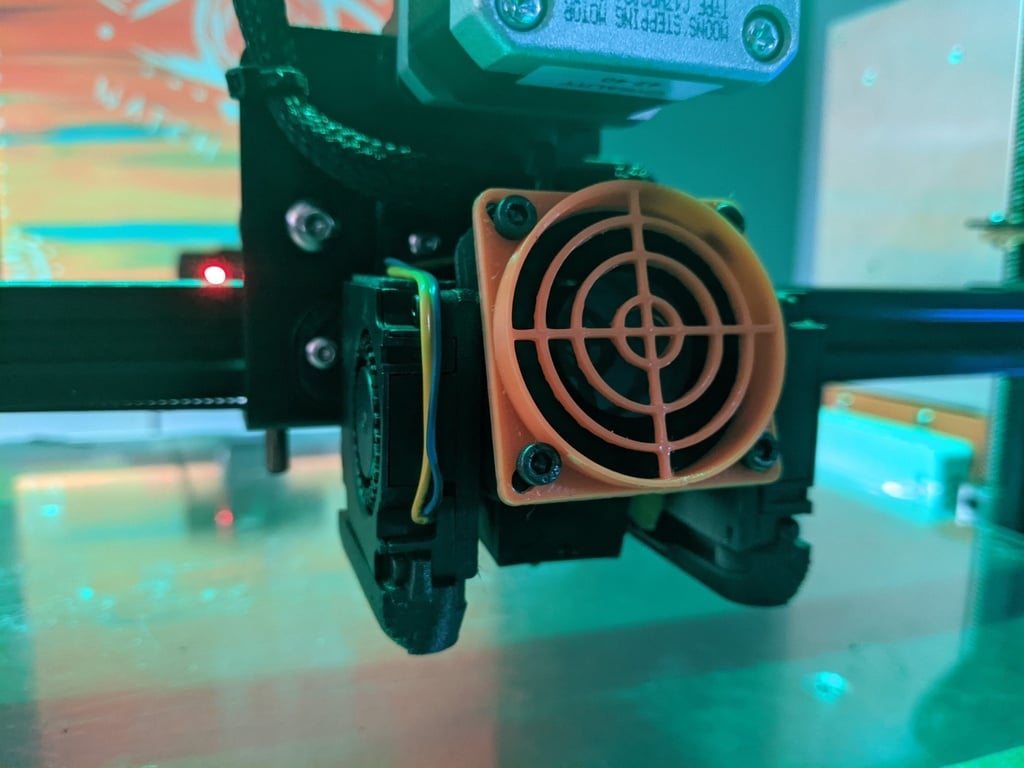
# Yeah, I said what I said # Up for grabs is what is (in my personal opinion) one of the easiest, best hot end upgrades you can make for your Ender 3 / Ender 3 Pro / CR10(?) (I think it's the same hot end mount, but do verify before printing). The factory cooling setup leaves so much to be desired. The hot end fan leaks air like crazy out of the bottom, all around the cold end and build plate, causing loads of problems with PETG and other heat sensitive filaments and warping, even with the part cooling fan turned off. The factory part cooling fan is also fairly small, which isn't a huge problem in an of itself, except for the fact that they include a very poor air redirect for it that blows air erratically all over the place. Rather than being directed at the filament being laid down on the part, the air goes all over the place, including the bed, again messing with heat sensitive filaments. So, I set out on a quest to find the best Ender 3 cooling upgrade I could find, and after trying at least five different ones and reading through descriptions for at least 50 more, I think I've finally found / modified (shoutout @cdsmakestuff && @coffeebuilt) what is the best, most well rounded hot end upgrade on Thingiverse to date. Reasoning: - **cheap:** Light on filament, I printed in less than 25-30g for everything - **heavy duty:** robust and DURABLE - **occlusive:** hot end fan exhaust successfully routed to hot end, and not leaving exhaust on the bed - **COLD:** Single or DUAL part cooling fan! That's right, you can print this bad boy off now and upgrade your stock ender, and when you have a chance, just pick up another cooling fan and slap it on the other side. - **quiet:** The fan grill from @coffeebuilt is actually designed to allow smooth airflow around the hot end fan, which drastically reduces the noise of that constantly running fan. Seriously, try it. - **accurate:** All air from part cooling fan funneled to a smaller, more directed and pressurized stream pointing directly at the part around the nozzle - **simple:** If you print everything, there are five total parts. Technically, only three of them are necessary for a base setup - **universal:** Works on both bowden and direct drive converted setups without separate pieces! - **accessible:** The heater block is perfectly exposed, making it easy to hold still with a set of pliers while you change your nozzle. No need to remove the factory shroud just to change a nozzle. - **just plain awesome:** Bad ass cooling capabilities on dual fan setup. Seriously, my overhangs and bridges are next level. Most other solutions I found were either weak in certain areas and broke easily after time, or were very robust and required many parts, and a teardown of the hot end area to install. This solution is fairly easy, mounting to the existing holes for the factory ender cooling bracket. Also, the duct for the hot end is separate from the part cooling fan bracket, making for easier install. When printing the fan ducts, you'll want to mirror one in your slicer to make sure the air outflow is on the correct side. I only included one side in the files. Make sure to mirror for the right side fan. To install, remove the existing cooling hood and take your fans out of it. Set them off to the side on the cross member for support (you can zip tie them in place temporarily if it helps). Loosen (you shouldn't have to fully remove) the two silver screws holding your hot end to the back plate to allow the duct to slide around them and mount firmly against the heat sink. Run a zip tie around the heat sink and through the holes in the duct and tighten firmly. Afterwards, retighten the hot end screws that you loosened. You can now mount your factory hot end fan right to the front, and then use the included fan duct, or any other cover you can find on thingiverse for a 40mm fan (but you really should try the included one, it's amazing).With the hot end duct in place, route the bracket for the part cooling fans into place around / behind it up against the carriage bracket. If you have direct drive, you might have to take the extruder off to fit it in place (I did), but it's a simple task generally. Screw the two screws into place to secure the bracket to the carriage, and then mount your part cooling fan on the desired side (or fans if you're using both! If you use the right fan bracket (or both fans), it can help to put a piece of double sided tape between the plate the fan mounts to, and the right side of the hot end fan / duct. This keeps it from drooping at all over time depending on the filament you use. If you decide to use both fans (the point of this setup!), you can either wire them in parallel or series. Series will result in less power to each fan over all. I chose parallel, which will put a higher amp draw on the board. I didn't check specs, so do this at your own risk, but it's running fine so far! No support necessary for anything. I printed in carbon fiber infused polycarbonate, but PETG should be just fine :) Huge shoutout to the guys I pulled these OG files from originally to modify! OG source here: https://www.thingiverse.com/thing:4580010 https://www.thingiverse.com/thing:3502258 # Post your makes! I'd love to see them! #
With this file you will be able to print (probably the best) Ender 3 Pro Dual Part Fan Mount with your 3D printer. Click on the button and save the file on your computer to work, edit or customize your design. You can also find more 3D designs for printers on (probably the best) Ender 3 Pro Dual Part Fan Mount.