Probe sensor for Dagoma Dicovery200 3D printer
thingiverse
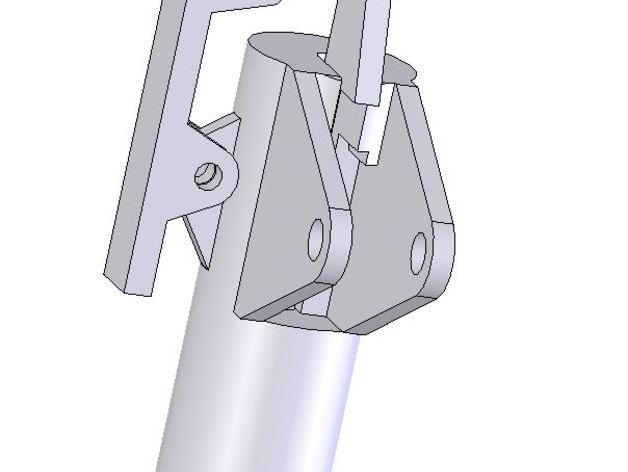
Le palpeur est basé sur un microswitch de souris d'ordinateur Le doigt est libéré et descend lors du homing X, pas besoin de gcode supplémentaire pour cela. Après le homing X,Y et Z un mouvement en Z relève le doigt et réarme le capteur pour une autre utilisation. Ce mouvement nécessite du gcode supplémentaire pour baisser la tête. 2 possibilités : Coller une pièce de monnaie ou une pile bouton, qui sera la zone de contact pour le réarmement (2 ou 3 mm d'épaisseur) En positionnant la tête en dehors du plateau, cela permet de descendre la buse en dessous de Z0 et le plateau soulève le doigt Pour construire le palpeur, on a besoin de : Un microswitch de souris d'ordinateur Un rayon e vélo diamètre 2mm coupé à 75mm, garder la partie filetée pour fixer la tête Un ressort de stylo bic Un domino pour maintenir le ressort sur le rayon Du scotch double face pour coller le baton d'armement (bout de plastique qui appuie sur le levier) Un morceau de mousse pour faire ressort sous le levier This is a probe sensor for the Dagoma Discovery 200 3D printer it come in place of the inductive sensor and does not need power supply. It is based on simple mouse microswitch. The dowel goes down and is activated when X homing ; no need to add an extra gcode for this. After homing X Y and Z a Z movement down lifts the dowel and re-arms for a next use. this movement need an extra gcode for XY positionning and for lower the hot-end. Two possibilities Stick a coin or a button cell on the build plate (2 ou 3 mm) this will be the contact position for re-arms while positioning the head outside the build plate area (y = 205 mm), this allow the nozzle to move under Z0 and the plate to lifts the dowel for building this sensor we need : A microswitch 12.7 x 5.7mm, very common in computer mouse, this can be wired as NO or NC depending on your firmware A bicycle spoke diam 2 mm cut to 75mm, keep the thread for fixing the head button A spring like those found in pens An electrical connection block for maintening the sping on the spoke A piece of double side tape for maintening the arming stick A piece of foam as lever spring sample of gcode G28 X ; homing X and move down the probe sensor G28 Y G1 X100 Y100 F3000 G28 Z ; homing Z, needed before 4 points probing G92 Z0 G91 G1 Z5 ; move up 5 mm before 4 points probing G29; Detailed Z-Probe G92 Z10 G1 Z4 ; move up over the coin or button cell G90 G1 X10 Y120 ; move over the coin or button cell G91 ; mode relatif G1 Z-5.2 ; move down the hot-end for fixing Z0 and lifts the probe sensor G90 G92 Z0 ; set Z to zero G91 G1 Z8 F3000 ; move up to 8 mm if you encounter an issue to go below Z0, you must probably modify your firmware and increase the Z offset like this define Z_PROBE_OFFSET_FROM_EXTRUDER -10 https://www.youtube.com/watch?v=e5EaKH_T2fQ&feature=youtu.be
With this file you will be able to print Probe sensor for Dagoma Dicovery200 3D printer with your 3D printer. Click on the button and save the file on your computer to work, edit or customize your design. You can also find more 3D designs for printers on Probe sensor for Dagoma Dicovery200 3D printer.