Programmable Animatronic Eyeball Mechanism Demo
thingiverse
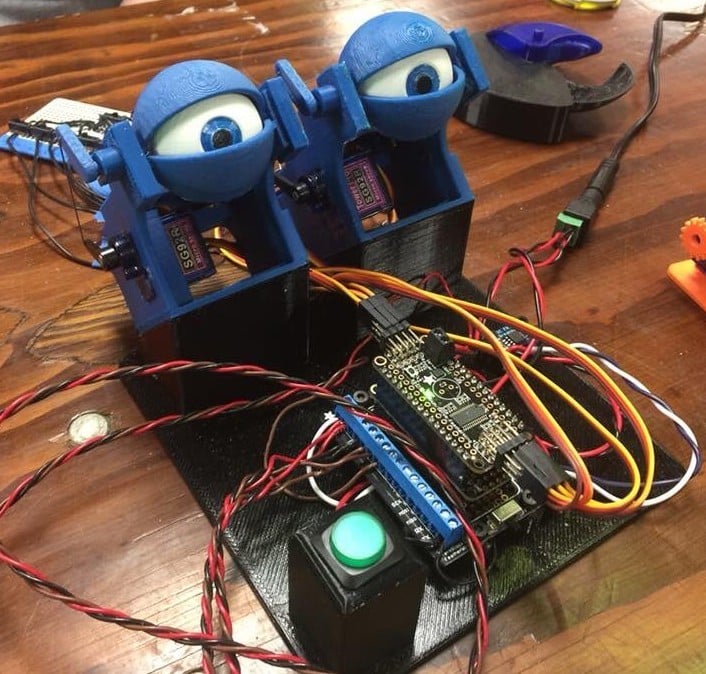
UPDATED 6/28/18 - See Below! As promised, here are the STL files for my animatronic demo unit I showed off at MRRF 2018. These files, combined with the Youtube series I'm currently creating here: https://www.youtube.com/user/jim2386 This project allows you to build a pair of animatronic eyes that can be programmed via puppetry and played back to you as much as you want. Here is a quick demo of how it works: https://twitter.com/JimScuba2386/status/965712794925633536 I want to release this project as a building block/stepping stone for people to get involved in basic animatronics. I do not claim this is the best way to do things, but they do work and they're fairly simple to build/program. :) I still have a few more videos to release in the series and the code, but feel free to print the parts in preparation for the series completion. IMPORTANT: To save on cost, these eyes use filament as your pivot shafts. When you print the "Eyeball U-joint" and "Eyeball mech base" pieces, please print only the 1.75 or the 2.85 files depending on what filament you have available to use as pins. My design uses 2.85, so if you print with 1.75, please let me know if you have any issues. If you want a more robust design, you can use 3mm diameter steel rods from your local hardware store. While I have build a few of these eyes and can confirm they work, please note that this is a work in progress and as people print the assembly and find any fit issues, I may make small tweaks. If you have a set of drill bits to ream out small holes, everything should assemble fine. I use this cheap drill bit set to drill out holes for press fits/clearance fits. They're not fancy, but they work great for 3D prints. I suggest them highly! https://www.harborfreight.com/115-pc-high-speed-steel-drill-bit-set-with-index-61620.html If you have any issues or want to get ahold of me, the best way is to contact me via twitter or DM @jimscuba2386. I hope you guys enjoy making these and learn some new skills along the way! UPDATE 6/24/18: The final video and code has been posted! Get the two codes you'll need for this project here: Analog pot and servo calibration code: https://www.dropbox.com/s/7e0wioezns4st0j/Analog_Pot_Servo_Calibration.ino?dl=0 Eyeball Demo to be Released code: https://www.dropbox.com/s/auap3uugs5fupyw/Eyeball_Demo_to_be_released.ino?dl=0 To see how to assemble everything watch my video series from start to end here: Part 1 - The Brains: https://youtu.be/8oh_uvJ9mG4 Part 2 - The Input Controls!: https://youtu.be/Cm8dbQKGaRU Part 3 - Joints, Toggles, and Pinning...oh my: https://youtu.be/XwMmuf30uH0 Part 4 - Assembling the Input Devices:https://youtu.be/Ihe13GyIyLg Part 5 - Building the Eye Mechanism: https://youtu.be/eF9NeQPDaAU Part 6 - The Code: https://youtu.be/ggKNXxkOOKU Part 7: Addendum - Adding the Reset Button https://youtu.be/EGltZj8opkc I hope you enjoy this project as much as I had creating it! All links to parts used can be found in the description section of each Youtube video. Update 6/28/18: Brad 44 on Youtube (Thanks Brad) pointed out I forgot the momentary button in the writeup. This was added after the initial design so I forgot to add it. The button holder STL and the orientation pictures have been added to this page.
With this file you will be able to print Programmable Animatronic Eyeball Mechanism Demo with your 3D printer. Click on the button and save the file on your computer to work, edit or customize your design. You can also find more 3D designs for printers on Programmable Animatronic Eyeball Mechanism Demo.