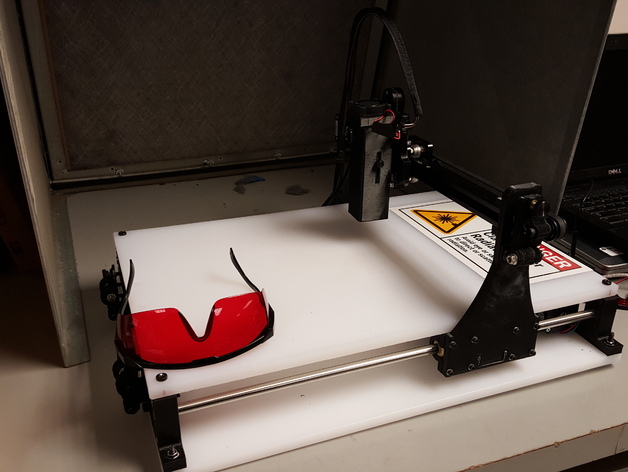
Project: Laserscythe - Another Open Source laser engraver using recycled doohickeys

Project: Laserscythe - Another Open Source laser engraver using recycled doohickeys

thingiverse

This project is basically a laser engraver frame designed to work with leftover TAZ 3d printer pieces and whatever stuff I had laying around. It should be pretty easy to adapt to whatever size or bearing setup you would like to use. The electronics setup is a clone of villamany’s 3dPburner project (http://3dpburner.blogspot.com/ - http://www.thingiverse.com/thing:610934 ), the only real differences are the 3d printed frame and parts. I wanted to go a different direction with most of the pieces, and I wanted to ensure they were all truly available as open source, so I ended up making my own parts. This is the first laser I have made or designed, so there may be some tuning required. It seems to work ok so far though! IMPORTANT NOTE: Class IV lasers are dangerous if operated incorrectly. NEVER use a laser without proper safety equipment, training, and interlocks. By downloading these files you agree to use them only in a safe, enclosed environment with all safety precautions taken. You further agree that you are qualified to build and operate a laser and will attempt no amateur Lasik surgery. Print Settings Printer Brand: LulzBot Printer: TAZ 5 Rafts: No Supports: No Resolution: 0.5mm nozzle Infill: doesn't really matter, I used 85% Notes: I printed this with ABS, but pretty much any material should work. I mean, not ninjaflex, can you imagine how floppy that would be? but anything else should work fine! Post-Printing Instructions: Print all the parts. You will need to download the bearing holders from lulzbot, as they are recycled, link is below. http://download.lulzbot.com/TAZ/5.0.1/production_parts/printed_parts/bearing_holder/ You will need 3 of the motor mounts, 2 of the Y idler assemblies, and 2 of the belt mount assemblies. Now inert the heat set inserts, 4x M3 inserts for the top of the laser duct, 3x in the laser mount carriage, M5 heat sets in the main gantry frame pieces at the lower spar locations and the Idler mount holes, M3 and M5 inserts in the rod mount corner pieces and Y idler frame tops, and 3 M5 inserts in all three of the idler arms. Bolt they axis rod assemblies to the corners of your baseplate (a delrin cutting board or plywood work well here) making sure they are perfectly square and parallel to each other. Next install the bearings on the gantry sideplates, X motor, and X idler. Test fit the Openbuilds rail and mark for length. Cut rail to length as required. The steelcase lower rail should be the same length. Break the end tabs off the steelcase rale, fit it through the slots in the lower section of the gantry, then mark it for the lower mounting bolts. Drill the lower bar holes for the gantry mounts, test fit, then slide the belt mounts on. We will drill those later. With the gantry and Y mount mainly in place, position and mount your Y motor and idlers using the pictures as a general reference. Depending on the size you decide to make your laser engraver, the position will vary greatly. Once all the motion segment pieces are in place, test fit everything and test the movement. Make any adjustments now as needed. Once everything is moving smoothly, you can temporarily fit the top plate. This will generally be the same length, but narrower than the bottom plate, and again will vary depending on your design. Remove the top plate. Locate a mounting point for the laser controller box and whichever Arduino control box you printed. Now you need to start building the electronics. Follow the 3Dpburner project instructions for more details, but basically you are going to build the Arduino Uno and GRBL control board stack, install microstepping jumpers on all three spots in the X, all three spots in the Y, and all three spots in the auxiliary axis, then install the motor controllers. Also install jumpers on the pins that link the Y axis and the Auxiliary axis. Run the motor cables out to the motors, the endstop cables out to the endstops, then assemble the laser controller. DO NOT PLUG THE LASER INTO THE FAN CONTROLL ON ACCIDENT- It will melt. It is annoying when your laser melts, and then you get to buy a new one. Your power supply should power the GRBL board (it does not go to the Arduino as well, the Arduino will receive power through the CNC shield GRBL board leads), the Laser board and any fans you have inline. You should have a panel mount power switch of some sort, as well as a panel mount USB hole. The emergency stop gets mounted on the outside of your enclosure box and routed back to the GRBL pins. Now you are ready to assemble the laser! The laser goes into the laser heat sink, which goes in the cooling duct. The duct blast shield gets screwed to the outside of the duct, and the entire assembly gets bolted to the laser mount block with 4 M3 10mm bolts. The cooling fan goes on top with 4 additional M3 bolts (8mm?) Now the laser carriage gets assembled. The two openbuilds mini wheel plates sandwich the spacers and the mini wheels, eccentric spacers go into the larger holes. Adjust the wheels for a snug fit on the openbuilds extrusion and test fit. Now bolt the Laser carriage to the front plate with 4 M5 bolts (8mm?) and insert two 30mm bolts with nuts in two of the holes in the backside to act as belt mounts (see pictures). Bolt the Laser mount plate mounting bracket onto the carriage, and then the laser itself onto the mount bracket and carriage, and install the assembly on the X axis. Run the belts, attach with paired zip ties (see picture) to each of the belt mounting lugs, then tension. Next, run both Y axis belts to the Y axis belt mount blocks to gauge the approximate location. Mark the holes, then slide the blocks back to drill as needed. Insert the long M5 bolts and nuts into the belt mount blocks, install the belt ends with the zip ties, then route the belts as required. Finally, Mount the Y endstop block where it will contact the lower crossbar at some point before it smashes your laser electronics. (or after, if you really like smashing laser electronics) You will then want to install the Arduino controller drivers, load the 3dpburner firmware, and install the laser control software. The last step is to put awesome stickers on everything. Lasers work better with stickers. Mostly complete Bill of materials with links: A possible source for the lower crossbeam:http://www.ebay.com/itm/ORIGINAL-STEELCASE-Front-To-Back-Rail-Kit-f-Lateral-Files-ONE-PAIR-BLACK-/121894212251 The M5 heat set inserts:http://www.mcmaster.com/#94180a361/=11ffepy You will also need M3 heat set inserts Endstops:https://ultimachine.com/content/microswitch-ss-3gl13pt Endstop wire:https://ultimachine.com/content/mechanical-endstop-wire-harness-set Openbuilds Vslot Linear Rail 20mm x 20mm, cut to desired length.http://openbuildspartstore.com/v-slot-linear-rail/ Mini V Wheel kit (4x)http://openbuildspartstore.com/xtreme-mini-v-wheel-kit/ Mini v wheel gantry plate 2xhttp://openbuildspartstore.com/mini-v-gantry-plate/ 4x 6mm spacershttp://openbuildspartstore.com/aluminum-spacers/ 4x 6mm eccentric mini wheel spacershttp://openbuildspartstore.com/eccentric-spacer/ Low profile M5 screws - a bunch of m5 30mm and at least 4 35mm ones.http://openbuildspartstore.com/low-profile-screws-m5/ 10mm M5 cap screws and T slot nuts – several 4x 50mm long M5 bolts for the Y belt mounts) M5 washers as needed M5 nuts of some sort. An openbuilds idler wheel kit (for the X axis)http://openbuildspartstore.com/smooth-idler-pulley-wheel-kit/ M4 bolts and bearings for the Y idler arms (4x, plus 2 large washers, no idea what size they are, they came out of the junk drawer)) 3d printed LM10UU bearing holder (4x) and the bearings to go with themhttp://download.lulzbot.com/TAZ/5.0.1/production_parts/printed_parts/bearing_holder/ 2x 10mm rods, sized to length Nema 17 stepper motors (3x) 17HS13-0404Shttp://www.ebay.com/itm/331601550532 Belts and 20 tooth pulleys (2x sets of 2, resulting in one spare belt and pulley )http://www.ebay.com/itm/2Pcs-GT2-20-tooth-Timing-Pulley-and-2-Meter-GT2-Belt-For-3D-Printer-US-Seller-/272144818974? The Laser (Nichia NDB7875 445nm 9mm Laser Diode In a Copper Module With Leads )http://www.ebay.com/itm/171342793909?_trksid=p2060353.m2749.l2649&ssPageName=STRK%3AMEBIDX%3AIT The laser housing 12mm Laser Module Aluminum Heat Sink 58mm Long Blackhttp://www.ebay.com/itm/321977504330 Power supply (any 12v 3-5 amp PSU should be fine)http://www.ebay.com/itm/201416076217?_trksid=p2060353.m2749.l2649&var=500601000049&ssPageName=STRK%3AMEBIDX%3AIT The laser controller (yeah, I know it's from China, if you can find a domestic one that works, go for it)http://www.ebay.com/itm/251627812234 The Laser Lens 405-G-2 (appears to be out of stock, but that same model lense in the right housing should be readily available.http://www.ebay.com/itm/170709204904 Estop switchhttp://www.ebay.com/itm/170520711348?_trksid=p2060353.m2749.l2649&ssPageName=STRK%3AMEBIDX%3AIT Panel mount USB extenderhttp://www.ebay.com/itm/301237338300?_trksid=p2060353.m2749.l2649&ssPageName=STRK%3AMEBIDX%3AIT 40mm 12 volt cooling fan (2x - one for laser, one for laser controller)http://www.ebay.com/itm/181576035965 a 12v fan for whatever arduino enclosure you end up using The Arduino UNO and GRBL CNC Shield V3.0 kithttp://www.ebay.com/itm/Arduino-CNC-kit-CNC-Shield-V3-0-uno-R3-4pcs-a4988-driver-GRBL-compatible-CGYG-/141837420633?hash=item21062b4859:g:k38AAOSwJcZWg6SD about 12 motherboard style jumpers - something like these:http://www.ebay.com/itm/10x-2-54mm-motherboard-dvd-cd-rom-harddrive-jumper-/250957603440?hash=item3a6e3d2270:g:OK4AAOSw~bFWHQuI Assorted wire, connectors, DC power jacks, On/off switches How I Designed This I started with a basic idea of what I wanted to end up with. A laser engraver that could work on something about the size of a standard piece of paper, that could use up some of the pile of spare 3d printer parts leftover after other upgrades I have laying around. I knew I wanted to use the 500mm rods from a Taz, and a piece of openbuild extrusion that I had laying around, and I knew that I wanted to use arduino control and a 445nm laser. From there I took a look at various projects that might meet my needs, and decided eventually that there wasn't one that already existed that would work. I liked the general overall approach of the 3dPburner project, and eventually adopted it's electronics design, but I didn't lke the parts themselves, or the fact that it wasn't fully open source. I decided to make my own parts that would accomodate taller objects to be lasered, would have better cooling and shielding capacity, and easier assembly. From there I just drew out the parts and extrudede them in the modeling tools, then exported them to STL files and printed them out. Project: Laserscythe - Another Open Source laser engraver using recycled doohickeys Project Name: Project: Laserscythe - Another Open Source laser engraver using recycled doohickeys Overview & Background: By completing this project, I hope to have a Class I/V diode based 445nm controllable etching laser that will be able to etch and or cut a variaty of surfaces, including wood, leather, cloth, plastic, mirror backs, and other non metallic non reflective objects. Objectives: Students would be expected to learn a variaty of things from this project, including robotic implementations and the Arduino, Laser focusing and optics, particularily pertaiining to diode lasers. Laser safety, the physics of laser cutting, and converting art or graphics into usable gcode designs. Mechanical troubleshooting skills may also occur. Audiences: Class i/V lasers are Dangerous. You can blow a hole in your eyeball instantly if you do not respect the safety requirements and proceed appropriatly. This project should only be attempted by serious, mature students who understand and comprehend the risks and the safety precautions required. I would estimate high school or above, however you will know your students better than I. Subjects: Science, Math, Art, Computers, Robotics, Physics, Potentially shop or home ec. Skills Learned (Standards): There can be two approaches to this projects. A student build / operate project, or a teacher constructed, student operated device. In the former case, students would learn 3d prrinting techniques, robot assemly techniques, arduino code adjustment, how to convert an image or a CAD drawing to gcode and the mathmatics behind that code, the art of laser engraving and how different materials react to lasers - Why do woods with higher resin content etch better, etc. ). From a science persepctive, the scientific method in determining what materials will work best for what applications is applicable. From an artestry perspective, learning to draw for etching. what techniques will work well on wood, will those same techniques work on leather, etc. A student should also have an understanding of how to connect the laser safely to a computer, how to make the computer talk to the laser in the first place, and a very thorough understanding of lasers, laser wavelengths, laser classes, laser safety, effects of lasers on different materials and why some lasers are better than others at cutting certain materials, how reflective surfaces damage diode lasers, and potentially Pulse Width Modulation control and how it works. Lesson/Activity: The very first lesson should be an overview of lasers, laser safety and the differences between a traditional gas tube laser and a solid state diode laser. Lesson two should go into specifics, looking at the difference between CO2 cutting and Diode engraving lasers, why a cutting laser is not suitible as an engraving laser and vice versa, and should cover the types of injuries that can be sustained while operating a laser and how to check for signs of eye damage with an amsler grid. You want to reinforce safety safety safety from the outset. a lesson on 3d printed objects, how to insert heat set inserts, 3d printer safety and part removal techniques will be appropriate if students will be making the part. Assemble the laser. frame integration and testing with the diode not installed may be accompleshed by students. Once they have the general structure assembled and in theoretical working order, it may be connected to a computer loading the Arduino IDE, laser control software and image editing software: with a suitable computer available, follow the tuning and installation steps found here: http://3dpburner.blogspot.com/p/lectronic.html Once you have control of the mechanicals and a proper saety enclosure available, a teacher can integrate the diode. Please note it is easy to destroy the diode on accident if you static discharge into it, or plug it into the wrong interface. Subsequent lessons should focus on turning student content into laser etched objects, and exploring different art techniques. You can also turn this into an economics or fundraser project. Make laser etched keychains / etc. with your school logo on them and sell them to raise funds for clubs and whatnot, etc. Duration: The laser itself can be built once the parts are sourced in a few days. Once you have a working laser, the project can be short or long in duration, depending on the needs and objectives of the class. A 1 day "make stuff with a laser" class, or a multi week, "make a project with a laser" module. Preparation: This project will require about $300 worth of parts and a working USB equipped computer running windows of some sort. You will also need a cabinet or a box to act as a laser enclosure. Your students should go into this with a very clear understanding of the risks a Class IV laser poses, you should require signed permission slips before participating in this activity, and you should have a stock of materials on hand to etch once you have the laser completed. You will also need a suitable 3d printer and knowledgable operatiors. A lulzbot Taz works well for the printong portion. References: http://3dpburner.blogspot.com/https://en.wikipedia.org/wiki/Laser_engravinghttp://www.instructables.com/id/DIY-Laser-Etching-Machine/https://www.youtube.com/watch?v=__5CpKlr4-4http://laserpointerforums.com/f53/hit-eye-1000mw-445nm-blue-laser-69469.htmlhttp://www.wickedlasers.com/laser-tech/blue_light_hazard.htmlhttp://www.laserpointersafety.com/news/news/nonaviation-incidents_files/a6392218b70b40d2334943c4fc97e677-206.php#on Rubric & Assessment: This can really vary by your course objectives. for an art class, turning in a completed laser etched piece of art completed by the student would meet requirements. For a physics class, testing on knowledge of lasers, wavelengths, types, etc. would be appropriate. For a robotics class, turning in an assembled and working laser would be sufficient. Handouts & Assets: http://3dpburner.blogspot.com/p/files.html - Laser control files and image conversion programs.

Download Model from thingiverse

With this file you will be able to print Project: Laserscythe - Another Open Source laser engraver using recycled doohickeys with your 3D printer. Click on the button and save the file on your computer to work, edit or customize your design. You can also find more 3D designs for printers on Project: Laserscythe - Another Open Source laser engraver using recycled doohickeys.