Project: Strength of Materials
thingiverse
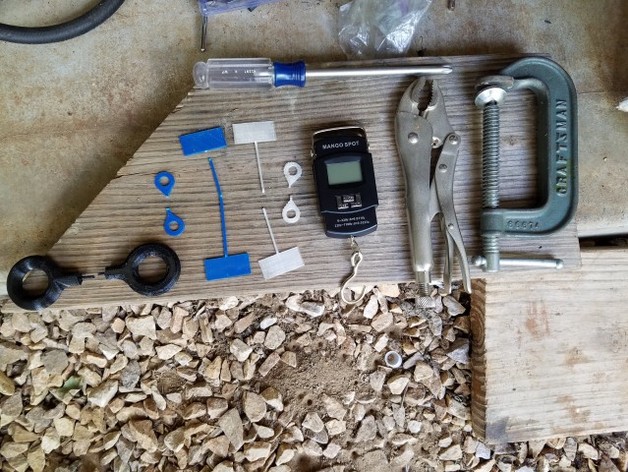
When you get down to really designing useful things to be 3D printed with plastic, you get to a point where you need to start considering material properties. Plastics have an extensive range of tensile strength, hardness, modulus of elasticity, and dozens of other material properties. A couple of the classic engineering tests are tensile strength break test and a compression strength break test. In this project we will do some material testing.https://youtu.be/4dgdBdbmbTE Print Settings Printer: Generic Prusa i3 Rafts: No Supports: Yes Resolution: 0.2mm Infill: 100% Notes: I did 100% infill for the parts I printed, 30-40% infill should be fine. Remember you want the part that will be broken to be solid, so adjust your shell thickness to make that part solid. I printed on several different printers Prusa was PETG, Fabrikator had ABS loaded, and a Replicator had Makerbot PLA. How I Designed This I came up with some properties I wanted to test for. Next I looked up some preliminary numbers on different plastics I was using. In my photos/videos: Black = PETG Blue = ABS Clear = PLA I designed the pieces with a cross section that should be able to be broken within the range of my spring scale. I also took into consideration that I desired the pieces to break in a relatively concentrated location on each piece. Loaded up Fusion 360 and sketched out some cross sections. The large breakers are present in the thing files in case you have some professional breaking gear like you would find in a university materials science lab. Standards NGSS CCSS Overview and Background Materials strength is key to designing parts that will take stress. This was particularly interesting to me because I have already designed some 3D printed parts that failed spectacularly. See Photo Below To get a practical appreciation for the strength of the materials you are using, a student can participate in pushing some materials to the limit through testing the material to the failure limit. Objectives Learn how to calculate cross sectional area. Learn what materials properties are (e.g. tensile strength, modulus of elasticity, compressive strength, etc...) Learn how materials strength works hand in hand with design loads for a finished product. Learn how to test and calculate material strength. Audience Main application: STEM of all ages, High school physics, college physics lab, materials science, engineering. Really any age could benefit from this project. The demonstration could enlighten all ages. Standards MP.4 - Model with mathematics. (HS-ETS1-1), (HS-ETS1-2), (HS-ETS1-3), (HS-ETS1-4) RST.11-12.9 - Synthesize information from a range of sources (e.g., texts, experiments, simulations) into a coherent understanding of a process, phenomenon, or concept, resolving conflicting information when possible. Lesson Plan and Activity Step 1 - Background and Knowledge Discuss materials science and property of materials. Discuss / review the cross sections and how to calculate their area. Discuss how the breaking tests work to show real world material properties. Print and use one ore more of the pieces for as a visualization aid. Using published material properties for materials you are 3D printing, develop an estimated break strength for pieces that you have as visual aides. Step 2 - Design and/or build Option 1: Have students design a piece to break and print it. Option 2: Print the pieces thing files. Step 3 - Practical testing Option 1: Weigh all the pieces and measure them, record results. Assemble the breaking setup. The piece to be broke needs to be anchored to a secure place, if breaking the point load piece, it requires the anchor to have less strength to resist the test. If breaking the bigger pieces you will need an anchor with more resistance strength - I used a agricultural disc or harrow for my anchor Anchor -> breaking piece breaking piece
With this file you will be able to print Project: Strength of Materials with your 3D printer. Click on the button and save the file on your computer to work, edit or customize your design. You can also find more 3D designs for printers on Project: Strength of Materials.