Promega Bottom Z Belt Clamp
thingiverse
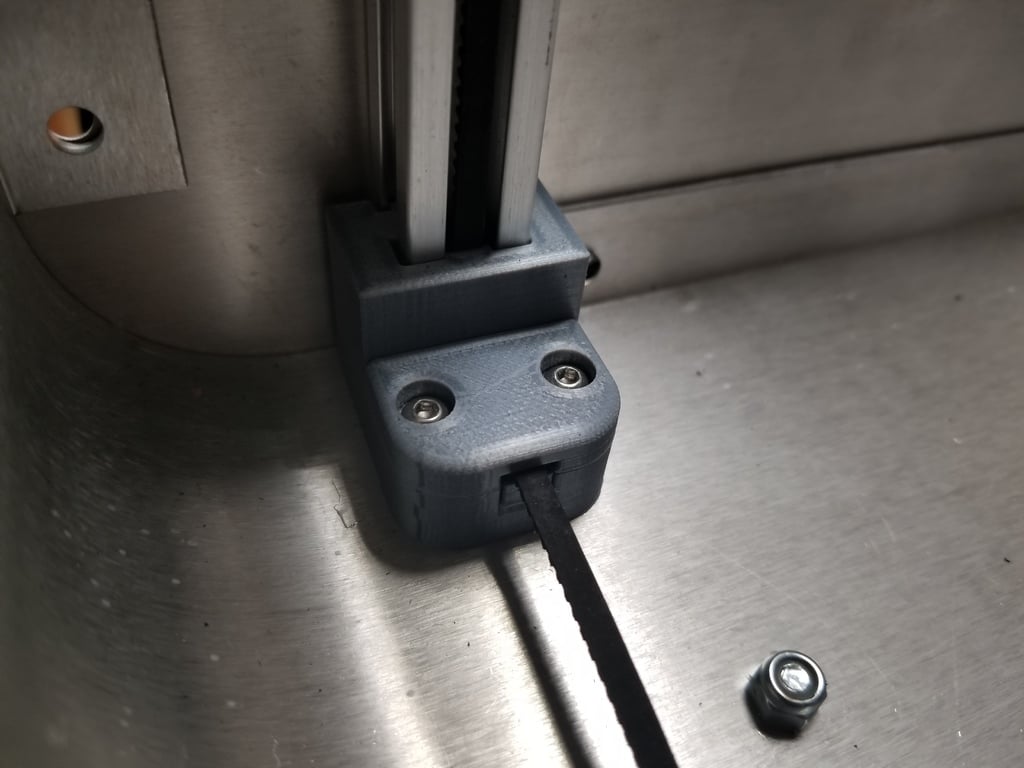
This design is specifically tailored to assist users in effectively managing belt tension on the M3D Promega printer. After experimenting with numerous prototype designs, I have determined that this particular layout works best and achieves optimal results. Cutting the end of your belt at a slight angle enables you to easily guide it through the necessary part. Depending on the specific printer model used for printing the part, some thread may be required to help draw the belt into place. **Readme for Promega Bottom Z Brackets V8 2018** **Bill of Materials (BOM)** **Parts needed - 4 per bracket:** https://www.amazon.com/gp/product/B077CJV3Z9 * M3 screws x 12mm length - 2 per bracket for the top caps https://www.amazon.com/gp/product/B01AXUSLYS * M3 screws x 8mm - 2 per bracket for the bottoms https://www.amazon.com/gp/product/B07C6DKT3H **Printing Requirements:** Print 4 each of - Belt Tension Cap Z Bracket GT2 Tooth Profile (print this model rotated at 45*, which seems to help the toothed profile print cleaner) Z Bracket GT2 Body Optical Probe Side (this has a wire pathway underneath) This is optional; otherwise, you can print 4 of the main model. Print 3 of - Z Bracket GT2 Body (or print 4 if not using above) **Securing the Bed:** Secure your bed around the Z20 area by placing a binder clip on the centermost belt under the bed (attached to the stepper motor). **Replacing Extrusions:** One Z extrusion at a time, remove the three screws located on the outside frame. Remove the screw from the bottom of the frame. This will allow you to slide the extrusion upwards enough to remove the old piece and install the new one. For further instructions, refer to the Promega Launchpad. **Installing New Brackets:** You might find it easier to slide the belt into place before attaching the bracket to the extrusion. Reinstall the extrusion screws. Install 2 M3x8mm screws into the Z brackets from the bottom of the frame. Place the toothed section of the slide in place with the number 1 facing out. Pull tension on the belt when you are ready. **Attaching Top Caps:** With one finger holding the belt down, place the top cap into position. Insert it at a 45* angle and rotate it downward. Screw into place with 2 M3x12mm screws. Repeat this process for all sides. If your bed level is off by 0.5mm, you can flip the toothed belt piece around. Make sure to mark the belt before doing so, allowing you to return to the same tension. **Additional Resources:** Heat Insert Install guides https://www.lulzbot.com/learn/tutorials/heat-set-inserts-tips-and-tricks **ADDED:** Optical Limit Switch Z Slider with Fin, and End Stop Holder **TODO - Design bracket that uses the ShadowHawk Optical Z Stop Switch
With this file you will be able to print Promega Bottom Z Belt Clamp with your 3D printer. Click on the button and save the file on your computer to work, edit or customize your design. You can also find more 3D designs for printers on Promega Bottom Z Belt Clamp.