Promega Carriage Replacement Modular
thingiverse
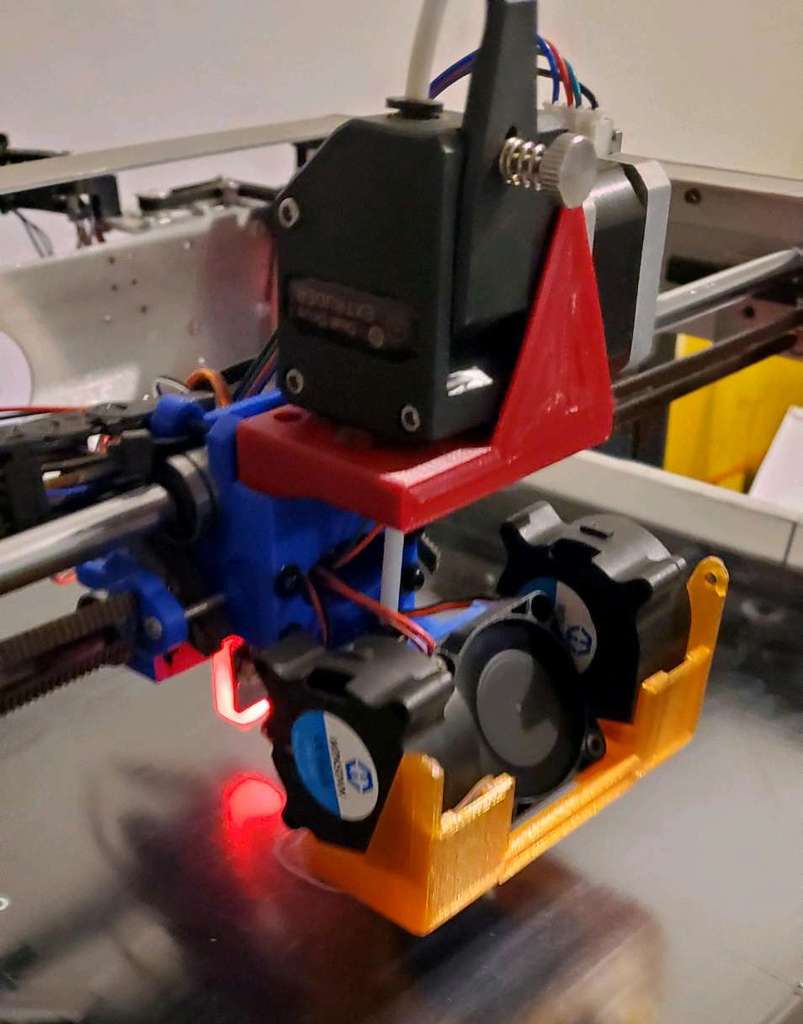
So this is my second attempt I made one for resin that I did that was not modular and attempted to not use bearings. While it did work. Not everybody has resin that can print at the resolution to use that. But that did prove out the basic layout. I actually got this printer to see what the best way to improve it was since it was so bad. I have looked at the Shadowmega while a great mod to the printer is overkill for most people to invest into a printer that most people do not like to begin with. So this mod is attempting to reuse as much of the existing hardware as I can (not the motors and extruders they are awful). I do not necessarily think the guide rods are bad in a printer so I am attempting to retain them. You can use any LM10uu linear bearings that you have. In theory you can use a single in the top and single in the back. I am using 2 19 mm long in each or even use extra long ones purposely made it as generic as I could. This should be the only specialized part needed. All the rest are m3 screws and nuts. However there is one optional part that I have include which is the bltouch mount. while this is not mandatory most people myself included would want to use this as its a more standard auto leveling method. The belt attachments I have include can be adjustable. thread the belt through place a zip tie around the belt so it can not pull back through the slot. You can then use m3 screws as long as you want to attach to the side of the base. I have slots inside the base to place m3 nuts to reinforce these. I plan to use m3 by 30mm to give me some tension adjustment. But shorter screws can be used. I have made them 14mm tall but may increase the distance a bit in the future. The front plate is made to use a microswiss/CR10 ender 3/5 or BMS hotend I prefer these over the j head style hotends as they are more secure. Feel free to take this plate and modify it for any hotend you would like. I made this as modular as I could to make it easy to remix. Direct drive mount is pretty generic and can be remixed however you like but works with a BMG style turned 90 degrees. I have included a y axis extension I used a similar one in my testing earlier that I secured with double sided tape. But have not mounted this one yet. This one in theory take the 3 mm long m3 on the right side gantry mount and replace it with a 5 mm long m3 to secure it and has a slide to adjust it. I have not mounted it yet so has not been tested in the current iteration. Admittedly I have not figured out what to do with the x axis as of yet. I will probably just use double sided tape to relocate it until I can find a more elegant solution. The front plate is threaded so that a Hero ME mod can be used and I included a base that I did a quick cutdown on. This can be threaded on using only the top 2 screws of the hero base. And then any combination of hero fan shrouds you like can be used. The screw hole on the back is a best guess to attach the cable chain but I suspect it is to low have not tested it yet so may make an update in the future to correct this. So while this is not a no cost solution I basically looked through my spare parts and these were for the most part low cost parts that most people have on hand. This makes this a very low upgrade cost. Shadow mega requires a lot of cutting and customization that most people are just not comfortable doing. This does not specifically require things such as linear rails or hemera though could be easily modified for such. One thing I do rely on screw that thread into pla parts though did include m3 nut inserts in key areas. While some do not trust these I have had no issues with them. If you do find one that either strips out or does not hold well. what I typically do is put a drip of superglue into the hole thread in a screw immediately. Wait 5 min then back it out and rethread this typically makes the superglue into a thread shape and have never had one of these backout after this. I think I have them all oriented correctly. the only one that requires supports is the base. and only between the "legs" you can print it with no supports if you sit it the same way up but in the first print this put the layer lines in the direction of the stress on the bearings this broke almost immediately. Keep it in the orientation That I have it and it is plenty strong. Example of the supports in the images. Update 4 Added a taller belt tensioner to better fit the belt width. Added a thinker front plate with a bit more stiffening. Added a Hero me with bit more clearance to use with the thicker plate. Update 3 Added a reinforced motor mount I printed most parts at 35% infill this one I had printed at 50% still saw some flexing. added 4 reinforce points and printed at 90%. Update 2 The y end stop that I originally had is not needed I have removed the file and the image of it. I was asked about a plate to mount a hemera. I have uploaded a base and front plate specifically for the hemera.
With this file you will be able to print Promega Carriage Replacement Modular with your 3D printer. Click on the button and save the file on your computer to work, edit or customize your design. You can also find more 3D designs for printers on Promega Carriage Replacement Modular.