Prometheus Mount for SeeMeCNC Rostock Ball Joint Platform +/- Accelerometer Option
thingiverse
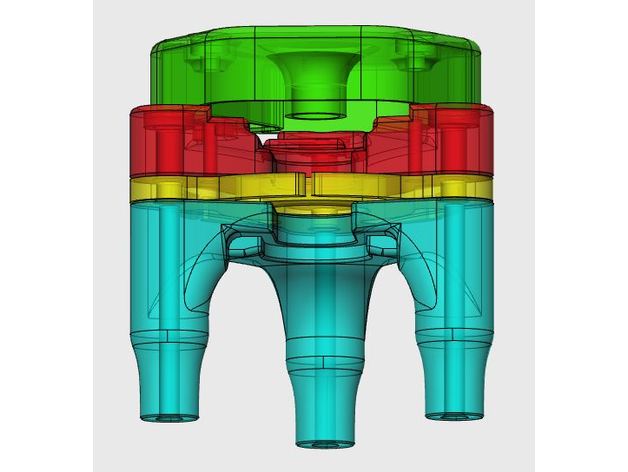
This is a setup for mounting the Prometheus hot end on the SeeMeCNC Ball Joint Platform with or without the Accelerometer plate. All models (no matter how shaggy they may be) in 123D Design, including a roll-your-own size master for the Stand Off, are included. Remember to print a Whip Clip if using an accelerometer. 3 Main Components 1. Standoffs ranging from 32mm to 55mm in 1mm increments 2. Centre Plate 3. Clamp Plates for Accelerometer or non-accelerometer There is also a Cover for the accelerometer clamp plate. Hardware Required: Qty 6 M4 x 16mm Button Head Socket Head Cap Screws to attach platform to bottom of Stand Off and Clamp Plate to top of Stand Off. Additional Hardware for Accelerometer Option: Qty 3 M3 x 6mm Cap Screws to attach cover. Qty 3 M3 x 6mm Male Female Standoffs to attach Accelerometer to Clamp Plate Qty 1 Push to Connect PTC retainer of some sort i.e. Lanyard PTC for 4mm Guest Fitting Cartridge Recommended Tools M4 x 0.7 Tap M3 x 0.5 Tap (accelerometer) 4mm (#21) Drill - to size holes in platform 3.3mm (#30) Drill to clean out holes for tapping the Stand Offs 3mm (#31) Drill to size holes in Cover (accelerometer) 2.3mm (3/32) Drill to clean out holes for tapping the accelerometer Clamp Plate 1/2" half round file for fine tuning holes and slots to fit hot end Stand Off Sizing Decide if you will assemble the platform with the ball joint "barbells" on the bottom or top. Bottom orientation allows shorter (and presumably stiffer) standoffs for a given amount of protrusion below the axis, but places fan shrouds closer to bed surface. For a given nozzle size and zone setup of Prometheus, decide how much protrusion below platform you want. Leave enough clearance for fan shrouds and ball end arms to clear bed clips!! For arrangement determined above, measure distance from top of platform to top edge of lower groove of hot-end. This distance (in mm) will be the size of Stand Off model. Components to Print a Stand Off from the StandOffs_32_55mm.zip file a Centre Plate either Clamp_Plate_71210_Accel or Clamp_Plate and a Cover_Plate_71210_1 if using accelerometer. Assembly Suggestions Holes are sized a little small, so drilling before tapping and assembly is recommended. Relieve edges and finish slots in clamp plates to 12mm and 16mm. Fit into hot-end grooves should be snug, but ensure hot-end seats fully into Stand Off and Clamp Plate throats. No more than gentle squeeze is required to bring holes into alignment with platform. Clock the Clamp Plate so that its throat is not aligned with that of the Stand Off in order to maximize stiffness. Note orientation of accelerometer board to Stand Off and Clamp plate in photos (sorry, no proper assembly pics) to facilitate wiring. The photo with black and white wires shows arrangement for running LED wiring. Avoid "pinching" pins of fan connector headers for grip. Heater wires will likely want to run right between them. Providing a little (~1cm slack in heater and thermistor wires allows disassembly of hotend without desoldering or removing Bowden tube. Gently feed Bowden tube through centre hole while "opening" (or closing) accelerometer plate relative to Clamp Plate like a clam shell. Be sure to seat Bowden tube and insert PTC retainer before mounting accelerometer board.
With this file you will be able to print Prometheus Mount for SeeMeCNC Rostock Ball Joint Platform +/- Accelerometer Option with your 3D printer. Click on the button and save the file on your computer to work, edit or customize your design. You can also find more 3D designs for printers on Prometheus Mount for SeeMeCNC Rostock Ball Joint Platform +/- Accelerometer Option.