Prop Balancer
thingiverse
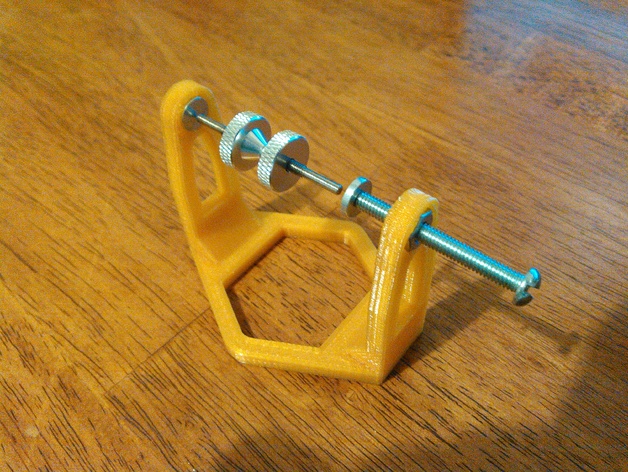
I ordered a balancer without any stand, so I went to my garage and found parts to model around. I used these 9x2mm magnets: https://www.fasttech.com/p/1140103 and made the space for the magnet to be glued into 10mm in diameter and 2mm deep. The nut and bolt was just something random I found in the garage and I don't know like the actual name for them (like M3, M4, M5) but from flat to flat on the nut is 8.65mm and the bolt is 4mm thick, I made the spot for the nut again 10mm and 3mm deep with the hole for the bolt at 4.5mm. I hope I oversized the spots enough for anyone to be able to find random parts around their house. I made it so there are about 53-54mm of floating space and it's 57mm from magnet to magnet (at most open position on screw). Another thing, I used this prop balancer from HobbyKing https://www.hobbyking.com/hobbyking/store/uh_viewItem.asp?idProduct=55640 and I don't know if I was sent the wrong one but the ends were flat. I put it on a drill and spun it on a grinding wheel but I might have been better off making one myself with again any random long bolt (head cut off and ends grinded to a point) around the house and some nuts. Edit: Changed the orientation (it was showing up on it's side). Print Settings Rafts: No Supports: Yes Resolution: 0.2 Infill: 50-100% Notes: I printed this in PLA at 50% infill, and while it does work as it came out the pillars to where the magnet and nut go looked very hollow with a 3 shell wall. If you're comfortable with your material keep it at 50% but if you think it'd be weak then I'd go for the 100% infill.
With this file you will be able to print Prop Balancer with your 3D printer. Click on the button and save the file on your computer to work, edit or customize your design. You can also find more 3D designs for printers on Prop Balancer.