
Prop Gun | Revolver - Single Action
prusaprinters
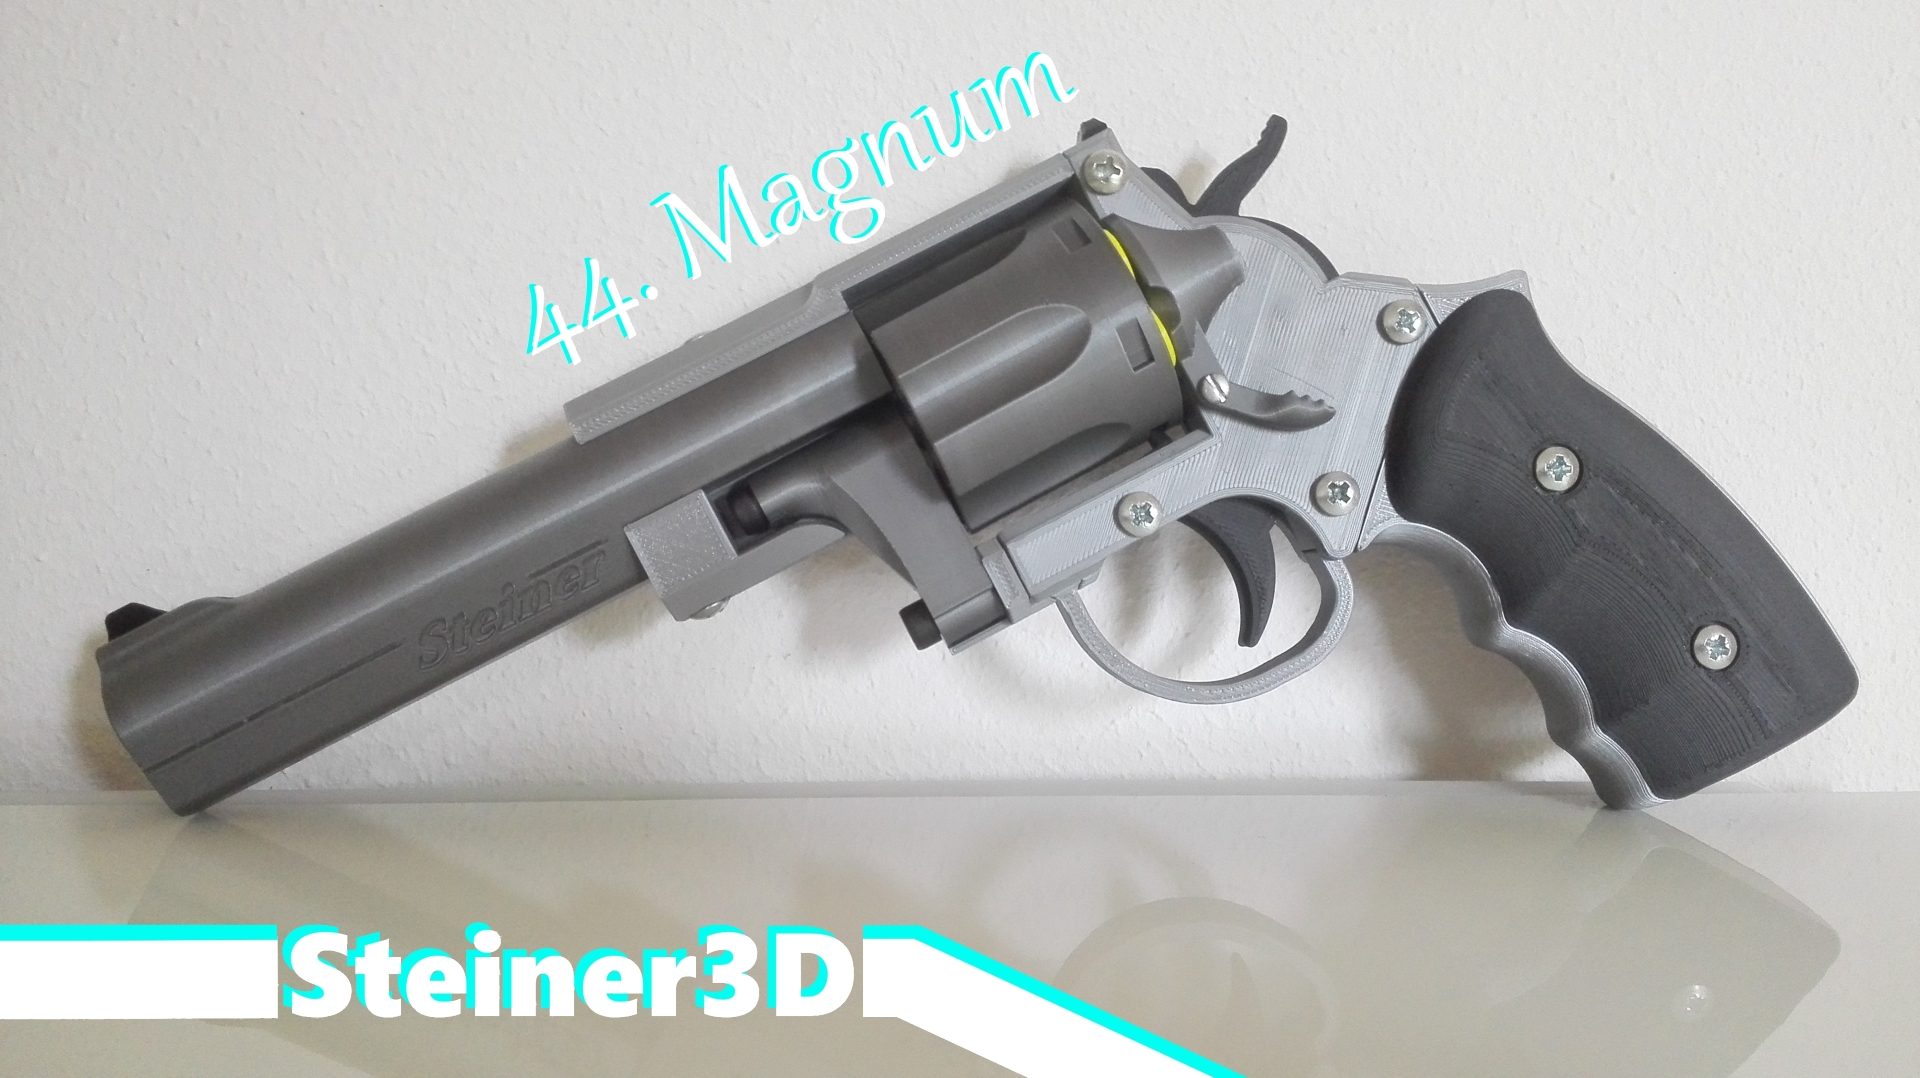
<p><strong>Fun fact, I know from a Prusa employee that one of those is (or was) in their offices and they played with it ^^</strong></p><p>Below is a huge description of the project, that accumulated over time when I uploaded this on thingiverse. It may look overwhelming, but there is also some valuable information to make sure that your print will work fine, so better check it out!<br>You can find the explosion diagram among the download-files, which contains the parts list, screw data and how to assemble it.<br>Have fun printing!<br>~DeSteiner</p><p>Of course the design has some flaws, like tons of different screws for example. It's been 4 years since I designed this and my skills have improved since then. Someday I will revise the design and make a V2 of this. Until then, this is all I got for you.</p><h3>Print settings:</h3><p>Printer: Prusa Mk2<br>Rafts: no<br>Supports: no<br>Resolution: 0,15mm<br>Infill: 8-15%<br>Filament brand: Prusa, Prusament, Hatchbox<br>Filament: PLA, ABS</p><h3>Introduction:</h3><p>Hi there! Ever wanted a Prop Revolver, that can do more than just look nice? I got you covered! I present to you, what is likely one of the only mechanically working 3d-printed Prop Revolvers available, especially for free!</p><p>Go here to see it in Operation: <a href="https://i.imgur.com/DBUVUkF.gifv">https://i.imgur.com/DBUVUkF.gifv</a><br><img src="https://media.printables.com/media/prints/276918/rich_content/78138958-85da-4cb7-ba85-4cac9abb1b85/img-animated.gif#%7B%22uuid%22%3A%22d3f8b7f0-614f-4929-b7cc-45891e07b44c%22%2C%22w%22%3A600%2C%22h%22%3A338%7D"><br>It is quite well balanced, see here: <a href="https://i.imgur.com/xiP3Ovo.gifv">https://i.imgur.com/xiP3Ovo.gifv</a><br><img src="https://media.printables.com/media/prints/276918/rich_content/d5fdd427-6770-46b4-a496-352f107e0fa9/dual_wielding.gif#%7B%22uuid%22%3A%2257f8a334-8ad7-4a16-ba7e-4dc7590bd97c%22%2C%22w%22%3A600%2C%22h%22%3A338%7D"><br>Update#3 introduced the Speed-Loader!: <a href="https://i.imgur.com/fzdfx1J.gifv">https://i.imgur.com/fzdfx1J.gifv</a><br><img src="https://media.printables.com/media/prints/276918/rich_content/f2faa207-5319-4632-b221-747f652f86db/speed_loader.gif#%7B%22uuid%22%3A%22961422a4-3906-4add-bbec-6eea1d02a6da%22%2C%22w%22%3A500%2C%22h%22%3A338%7D"><br>Go here for full-size, high-resolution assembly drawing: <a href="https://i.imgur.com/3nPtyNg.jpg">https://i.imgur.com/3nPtyNg.jpg</a></p><p>You made one? Awesome! Don't hesitate to share it with us!</p><h3>Core Features:</h3><ul><li>Fully printable without MultiMaterial, Supports, Rafts or whatever!</li><li>Single Action: pulling the Hammer will turn the Cylinder to the next round. Cylinder and Hammer lock into position. Pulling the trigger releases the hammer, internals are reset for next operation.</li><li>Cylinder can be flipped out on the side to exchange the rounds</li><li>Customizable: Ergonomic grip or Classic grip, long barrel or short barrel, combine as you like!</li><li>Rifled barrel, though you can hardly see it (I put my phone in the space left free for the cylinder to take that photo)</li><li>A2 size assembly drawing (check out the parts list on that one for further information)</li></ul><h3>What you need:</h3><ul><li>1 M5x50 screw</li><li>1 M5x30 screw</li><li>11 screws meant for plastic/wood (labeled "ST#x#" in assembly drawing) with a length of at least 20mm and 4mm in diameter, 3mm core diameter. Cut them to shorter screws according to the parts-list on the assembly drawing (link in introduction). Leave the tip flat after cutting, but screw an unmodified screw into every hole before, the screws will not be able to cut the thread themselves anymore afterwards.</li><li>1 screw meant for plastic/wood (labeled "ST#x#" in assembly drawing) with a length of at least 8mm and 3mm in diameter, 2mm core diameter. Also mentioned in parts-list.</li><li>at least approximately 73m of filament</li><li>1 spring as it is mentioned in the parts list. You will have to find a pen with a suitable spring, but it should be pretty common.</li><li>M5 thread cutters for the Cylinder and the Body. Just screwing the M5s in without cutting a thread may work, but I have not tried it and would not recommend it.</li><li>ABS/PETG filament: I heavily recommend you to use ABS for the Cylinder-Stopper, as PLA is not as flexible and will change shape under load pretty quickly. Also recommended for Trigger, Hammer and Hammer_Rotator. These likely work with PLA too (at least at first, long term is another story), but I have not tested. Many have reported, that PETG works too!</li></ul><h3>Further Information and Tips:</h3><p>It took me around 4 weeks to design this Revolver from scratch until the object was printed and worked as intended. I googled the dimensions of a 44.Magnum cartridge and built everything around it, while the design is entirely fictional. The result is extremely satisfying!</p><p>The grip feels pretty ergonomic in my large hand. The weight distribution makes it easy to flip it in your hand.</p><p>All STL files are oriented correctly out of the box! Be sure to use a large brim for the barrel to make sure that it stays in place tightly. You may also want to decrease the printing speed a little, as quick movements may cause the tall object to start shaking, resulting in bad surface quality. To avoid edges of parts lifting from the heatbed, I would recommend a brim an all parts.</p><p><strong>Print slowly</strong>, as print speed directly affects print quality. Faster printing results in smaller hole diameters, for example. I generally use 20mm/s for outer perimeters, 25mm/s for all other perimeters, and 30mm/s for infill. Super slow, I know, but I get great results and am usually not in a hurry when it comes to printing.</p><h3>Afterwork to do:</h3><ul><li>The latest version of the Cylinder Stopper should work right out of the box. If not, use a lighter or some other heat source to bend the Cylinder-Stopper and the leaf spring of the Flip-Switch until they work best for you.</li><li>I advise you to test the operation multiple times before screwing it together!!</li><li>The triangular nose that keeps the Flip-Switch tight to the Body-Top will also need some afterwork until it can move smoothly.</li><li>For better adhesion I have added a bigger first layer to the gear of the Hammer, as a brim does not work properly in these tight spaces (so basically a manually added brim directly in CAD). <strong>This needs to be removed after printing!</strong> The space between the teeth should be completely free!</li><li>I have printed ALL parts with a brim. Especially the Body is suspect to warping due to many overhangs.</li></ul><h3>Known Issues: can I fix my problem?</h3><ul><li>Hammer stops half way: adjust nose of Hammer-Rotator until it can slip over the teeth of the Cylinder-Rotator.</li><li>Cylinder spins over the notch, resulting in misalignment with the barrel: Either you are pulling the Hammer too fast, or the Cylinder-Stopper is not applying enough force. Try adjusting the bend with a heatsource.</li><li>(Cylinder spins not well during Hammer pull: Try cutting off a little bit of the Cylinder-Stopper ||| fixed in 2nd Update)</li><li>(Cylinder spins not far enough to lock into a notch: Your Hammer-Rotator may be worn off. Check if there is material missing of the nose. Pulling the Hammer a little faster should work, but a fresh print is the best solution ||| fixed in 2nd Update)</li><li>Cylinder does not fully move back into the Revolver when it is flipped in after reloading: Caused by ammo not fully inserted and crashing into the body. Should not cause any damage, though. Just flip it back out and in again. If the barrel is pointed slightly downwards, chances of success are greatly improved.</li><li>(Pulling the Hammer pushes the Flip-Switch back, eventually releasing the Cylinder to the side: May happen rarely. Reason is the Flip-Switch leaf spring being to soft ||| fixed in 1st Update)</li><li>(Loose Cylinder-Rotator: Apply multiple layers of tape to make less room for movement. You can use glue, too, but if something breaks you will have to print the entire Cylinder again ||| Less likely since 2nd Update)</li><li>Flip Switch stays in position of unlocked cylinder: On the Flip Switch there is a little nose, that makes sure it stays close to the surface of the Body Top, as the screw alone does not provide enough stiffness. However, it is very likely that this nose comes out in oversize. Carefully cut or grind it until it moves without much resistance when screwed gently to the Body Top. You may also use heat on the little leaf spring to bend it and generate more tension, increasing the torque that will reset the Flip Switch to its original position on its own after operation. Remember, do not screw the Flip Switch too tight, there should be space for movement!</li></ul><h3>Conclusion:</h3><p>I really hope you like this thing as much as I do!<br>As always, feel free to comment and please share if you made one!<br>This was a LOT of work, so do not use or publish this thing anywhere without mentioning me as creator.</p><p>I am looking forward to see your makes!<br>Happy printing!</p><p>~ DeSteiner</p><p> </p><p> </p><h3>Update News:</h3><h5>1st Update 24.09.2018 - Classic and Customization</h5><p><img src="https://cdn.thingiverse.com/assets/01/be/ec/65/45/IMG_Revolver_Classic.jpg"></p><p>This is the first major update.</p><p>Some may prefer a classic grip over an ergonomic synthetic one. So there you go! Just print the Revolver_Body_Classic and you are able to install the Revolver_Grip_Classic, changing the looks to fit the good old days! Therefor the Body is also slightly smaller, in case the ergonomic version does not fit on your printbed at full scale.</p><p>You think the Revolver was big enough before? Me neither! Introducing the extended Barrel with an additional 30mm in length! Furthermore, both Barrel Versions now come with an optional reinforcement rail, which makes the side profile look wider, as well as with engraved Caliber 44.Magnum text on the other side.</p><p>Want to add some color to your sights? With the new Revolver_Korn_Bicolor files you can print just the tip in some neon color, while the fixing stays within the style of the rest of the gun!</p><p>Further improvements:</p><ul><li>added notch on Handguard to reduce wobble after assembly. May not fit on first try, tweak carefully.</li><li>increased strength of the leaf spring on the Flip_Switch. The Switch should reset its position more reliable now.</li><li>Slightly reduced diameters in Cylinder_Lever to reduce wobble and added chamfers on opposite side to ease bolt insertion.</li><li>changed Hammer and Trigger geometry for smoother operation.</li></ul><h5> </h5><h5>2nd Update 27.10.2018 - Internals reliability and quality of life improvements</h5><figure class="image"><img src="https://cdn.thingiverse.com/assets/2f/39/87/72/09/internals.jpg"></figure><p>This is the second update, now featuring 3rd.Generation Internals.</p><p>To me the operation was not reliable enough. Pulling the hammer a little too fast would turn the cylinder too far, pulling it very slowly would not rotate the cylinder far enough. No matter how you tuned the Internals after printing them, they would never work consistently. To get it working at all, a lot of tuning on the printed parts was necessary. This had to end!</p><p>Introducing the new Internals of the Third Generation!<br>Through research plus trial and error, the root causes of previous inconsistencies were identified and eliminated. The amount of time to tune the parts after printing is drastically decreased, as most parts can now be used and installed right out of the box (chapter "Afterwork" is updated accordingly)</p><p>Change notes:</p><ul><li>changed Revolver_Body_Top to hold the cylinder more tightly, reduced afterwork for Flip_Switch installation;</li><li>major overhaul of Cylinder_Stopper as the model is now pre-bent (which you had to do by hand before), spring length was increased to lengthen the life time by reducing mechanical stress, nose geometry now catches the Cylinder earlier;<br>-the Hammer_Rotator now does not get stuck on the ammo upon flipping the Cylinder out anymore, it is slightly pre-bent, slides back over the gears more easily, increased flexibility;<br>-changed Revolver_Cylinder to have chamfers on ammo insertion side;</li><li>changed Cylinder_Rotator to fit nicely into the Cylinder -> no more glue or tape necessary, also changed geometry so the angle of rotation is increased;</li><li>Finger surface of Flip-Switch is narrower now to prevent ammo from getting stuck while emptying the Cylinder;</li><li>reduced spring strength of Hammer lock mechanism;</li><li>reduced spring strength of Trigger lock mechanism;</li></ul><p>You care about the technical background? Well, here's the story:<br>Previously much more force was needed to fully cock the Hammer, as the locking springs of the Hammer and the Trigger were too stiff. Once you overcame the spring force, all the applied force is suddenly converted into a quick rotational momentum of the Cylinder. To prevent the Cylinder from turning too far, the Cylinder_Stopper needed to be very powerful, which resulted in increased wear of moving parts. The greater friction also caused the Cylinder to not turn far enough when the Hammer was cocked very slowly and carefully to prevent the quick rotation. With 3rdGeneration Internals, the operation is now very smooth as less force is needed. This eliminates the quick rotation and allows for a weaker but more reliable geometry of the Cylinder-Stopper. Therefor, successful catching of the Cylinder in the correct postion is now much less dependent on Cylinder rotation speed.</p><p> </p><h5>3rd Update 05.11.2018 - Speed Loader accessory</h5><figure class="image"><img src="https://cdn.thingiverse.com/assets/56/6d/f7/59/8d/speed-loader_branded.jpg"></figure><p>But DeSteiner, reloading this Revolver takes ages! Ain't there a faster way?? Fear not, as of Update#3, now there is! And it only consists of two parts! No springs, no screws, no supports, no glue, just true DeSteiner fashion.<br>Reloading the speed loader is not faster than reloading the Revolver itself, obviously. To counter that, you might as well print multiple of them, at least if you are a fanatic ;D<br>You can find a link to a gif in the introduction to see it in use.</p><p>Parts are sl_body and sl_button. Be sure to print the Body slowly and with enough cooling, to prevent bad printed springs. I tested multiple leaf-spring dimensions, and these seem pretty stable while having relatively low impact on operation smoothness.</p><p>It needs some force to assemble it, so be careful. The hexagonal holes must be aligned with the two spring pillars.</p><p> </p><h5>4th Update 20.12.2018 - Display stand & minor adjustments</h5><figure class="image"><img src="https://cdn.thingiverse.com/assets/4d/fa/d1/35/c8/revolver_disp-stand.jpg"></figure><p>Tired of leaning your fancy Revolver to a wall, a shelf, a mug or a candle because you don't want it to just lay around flat? So am I!<br>So there you go, print yourself the all new Display-Stand to show off what you printed! As always, parts are easy to print with flat surfaces and no supports. For the left and right support you can play around with infill patterns and leave away the solid top and bottom layers, this is how I got the Hexagons in there. If you want to include the color changes of the label into your gcode and you own a Prusa, go here: <a href="https://www.prusaprinters.org/color-print/">https://www.prusaprinters.org/color-print/</a></p><p>Minor adjustments:</p><ul><li>Cylinder, Cylinder-Rotator and Cylinder-Lever now have chamfers on their bottom surfaces to counteract "Elephant Foot Symptom" and reduce afterwork. Also I expect to see less comments of "Cylinder and Rotator not fitting together" now. I printed both parts again and just as before, I had zero issues, perfect fit.</li><li>The Hammer is now available without the manually added brim, too. This should avoid future misunderstandings where people forgot to cut this brim away.</li><li>Body and Handguard now have chamfers to better slide together.</li><li>Both Bodies now have deeper screw holes for the Body-Top screws. These four screws can now be all of the same length and used in any length from ST4,2x9 to ST4,2x14.</li></ul><p> </p><h5>5th Update 28.01.2019 - Assembly Drawing Update</h5><p>Everyone had a hard time finding the right P#x# screws. That is no more! I have looked into the industry standard and all screws are now correctly named according to ISO 7049.<br>Happy shopping!</p>
With this file you will be able to print Prop Gun | Revolver - Single Action with your 3D printer. Click on the button and save the file on your computer to work, edit or customize your design. You can also find more 3D designs for printers on Prop Gun | Revolver - Single Action.