Prusa Bear Raspberry Pi Mount for Armor Heatsink Case
thingiverse
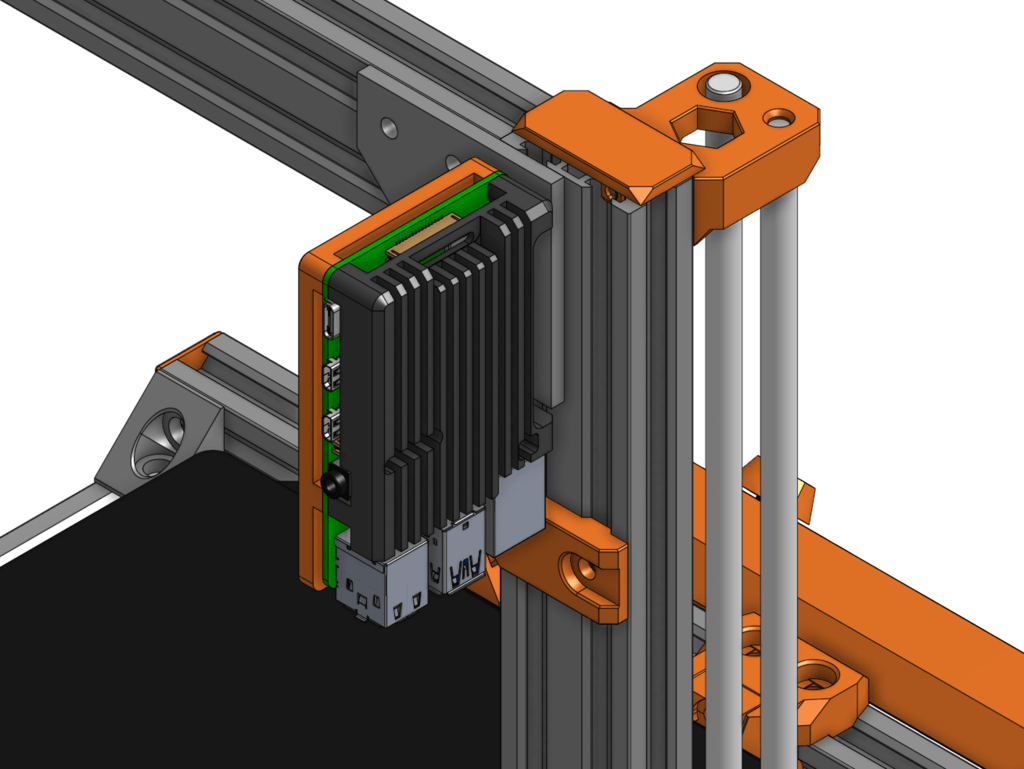
## Moved to Printables.com **[This design has moved over to Printables.com](https://www.printables.com/model/93184-armor-case-raspberry-pi-mount-for-prusa-bear).** If you have any comments or questions please post them on Printables. ### Looking for a version for the stock Original Prusa Frame? I've uploaded a [version for the original frame](https://www.printables.com/model/211361-armor-case-raspberry-pi-mount-for-original-prusa-m) on Printables. ## Description This is a **Raspberry Pi mount for the [Prusa Bear](https://github.com/gregsaun/prusa_i3_bear_upgrade) frame that works with heatsink type cases**, such as the Sertronics [Armor case](https://shop.pimoroni.com/products/aluminium-heatsink-case-for-raspberry-pi-4?variant=29430673178707) or the Joi-It Armor Case. It works with Raspberry Pi 3 and 4. You just have to have the right case respectively. ### Features - Works with Raspberry Pi 3 and 4 - Works with any type of Armor-style case that uses M2.5 screws - Prusa Bear-style aesthetics - Short path between Raspberry Pi and the electronics case allows very short USB cables - STEP file available for easy remixing ### Additional Hardware - 1 x Armor case for the Raspberry Pi - 4 x M2.5x10 screws (comes with Armor case) - 1 x M5x8mm screw (button head or flat head preferably) - 1 x M5 T-Nut (works with drop-in T-nuts or regular slide-in T-nuts) ### Assembly Assemble the top part of the Armor case and the mount using the M2.5 screws so that the Raspberry Pi is sandwiched between them as shown in the picture below. You don't need the bottom of the Armor case. Install the mount on the back side of the left vertical aluminum 40x20 extrusion (just above the electronics case) using the M5 bolt and T-nut. If you use a slide-in T-nut you will have to temporarily remove the top cap of the extrusion.  ### Print Settings Use PETG or another material with a higher temperature resistance in case the Pi gets a little warm. You can use the [Bear print settings](https://github.com/gregsaun/prusa_i3_bear_upgrade/blob/master/doc/print_settings.md) using 3 to 4 perimeters, 4 to 5 top/bottom layers, 20% or more infill, and 0.2mm layer height. Print the part with the flat side down as shown in the picture below. No support material is required.  ### Post-Printing The four M2.5 holes are floating counterbore holes. They're closed so that they can be printed without support. You need to punch them through using an M2.5 crew or a 2.5mm drill bit or anything pointy. It's just a single layer.
With this file you will be able to print Prusa Bear Raspberry Pi Mount for Armor Heatsink Case with your 3D printer. Click on the button and save the file on your computer to work, edit or customize your design. You can also find more 3D designs for printers on Prusa Bear Raspberry Pi Mount for Armor Heatsink Case.