PRUSA i3 10mm rod Z Stop Adjustable Assembly
thingiverse
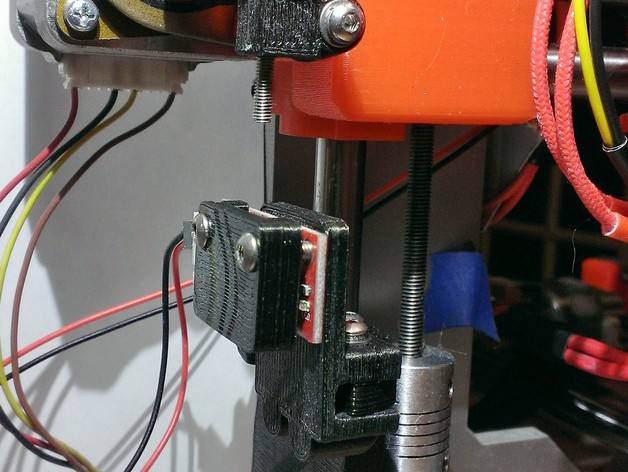
This thing was made with Tinkercad. Edit it online https://www.tinkercad.com/things/4d3s0mbFAR3 UPDATE May 2015: I suggest gluing the thumb screw mount to your existing motor mount part, just to make sure it doesn't loosen or move. (acetone for ABS, Gorilla Glue for PLA). This design my seem "over done" but it is fully adjustable and rock solid stable, I RARELY have to re-adjust my Z-Stop height ... accurate Z Stop height is critical to print quality, this design really helps. Also, self tap the thumb screw into its mount, the thread fit must be tight with friction, this eliminates any play and prevents vibrations from moving the setting ... simple & accurate, no silly springs, nuts, guide rods, etc... Lastly, it is important to use the outer cover on the micro-switch, this stabilizes it's position, normally this switch is only located by its solder leads which bend, allowing it to move around preventing accurate position control. Note in my photos, that there is a tie wrap installed around the 10mm guide rod, this stablizes the Z Stop bracket, I strongly recommend using this tie wrap. Adjustable Z stop for PRUSA i3 with 10mm rods. A clamping bracket allows accurate positioning X-Y of micro switch. Multiple parts are used in order to make prints faster, stronger, and without any support material (I would rather assemble parts instead of picking away at support material!!!). A micro switch mounting clamp is included to prevent switch from rocking on it's solder tail leads, improving accuracy & repeatability of the stop position. The accurate X-Y positioning allows the Micro Switch metal springy to be removed, this increases Z positioning accuracy and repeatability. Instructions Print all parts without support. Assembly is designed to only use one metal nut (IMO metal nuts are almost always unnecessary, only complicate designs, and are difficult to print pockets for), if necessary, drill threaded holes with 2.5mm drill, then self tap M3 screws into holes. One metal nut is used under the adjuster knob to firmly protect against the knob spinning on its M3 adjustor screw (M3 x 30 or M3 x 35). Note that a tie wrap is used on base mounting bracket to further secure / stabilize the bracket by tie wrapping it to the 10mm Z rod.
With this file you will be able to print PRUSA i3 10mm rod Z Stop Adjustable Assembly with your 3D printer. Click on the button and save the file on your computer to work, edit or customize your design. You can also find more 3D designs for printers on PRUSA i3 10mm rod Z Stop Adjustable Assembly.