Prusa i3 Mk2.5-Mk3 Extruder, Body and Cover R3 rework to align filament path - Eliminates squeaking - Improves flexible filament reliability
myminifactory
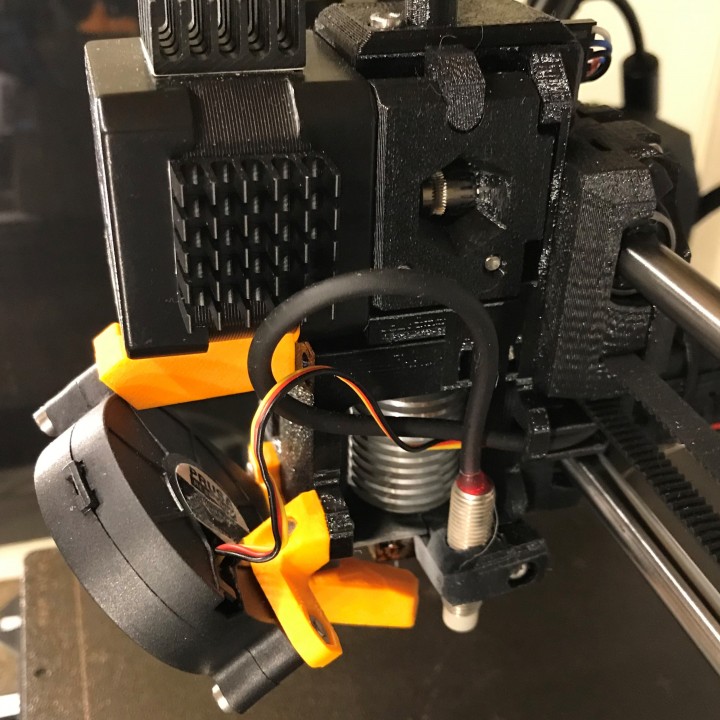
View full zoomed-in size of all pictures!\r\nSTEP files are included for CAD users.\r\nExtruder Body and Cover are marked "N3" to distinguish them from Prusa official parts.\r\nUpdated for Mk3S and R4 parts here: https://www.myminifactory.com/object/3d-print-86329\r\nThis model is reworked from the R3 parts released by Prusa in August 2018. The R3 changes have overall been fantastic, but I had found that the filament path in the printed parts was not well enough aligned with the bondtech gears, and filament was always rubbing against the inside of the extruder (PETG squeaked horribly on my printer). The idler tension adjust also didn't seem to do much, since the drive gear of the bondtech pushed filament against the extruder itself (my printer was able to load, push, and unload filament with the idler door completely swung open). In order to fix that, I completely remodeled the top half of the extruder body in Fusion360 (as I wasn't able to just move the filament path from Prusa's .step file).\r\nThese are drop-in parts for the Prusa i3 Mk3, and require no other changes other than disassembly and reassembly of the extruder. The new part cooling fan brace mounts with the original hardware (M3n nut and M3x25 screw) for the 2nd mounting hole on the part cooling fan, with the addition of an M3n nut and an M3x10 screw from the spare hardware bag.\r\nMoving the filament path (and the filament sensor) was the simplest solution; the alternative would have been to move the stepper motor itself (in the opposite direction, of course). This would have required modification of the X-Axis Carriage, however.\r\nWhile I was at it, I also tweaked several other small things and added a mounting boss to the extruder cover, and designed a new support bracket for the fan. It just didn't feel right having only a single screw (and an interference fit with the nozzle) holding the part cooling fan/blower in place!\r\nI have been using and printing with these parts installed on my Mk3 since August, and they have worked wonderfully. Update Jan 9, 2018: I have also had the chance to print flexible TPU filament with these parts and am happy to report that they worked flawlessly, even when I was trying to get the filament to fail or jam or spit out the side of the extruder.\r\nSee the pictures for more in-depth information and views of the changes that have been incorporated into these parts. A list is also included below.\r\nExtruder Body (Required)\r\nMoved filament path to align with bondtech gears and extruder stepper motor.\r\nReduced height of the PINDA sensor holder, just for that little extra bit of airflow. Note that in my four months of printing and testing, this has not introduced any heat related PINDA sensor "sag", even while printing ABS and PETG in an enclosure.\r\nAdded a slight teardrop shape to the main filament path directly above the bondtech gears. This should help ensure that the filament path is free of obstructions from sagging overhangs after printing, with less post-processing.\r\nExtruder Cover (Required)\r\nMoved filament path to align with bondtech gears and extruder stepper motor.\r\nAdded mounting point for new Blower Brace 2.\r\nCleaned up some weird edges in the model around the bottom nut capture hole for the fan nozzle.\r\nBlower Brace 1 ("nozzle-fan-holder", Optional; R3 Part will fit fine)\r\nAdded a rib connecting the two screw hole bosses. This probably doesn't do much, but any additional stiffness here can't hurt. Plus, it's still a really easy print.\r\nBlower Brace 2 (Optional)\r\nNew part (it was probably fine, but an unused mounting hole on the fan itself just was bothering me)\r\nPart Cooling Nozzle (Not necessary if the R3 nozzle has already been printed - there's no fitment difference in this model)\r\nAdded two bridge features inside the nozzle to improve slicing and bridging in a critical airflow path.\r\n\r\nEdit December 29, 2018: Uploaded v1-1 version of the extruder body. This fixes a very minor modeling error that might have affected screw clearance in a thru-hole for the lower-right motor screw hole.
With this file you will be able to print Prusa i3 Mk2.5-Mk3 Extruder, Body and Cover R3 rework to align filament path - Eliminates squeaking - Improves flexible filament reliability with your 3D printer. Click on the button and save the file on your computer to work, edit or customize your design. You can also find more 3D designs for printers on Prusa i3 Mk2.5-Mk3 Extruder, Body and Cover R3 rework to align filament path - Eliminates squeaking - Improves flexible filament reliability.