Prusa i3 mk2 "Tom's Dolly Clone" Mean Well LRS-350-12 Cover
thingiverse
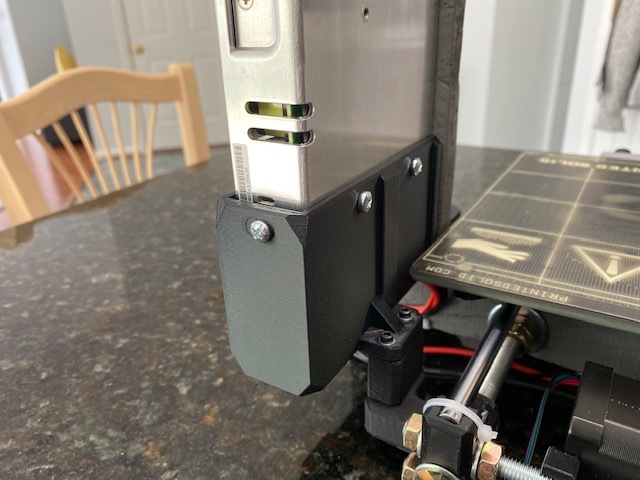
***EDITED 5/18/2020*** Final edit- because I fitted it all up, and REV5.2 holder (and the REV1.0 spacer) worked perfectly, as you can see from the pics. I really hope this helps out someone else's build too, I know it really put that professional finishing touch on my Prusa MK2S clone. Print of the main part (the power supply holder itself) took 5 hours and 45 minutes, on normal MK2S settings, 20% infill, rectilinear infill type, standard PrusaSlicer all other settings, PLA. The 2 screws to mount the power supply holder to the spacer and ultimately to the PSU Y part are m3 socket cap head, 40mm length, with a washer and standard m3 nut. I used m4 phillips screws to mount the power supply holder to the power supply (make sure you get the right length so that you're not hitting anything inside the power supply unit if your screws are too long. You can trim screws with a dremal and cutoff wheel.) For the rear side m4 screw, I used 4 flatwashers to take up the space between the power supply and the holder. ENJOY!!! ***EDITED 5/16/2020*** REV5.2 is uploaded. This is it- after printing 5.1, I modded 7 things: 1) Screw holes added to the side for mounting the power supply. 2) Back side screw hole moved 1mm to the left. 3) Power switch slot made slightly larger vertically. 4) Power switch slot made 1mm narrower. 5) Latch tab made 1mm smaller vertically. 6) Left side step removed from front, next to latch tab to allow for circuit board fit. 7) Ledge adjusted to the right of the latch tab, for proper power supply fit. I also verified, the power socket is a perfect fit- but I did not put the screw holes there, as your power supply jack might be different from mine? This is a simple job to drill as needed once the power supply jack is fitted up. ENJOY! This design is no longer a "Work in progress", it is ready to use! ***EDITED 5/13/2020*** REV5.1 is uploaded. I modded the brace gusset which connects the power supply holder body to the bottom brace mount. The REV5 version was too tall, and this just barely scraped the side of the heated bed. It has much less rise now, so it should clear with ease. All that remains to be tested now is the latch, the screw hole, and the openings for the switch and power jack. ***EDITED 5/05/2020*** REV5 is here!!! Much work went into this dude.. Fixed many cosmetic flaws (important for looks of course, but also speed: areas where, due to cutting and slicing back together- if the thickness did not match, it would cause the printer to make extra moves to build up the alignment differences- and these cost printing time!) The spacer is now a seperate .stl file too- so if you have a printer where the Z-axis parts screw into the frame itself and stop flush- you won't need to print the spacer... Enjoy! ***EDITED 5/04/2020*** Just uploaded REV4.. Today I printed REV3- it fits the power supply perfectly in dimension- and also between power supply Y mount and frame. BUT- it needs to be raised higher to clear the Z-axis motor mount screws on the same side as the power supply... So, REV4 comes with a 22mm spacer needed to clear these screws. Then, I had to make the cover part itself taller, so that the mounting screw hole and the latching tab would work when the power supply is properly seated in the cover. The REV3 test print was printed in PLA, with 20% grid infill, and it seemed very strong.. SO, REV4 should now be good, but, I want to print this thing out once more to completely make certain. ***EDITED 5/03/2020*** Modded cosmetics only- cleaned up the lines a little bit, and also added .3 mm of extra space beyond the exact 30mm powersupply accommodation (side-to-side) that was there previously. There was already a little bit of extra accommodation for the other direction (front-to-back). ***EDITED 5/02/2020*** The original upload was too short distance-wise from the frame to the power supply mount. I have fixed this today, and re-uploaded REV2, which has been quadruple checked for the proper distance. I have not printed this out yet- but, this part will be the one I print soon. Once I've verified with the actual printed object, I'll remove the "Work in process" banner from this page. Folks, I've been enjoying building a Prusa i3 mk2 clone. Seems I'm a few years behind the curve; it's 2020, and most people seemed to do these clones in 2017? Mean Well has retired their old 12v power supply, and now makes the LRS-350-12. It's the same exact specs on paper, but the footprint is different: it is thinner, but longer- so the original Prusa power supply mount/cover part does not work. It seems that most other people using this power supply are using it for a Prusa i3 mk3, which uses a different frame. I really think the power supply should be mounted to the frame, as it appears to be a supporting member. I'm a total newb at CAD design for 3d parts- I used tinkercad, and modded the original Prusa part .stl file. It is not perfect looking- but I tried to make it look presentable enough- should fit perfect too. Note- to get my XYZ to calibrate with the Prusa firmware in my printer, I had to move the y-axis/frame to about 97mm from the frame- that's down from Prusa's recommended 100mm. This means that the the power supply holder here was designed for that setup.. I lengthened, thinned the mount, and also removed screwholes that would not work (you'll have to drill the side ones).. I moved the back screw hole to the right place. Print at your own risk- I've not been able to test this yet, as I haven't yet completed my printer! Just sharing- in case someone else benefits from this work (or can make it better).. When I looked, there was no such part available for this power supply for a mark 2! Enjoy!
With this file you will be able to print Prusa i3 mk2 "Tom's Dolly Clone" Mean Well LRS-350-12 Cover with your 3D printer. Click on the button and save the file on your computer to work, edit or customize your design. You can also find more 3D designs for printers on Prusa i3 mk2 "Tom's Dolly Clone" Mean Well LRS-350-12 Cover.