Prusa i3 MK3: Bearing clips for Y-axis (bed)
prusaprinters
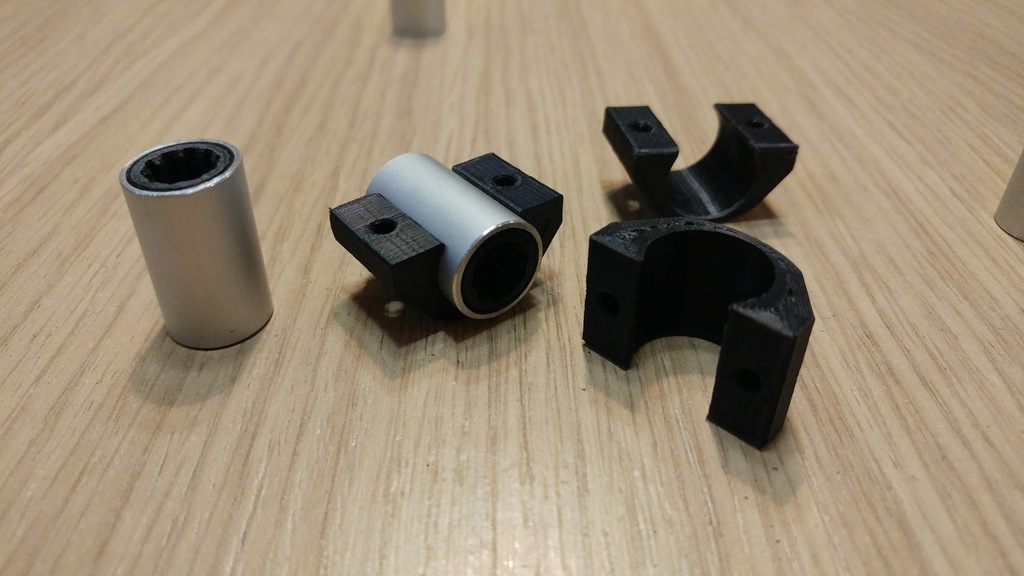
<p>This version of the LM8UU bearing clamps for the Y-axis (print bed) is modified to fit Prusa MK3.</p> <p>The differences from the source model (<a href="https://www.thingiverse.com/thing:1848700">https://www.thingiverse.com/thing:1848700</a>) are:</p> <ul> <li>This model is cut down in order to pass over the V-cuts in the frame of the MK3.</li> <li><p>Unlike on MK2, the Y-rods holders of MK3 are<strong>not</strong> obstructing the bearing holders any more, so now you can use the same model for all 3 bearings. There are 2 variants regarding grooves:</p> </li> <li><p>For a grooved version of the bearings.</p> </li> <li><p>For a smooth (non-grooved) version of the bearings (for DIY PLA printed bearings with a smooth metal tube shell). There are 2 variants regarding nuts:</p> </li> <li><p>Without nuts</p> </li> <li><p>With M3nS nuts <strong>IMPORTANT NOTE REGARDING THE NUTS</strong><br/> <em>After 18 months of using the version without nuts I had absolutely no issues. However, some people reported bearings getting loose over time. Perhaps it was due to bad or inappropriate filament, because the screws were overtightened, or they just had bad luck. They asked for a version with nuts, so I also added the version that uses two M3nS nuts. I have not tested that one, so please leave your feedback in comments .</em></p> <p>Use M3x16 screws with hex socket drive. Longer ones will be hitting the V-cuts on the frame, and the shorter ones will not provide enough grip.</p> <p>Mounting</p> </li> </ul> <hr/> <p>Mount and tweak the bearings using a spare rod, or just do it before you fix the Y-rods to the frame.</p> <ol> <li>Align the bearings and use a rod to align them perfectly.</li> <li>Place the clips and tighten them just before the point where the tension starts affecting the movements of the rod.</li> <li>If you notice that after tightening screws the rod becomes more difficult to move, release the screws and ensure that the bearings are aligned.</li> <li>Repeat 2 and 3 until you get the best tension where the rods are stil free to move. <strong><em> Do not overtighten the screws, or you will destroy the threads on the plastic clips, so you will need to print new ones. Printing an extra spare clip at the beginning might be a good idea.</em></strong></li> </ol> <p><strong><em>IMPORTANT: Print in PETG or ABS using 6 perimeter shell to prevent wear-out.</em></strong></p> <p><strong>* NOTE:</strong> The photo shows my custom LM8UU PLA core bearings (<a href="https://www.thingiverse.com/thing:2202854">https://www.thingiverse.com/thing:2202854</a> with 8.15/13.22 mm diameter and 10 teeth) in 15mm/1mm aluminum tube shell.*</p> <h3> Print Settings</h3> <p><strong>Printer Brand:</strong></p> <p>Prusa</p> <p><p class="detail-setting printer"><strong>Printer: </strong> <div><p>i3 MK3</p></div><strong>Rafts:</strong></p> <p>No</p> <p><p class="detail-setting supports"><strong>Supports: </strong> <div><p>No</p></div><strong>Resolution:</strong></p> <p>0.20</p> <p><p class="detail-setting infill"><strong>Infill: </strong> <div><p>20%</p></div></p> <p><strong>Notes:</strong></p> <ul> <li>6 perimeter shellrn- ABS or PETG</li> </ul> </p></p></p> Category: 3D Printer Parts
With this file you will be able to print Prusa i3 MK3: Bearing clips for Y-axis (bed) with your 3D printer. Click on the button and save the file on your computer to work, edit or customize your design. You can also find more 3D designs for printers on Prusa i3 MK3: Bearing clips for Y-axis (bed).