Prusa i3 MK3 Fan Filters
thingiverse
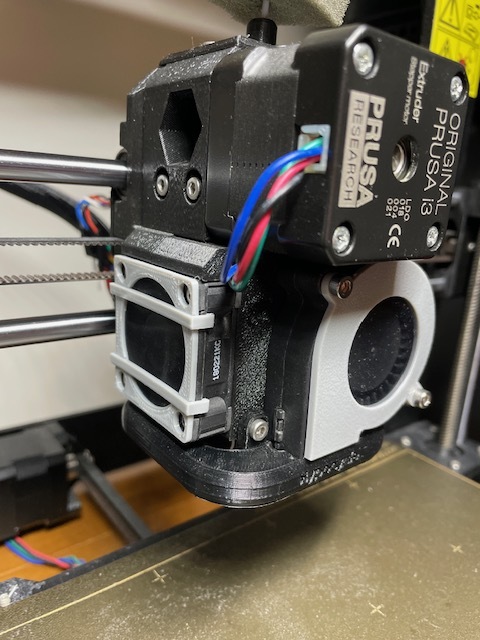
IMPORTANT NOTE ON DESIGNS: Files (40mm)Grate, NoGrate, and Pegs were prototype designs for the following reasons, while they did work, there were interference issues with the bolt heads of the Grate and NoGrate designs, they would bump into the ball screw when homing the machine, I went so far as to trying low profile M3 screws, but it still had interference issues. I'm not sure how much it matters, but I didn't want to risk damaging the ball screw over time. The design 40mmPegs will work, however I did not use it in the end because I was worried about breaking off the pegs inside the bolt heads and not being able to remove them. The final design 40mmFilter does still interfere with the ball screw to some degree when homing the machine, but the clips have enough flex to them, when it bumps that I consider it to be non-affecting. As for the radial fan filter, it's pretty much print and install, the scale can be adjusted as low as 97% if you're looking for it to better fit to the profile. INSTRUCTIONS: -For filter media, I used some left over magnetic PC fan filters I had and cut them to a close enough size to cover orifices of the frames. -When slicing I added a layer pause (use best judgement on height for pause) and placed my filter on the printed part and added dots of super glue to hold it in place as best as I could (DO NOT GET GLUE ON PRINT BED AND APPLY IN A WELL VENTILATED AREA) and allowed it about a minute or so to setup as best as it could before resuming the print. (The first layer it prints over the filter media will look pretty sad, but the following layers will sort themselves out) -ALTERNATE STEP, if you do not wish to use superglue or are in a confined space, you can use a larger piece of filter material and tape it to the print bed using painters tape or masking tape. -Once parts are printed, installation is easy. For the radial filter, remove the two M3 screws and install. For the 40mm fan, place the frame over the fan and install clips in horizontally into the printed groovers and clip into the sides of the fan. No need to remove the 4 M3 screws.
With this file you will be able to print Prusa i3 MK3 Fan Filters with your 3D printer. Click on the button and save the file on your computer to work, edit or customize your design. You can also find more 3D designs for printers on Prusa i3 MK3 Fan Filters.