Prusa Leveling Guide Angle Finder
prusaprinters
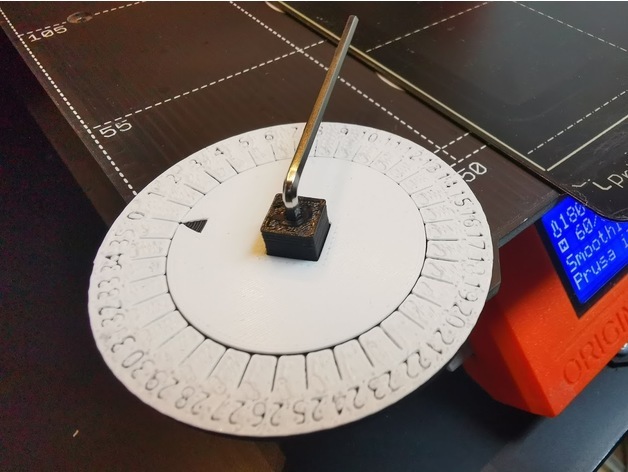
<p>This Angle Finder (Angle Meter, or Protractor if you prefer) helps you finding the exact angle to rotate the bed screws on your <a href="https://www.rearvuemirror.com/guides/nylock-mod-for-the-mk3s">Nylock Mod</a>, when leveling the print bed using <a href="https://plugins.octoprint.org/plugins/PrusaLevelingGuide/">Prusa Leveling Guide</a>.</p> <p><strong>Besides the original version with 10° marks, a version with M3 screw pitch in millimeters has been added.</strong></p> <p>Print parts as oriented at 0.2 mm layer height, and set the filament change as follows:</p> <p><strong>*center.stl</strong> - filament change at 0.6 mm <strong>*dial.stl</strong> and<strong>dial-pitch-mm.stl</strong> - filament change at 2.8 mm The Center Wheel should freely rotate inside the Dial, and the hex key should<strong>snugly fit</strong> through the Key-Core.</p> <p>The Key-Core should click into the Center Wheel. If you have difficulties passing the hex key through the core, lower the extrusion and print the core again. You can also change just the Key-Core if it wears out and your hex-key starts freely moving inside it.</p> <h3> Print Settings</h3> <p><strong>Printer Brand:</strong></p> <p>Prusa</p> <p><strong>Printer:</strong></p> <p>I3 MK3S</p> <p><strong>Rafts:</strong></p> <p>No</p> <p><strong>Supports:</strong></p> <p>No</p> <p><strong>Resolution:</strong></p> <p>0.2</p> <p><strong>Infill:</strong></p> <p>15%</p> <p><strong>Notes:</strong></p> <p>Print parts as oriented at 0.2 mm layer height, and set the filament change as follows:</p> <p><strong>*center.stl</strong> - filament change at 0.6 mm <strong>*dial.stl</strong> and<strong>dial-pitch-mm.stl</strong> - filament change at 2.8 mm</p> <h3> Usage</h3> <p>The<strong>dial.stl</strong> has a mark for each 10°, while the<strong>dial-pitch-mm.stl</strong> has M3 screw pitch values in millimeters.</p> <p><strong>*To rotate a screw clockwise</strong>, for example 30° - insert the key into the screw,<em>slightly</em> rotate it clockwise until you feel the resistance from the screw. Rotate the dial to align "0" mark with the arrow on the center wheel and hold it firmly against the print bed. Rotate the hex clockwise until the arrow aligns with the mark "3". <strong>*To rotate a screw counter-clockwise</strong>, for example 30° - insert the key into the screw,<em>slightly</em> rotate it counter-clockwiseit until you feel the resistance from the screw. Rotate the dial to align "3" mark with the arrow on the center wheel and hold it firmly against the print bed. Rotate the hex counter-clockwise until the arrow aligns with the mark "0".</p> <h3> IMPORTANT NOTE</h3> <p><strong>Keep in mind that the bed warps as its temperature changes, especially when heating above 60°C.</strong> Therefore, before starting the bed leveling I always let the bed temperature settle for at least 5-10 minutes when it reaches its target temperature. I also prefer fixing the above-first-layer bed temperature to the same value as the first-layer temperature in all filament settings, to avoid warping during the prints.</p> Category: 3D Printer Accessories
With this file you will be able to print Prusa Leveling Guide Angle Finder with your 3D printer. Click on the button and save the file on your computer to work, edit or customize your design. You can also find more 3D designs for printers on Prusa Leveling Guide Angle Finder.