Prusa Lights with Clip-On Brackets
thingiverse
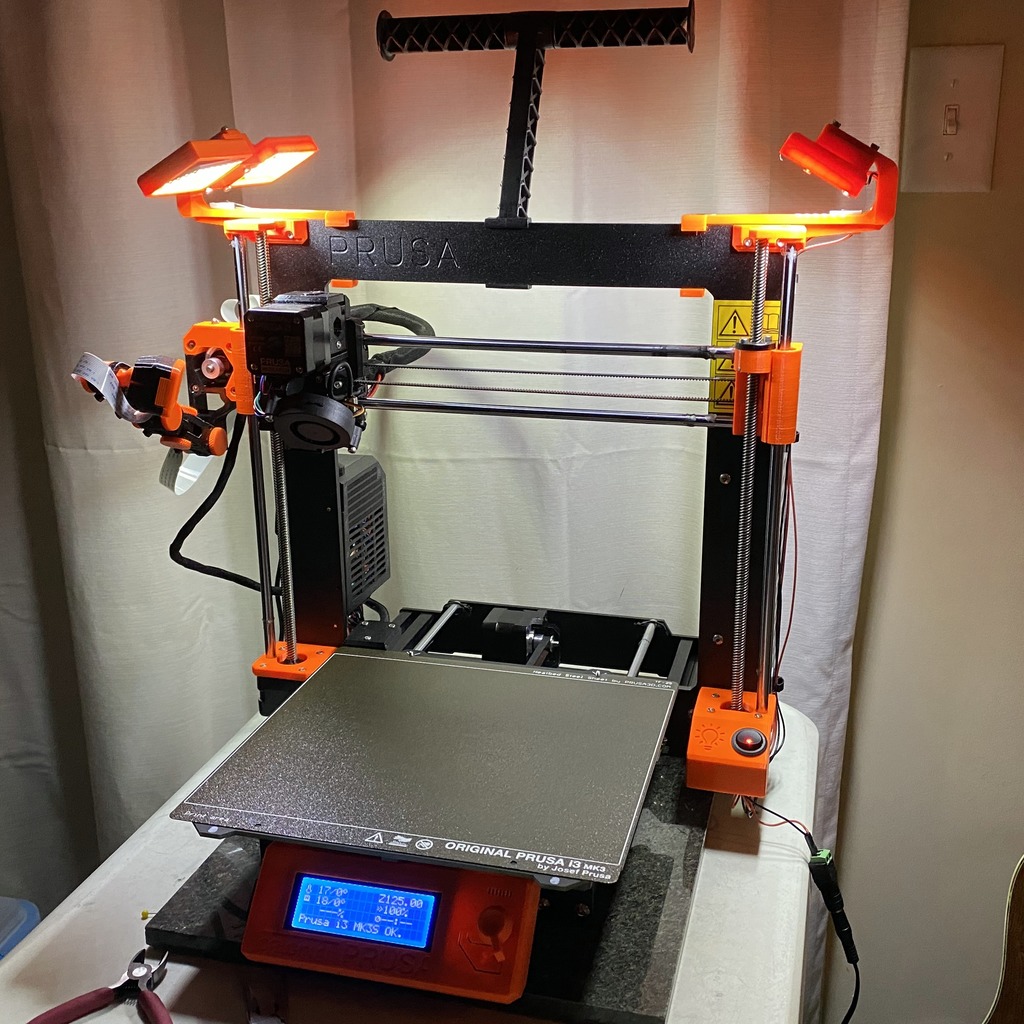
A remix of Prusa Lights (using WAGO connectors) from [Zarbuta](https://www.thingiverse.com/Zarbuta/about): https://www.thingiverse.com/thing:3534473 That project was in turn inspired by: - [Prusa I3 MK2 Frame Holder Collection: 2 LED light holder](https://www.thingiverse.com/thing:2055511) by [wschadow](https://www.thingiverse.com/wschadow/about) - [Prusa Switch Box ](https://www.thingiverse.com/thing:3002916) by [Aeggsbaerde](https://www.thingiverse.com/Aeggsbaerde/about) A modification to the light mounts was necessary to clear the filament spools. As designed, the original was fitted on a printer with the MMU upgrade, which I do not have. The clip-on brackets should work with or without the MMU setup. The inspirational project also used longer screws threaded through the Z-axis caps. The clips avoid taking that apart. The "lightbox" sides were beefed up a bit as they would sometimes peel up or warp during printing since the sides cooled before the top was complete. This change necessitated additional changes to the top and bottom lightbox lids, as well as the mounting mechanism to the brackets. A square nut slot and a hex nut recess were added to the lightbox top cover to make the mounting more substantial vs. the original, which had threads in the print. The bottom has been changed to three screws instead of a snap-fit. These are threaded into the plastic as there is no structural strength needed. These modifications were done by @gromitdj on [Homebrewtalk.com](https://www.homebrewtalk.com). As shown (one lightbox on each side of the printer and the switch box), you would need: - 4 x [12V Car 1210 48SMD LED](https://www.ebay.com/itm/Car-Interior-12V-White-48-SMD-5050-LED-Light-Lamp-Panel-T10-Festoon-Dome-BA9S/182125627174?epid=1868625923&hash=item2a67888726:g:JgEAAOSwck5XMWqF) - 5 x [WAGO 221-413 3 Way](https://www.electricalworld.com/us/WAGO-221-413-3-Way-Lever-Operated-Terminal-Connector/m-2999.aspx) (2 for each side, 1 in the switch) - 1 x [WAGO 221-415 5 Way](https://www.electricalworld.com/en/WAGO-221-415-5-Way-Lever-Operated-Terminal-Connector/m-3000.aspx) (1 in the switch) - 1 x [HOTSYSTEM DC12V 20A Round Rocker Toggle Switch ON-OFF](https://www.amazon.com/gp/product/B007B856YY/ref=oh_aui_search_asin_title?ie=UTF8&psc=1) - 1 x [12V power supply](https://smile.amazon.com/gp/product/B07HNL5D56/r) - 2 x M3 square nuts (one in each lightbox) - 2 x M3 hex nuts (one in each lightbox) - 4 x M3*12mm to mount lightbox to brackets (two in each lightbox) - 6 x M3*6mm to affix the bottom cover to the lightbox (three in each lightbox) - 2 x M3*12mm to replace the M3*9mm screws which will be used to affix the switch box to the Z-motor - Miscellaneous electric wiring (I used 20 gauge stranded black and red) Carefully break off the black plastic which holds the pins on the wires connecting the LEDs. You will use the pins inside the Wago connectors. The 5-way Wago is used in the switch box for the ground pins in the switchbox, there will be one place left over. A three-way will be used for power. You must solder the cables to the switch as there is not enough depth in the box to use crimp on female spades. For the rest, the wires clamp into the Wago connectors. I used male Dupont pins crimped on all of the wire ends as they fit all the way into the Wagos and provided a more secure connection.
With this file you will be able to print Prusa Lights with Clip-On Brackets with your 3D printer. Click on the button and save the file on your computer to work, edit or customize your design. You can also find more 3D designs for printers on Prusa Lights with Clip-On Brackets.