Prusa Mini - Filament holder
prusaprinters
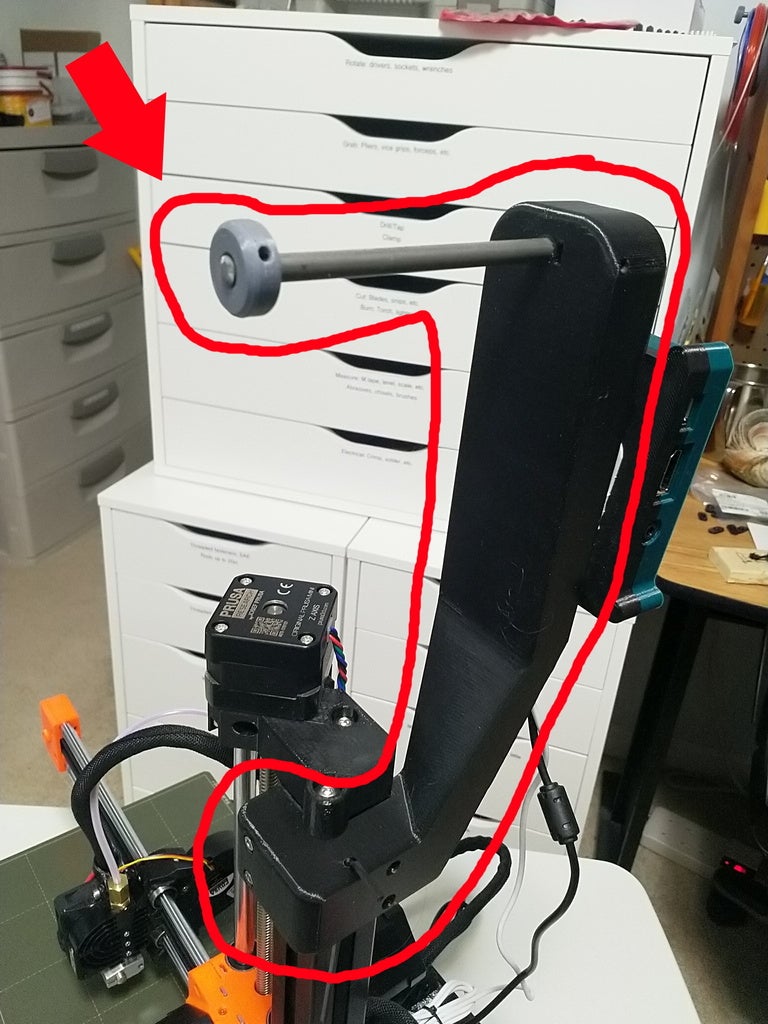
<p>Simple but stout filament holder for the Prusa Mini. Mounts to the top of the vertical 3030 beam using T slot nuts. Spools ride on a 1/4" steel rod. Resilient against even the most tangled of filament spools.</p> <h3>Print instructions</h3><h3>Print Settings</h3><p>Unfortunately, the model is too big for the Prusa Mini as-is. I know, it's lame to have an accessory that can't be printed on the machine its for, but I needed a certain height to clear all common filament spools, so I designed this to be printed on my Prusa Mk2.5S. If the Prusa Mini is the biggest printer you have access to, I'd recommend editing the model to split it into two pieces that get joined with some M3 screws and nuts. Alternately, you could cut it in half in your slicer, then merge the two printed halves using strong epoxy. Make sure your join method is strong - you don't want the filament holder to break apart when the printer tugs on a tangled spool!</p> <p>Print on the big part on the flat side. Print the collar piece with holes up.</p> <h3>Assembly</h3><p>Hardware required:</p> <ul> <li>1x 5.125" (130mm) of 1/4" diameter steel rod. Aluminum would work too. Wood will not.</li> <li>4x M3 hex nuts</li> <li>4x M3 set screws (can substitute regular M3 screws if needed)</li> <li>2x M3x20 socket head screws</li> <li>2x M3 T slot nuts (like these)</li> </ul> <p>The small round collar accepts two M3 hex nuts - press them in the side. Now install two M3 set screws, leaving them loose. Install the collar onto one end of the steel rod, and tighten the set screws to lock it.</p> <p>Install M3 hex nuts into the slots on the top of the filament holder. Press and twist the steel rod into the hole, then tighten these set screws to lock the steel rod in place. (This is probably optional - when I assembled mine, the fit of the rod was so tight the set screws didn't feel necessary.)</p> <p>Press the filament holder onto the very top of the vertical 3030 beam.</p> <p>This next part is a little annoying...we need to get T slot nuts behind the filament holder and tighten them "blind". Seat the M3x20 socket head screws in the front two holes of the filament holder, but don't press them in. Take one of the T slot nuts and put it into the 3030 beam. Carefully rotate it to horizontal position, then with a long implement of some kind, lift it up behind the filament holder. You can do so by lifting the nut by its left side -- the nuts can only rotate 90 degrees, so you can push up from the left side and it will stay horizontal. Maneuver the nut behind the upper screw, and when it's close, press on the screw with an allen key, turning it clockwise until it threads into the nut. Do the same with the lower screw.</p> <p>If the above doesn't work or your T slot nuts aren't the insertable kind, you can remove the Z axis mount from the top of the 3030 beam, then slide the filament holder with pre-threaded nuts into the slot. However, you'll probably have to recalibrate afterward. I didn't want to mess with any of the pre-assmbled parts, so I did it the way described above.</p> <p>Once the screws are tight in the nuts, the mount should be quite stout. Filament feeds from the right side down into the printer.</p> <p>Note: there are two other mounting holes in the side of the filament holder, but I consider these to be optional - mine was plenty rigid without them.</p> <p><h3>CAD source</h3><br/> Open design. <a href="https://cad.onshape.com/documents/a31975207f66f817bce7c222/w/25a3e1073bb2c050377bcaa1/e/0ae4ee8d40839fb38343459b">Find the CAD in OnShape here</a>.</p>
With this file you will be able to print Prusa Mini - Filament holder with your 3D printer. Click on the button and save the file on your computer to work, edit or customize your design. You can also find more 3D designs for printers on Prusa Mini - Filament holder.