Prusa MINI Z-Top | Electronics Box Lid Raspberry Pi Zero 2 W
prusaprinters
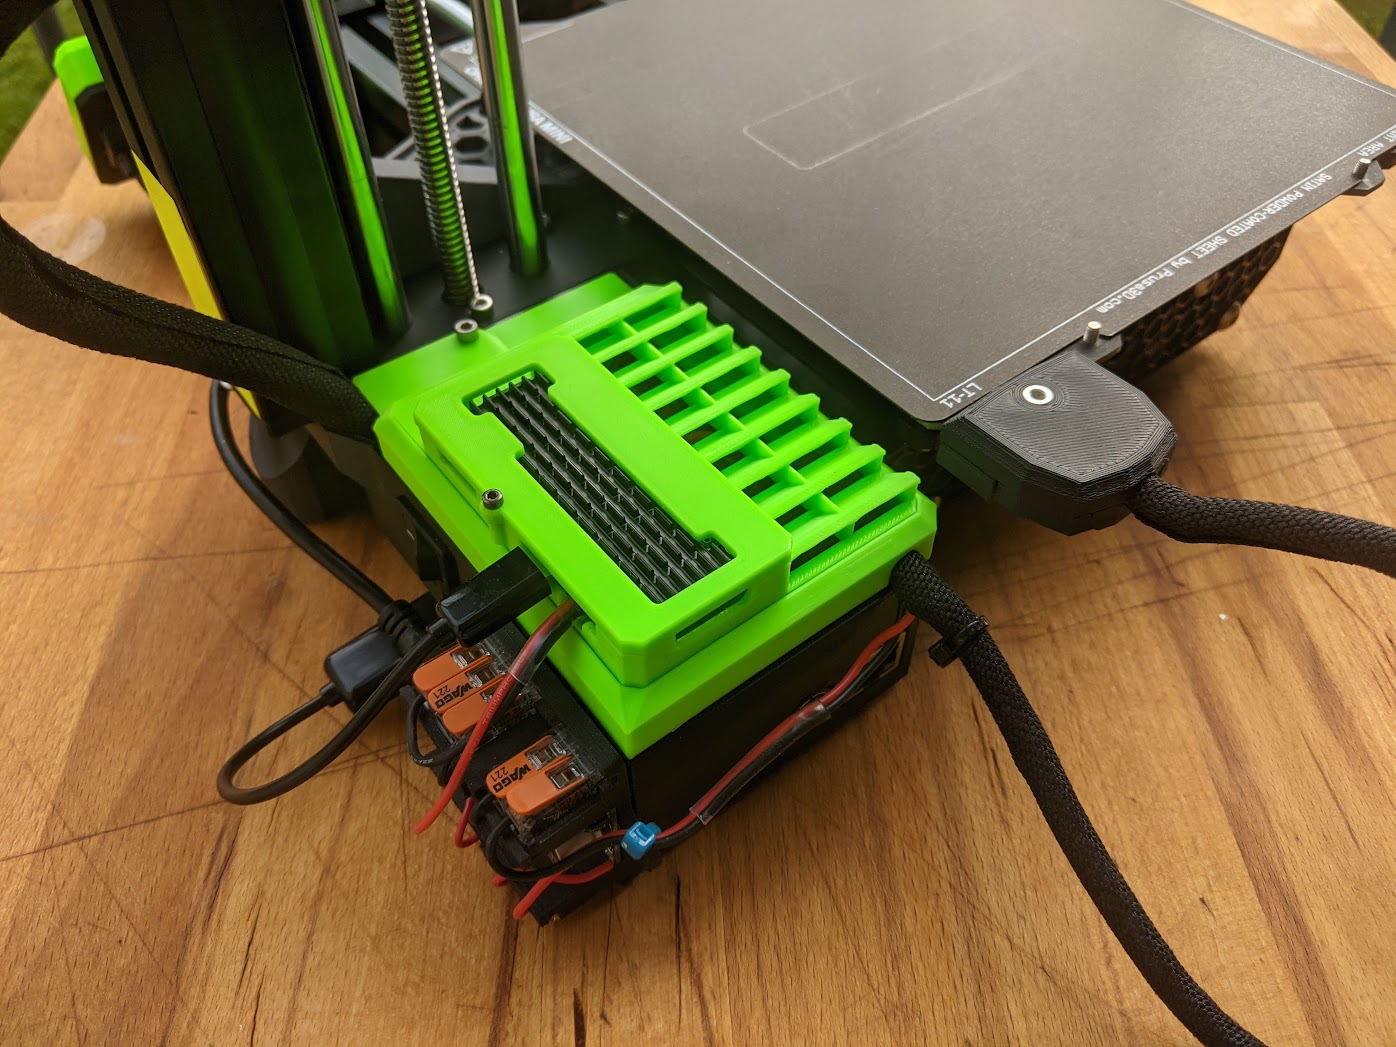
<p><strong>This is a remix of the </strong><a href="https://www.printables.com/prints/72989-prusa-mini-z-top-electronics-box-lid"><strong>Prusa Mini Z-Top | Electronics Box Lid</strong></a><strong> by </strong><a href="https://www.printables.com/social/117808"><strong>freewheeler</strong></a><strong>, the </strong><a href="https://www.printables.com/prints/107019-prusa-mini-z-top-electronics-box-lid-raspberry-pi-"><strong>Raspberry Pi Zero mount lid</strong></a><strong> by </strong><a href="https://www.printables.com/social/194897"><strong>Deeps</strong></a><strong>, and the </strong><a href="https://www.printables.com/prints/199954-pi-zero-2-w-full-hex-mount-for-prusa-mini"><strong>Pi Zero hex lid</strong></a><strong> by </strong><a href="https://www.printables.com/social/108984-crokobacon"><strong>crokobacon</strong></a><strong> </strong>with the following changes:</p><ul><li>Boxier design that, in my opinion, visually works better with the other Prusa Mini parts</li><li>Better dust protection due to no direct vertical openings. All top ventilation openings are angled</li><li>Cutouts for the Raspberry Pi camera ribbon cable</li><li>Cutouts for Raspberry Pi SD card access</li><li>Cutouts for wires to power the Raspberry Pi directly via the solder pads</li><li>Support for heat sinks for the Raspberry Pi. Works with the regular rectangular heat sinks or the <a href="https://www.waveshare.com/zero-heatsink.htm">Waveshare heat sink</a>.</li><li>Two different styles of ventilation openings</li><li>STEP files available for easy remixing</li><li>This remix does not currently have an option to mount a fan inside the enclosure</li></ul><h5>Powering the Raspberry Pi</h5><p>If you would like to power your Raspberry Pi Zero from The Prusa Mini's power supply using a buck converter as shown in the pictures, check out the great <a href="https://www.printables.com/model/44341-led-light-bar-prusa-mini">instructions for the LED light bar</a> to learn how to get 24V directly from the power inlet of the Prusa Mini. Then use a buck converter such as the LM2596 to step the voltage down to 5V for the Raspberry Pi. I used <a href="https://www.thingiverse.com/thing:5147672">this thing</a> to attach the buck converter and used VHB tape to stick it to the electronics box.</p><p>If you're unfamiliar with electronics wiring you should power the RPi from a USB power supply or ask friend for help.</p><h3>BOM</h3><figure class="table"><table><thead><tr><th>Qty</th><th>Description</th><th>Notes</th></tr></thead><tbody><tr><td>1</td><td>M3x12mm Socket Heat Cap Screw</td><td>From existing electronics box</td></tr><tr><td>4</td><td>M2.5x6mm Button or Socket Head Cap Screw</td><td>Only if using Raspberry Pi</td></tr><tr><td>1</td><td>M2x6mm Button or Socket Head Cap Screw</td><td>Only if using Raspberry Pi</td></tr></tbody></table></figure><h3>Printing</h3><p>These aren't load-bearing parts so you can choose pretty much what you want. I chose PETG with 3 perimeters and 20% infill, 3 bottom and 5 top layers. I wouldn't recommend PLA because the electronics might produce some heat.</p><p>The parts can be printed in the original orientation. The Base requires support material from the build plate only. There's an alternative version that doesn't require support (see comparison further down). All the other parts do not require support material.</p><h3>Choose Your Parts</h3><p>There are different variations of each part. Choose depending on your visual preferences and cooling method for the Raspberry Pi Zero.</p><h4>Base</h4><p>There is a version of the Base that is flush with the edges of the electronics case but requires support material from the build plate around the edges. If you don't like supports you can choose the “No Supports” version. However, it has a gap between the Base and the electronics case. See below for comparison.</p><figure class="image"><img src="https://media.printables.com/media/prints/211191/rich_content/50575eb4-ea26-494d-8e69-778d8f853df9/bases.png#%7B%22uuid%22%3A%223a108719-e45a-4a9a-884c-f77e93c51611%22%2C%22w%22%3A3504%2C%22h%22%3A2478%7D"></figure><h4>Lid</h4><p>There two different styles of ventilation openings and both come with a variation to mount a Raspberry Pi Zero. I assume Lid A provides better air circulation but the openings are big enough that a very small screw might fall through if your drop one. M3 and larger screws can't fall through the opening.</p><figure class="image"><img src="https://media.printables.com/media/prints/211191/rich_content/204a4715-cdf7-4e54-997b-8885abb423f5/lids.png#%7B%22uuid%22%3A%2235b514c6-3505-4a22-8cee-bdf68b255760%22%2C%22w%22%3A3504%2C%22h%22%3A2478%7D"></figure><figure class="image"><img src="https://media.printables.com/media/prints/211191/rich_content/a536fd58-4563-494a-a0dc-1a5fb21f6865/lids-top-view.png#%7B%22uuid%22%3A%2231d2e0aa-842e-4d54-90dd-ae3fba938563%22%2C%22w%22%3A3504%2C%22h%22%3A2478%7D"></figure><h4>Raspberry Pi Lid</h4><p>If you use a Raspberry Pi you can choose the right lid for your preferred cooling method. The <a href="https://www.waveshare.com/zero-heatsink.htm">Waveshare Dedicated Aluminum Heatsink for Raspberry Pi Zero Series</a> is supported too. </p><p>The version without heat sink and the Waveshare lid can also be used with the old Raspberry Pi Zero. The other lids only support the Raspberry Pi Zero 2.</p><figure class="image"><img src="https://media.printables.com/media/prints/211191/rich_content/91a818d8-ef3e-4774-a91a-d57c897a29ea/rpi-lids.png#%7B%22uuid%22%3A%22e3bcd9f2-ecf3-4c7c-951f-6fe48e691e97%22%2C%22w%22%3A3504%2C%22h%22%3A2478%7D"></figure><h3>Assembly</h3><ul><li>Push the bed wire harness through the opening highlighted below.</li><li>Install the Base the same way as the original electronics case cover and secure it using the original M3 screw.</li><li>Place the Lid inside the Base and rest it on top of the support tabs. I have chosen not to include the snap-together tabs from the original as they did not work for me and caused the upper lip of the base to break. Instead, I've added additional support tabs. The Lid holds pretty well without anything but you can optionally add some superglue to the support tabs to permanently attach the parts.</li><li>Install the Raspberry Pi using M2.5 screws or use the provided stand-offs if you use the Waveshare heat sink.</li><li>Attach the RPi Lid using the M2 screw.</li></ul><figure class="image"><img src="https://media.printables.com/media/prints/211191/rich_content/f61b61c4-5de7-44f2-85cd-f5f7b59ff053/exploded.png#%7B%22uuid%22%3A%2277f14e1e-30a5-4045-aeb4-862eb1c4cc2f%22%2C%22w%22%3A3504%2C%22h%22%3A2478%7D"></figure><figure class="image"><img src="https://media.printables.com/media/prints/211191/rich_content/9349d931-253b-4795-9ae5-52439cd22487/base-top-view.png#%7B%22uuid%22%3A%22b4873070-cc8e-4c7e-a3a1-0e19f6d6fac7%22%2C%22w%22%3A3504%2C%22h%22%3A2478%7D"></figure><p> </p>
With this file you will be able to print Prusa MINI Z-Top | Electronics Box Lid Raspberry Pi Zero 2 W with your 3D printer. Click on the button and save the file on your computer to work, edit or customize your design. You can also find more 3D designs for printers on Prusa MINI Z-Top | Electronics Box Lid Raspberry Pi Zero 2 W.