Prusa MK3 / MK3S / MK3S+ Y-Axis Linear Rail Guide Upgrade
prusaprinters
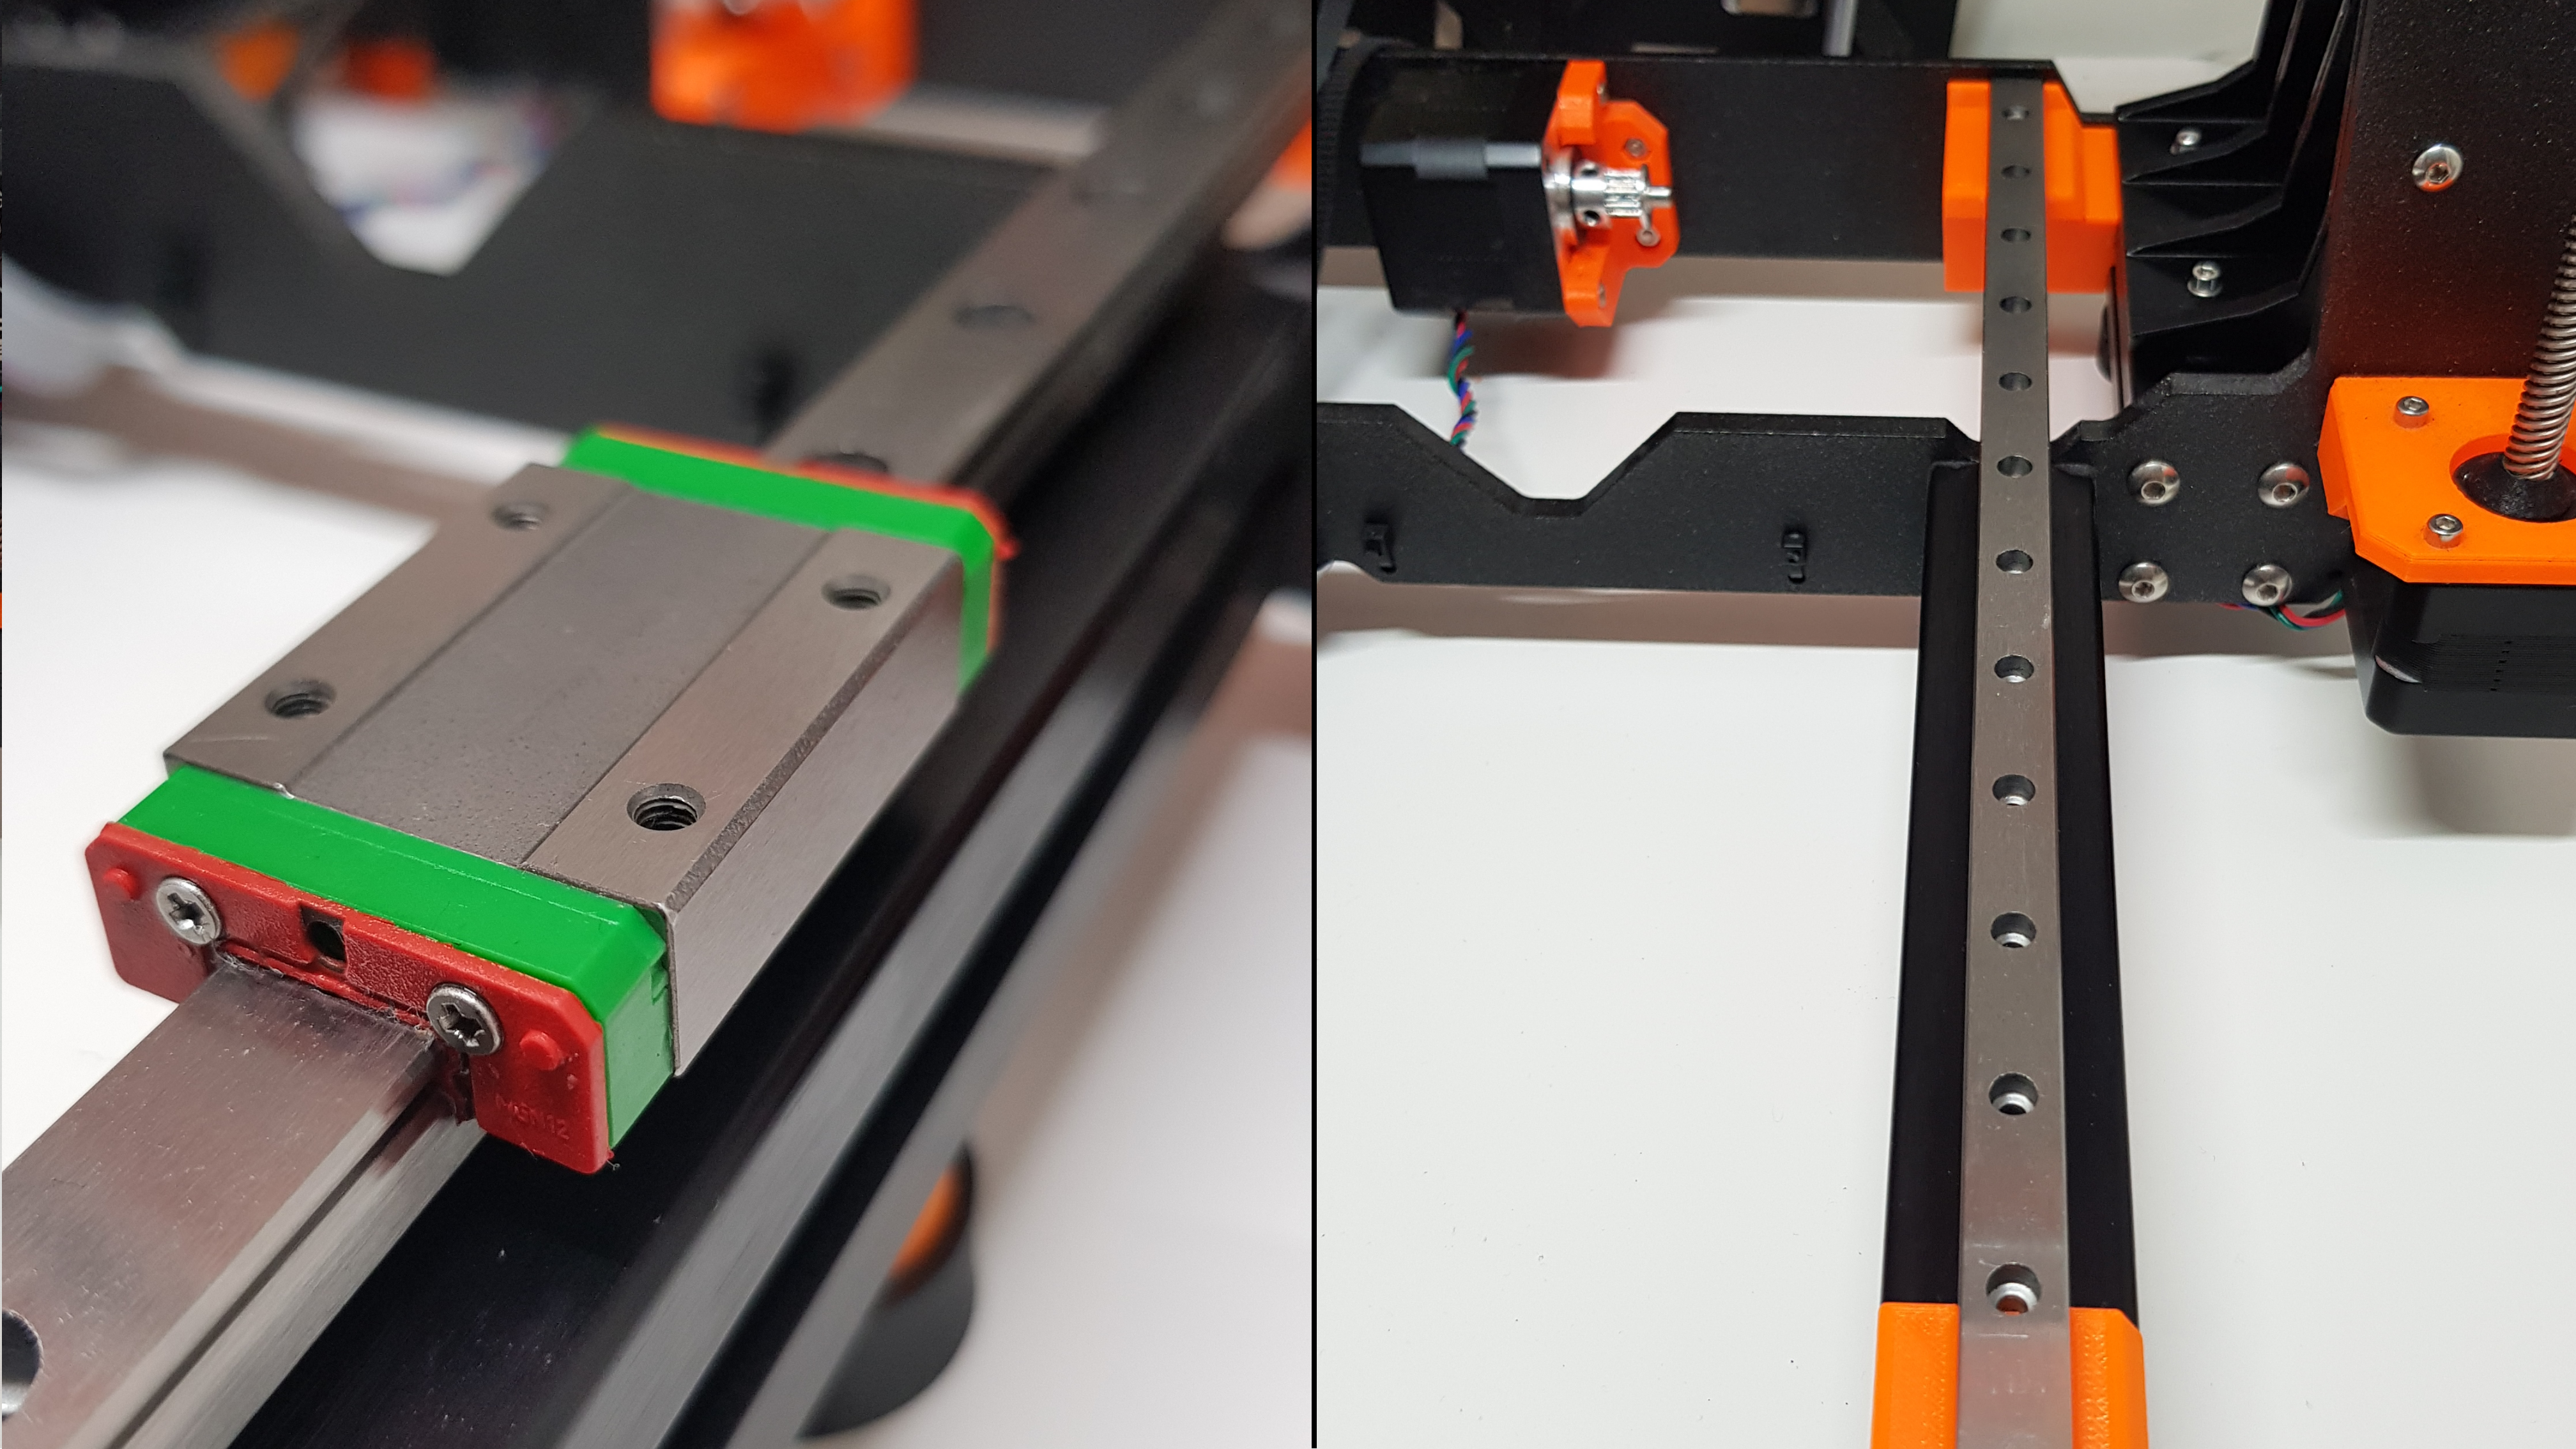
<p><strong>THIS DESIGN HAS BEEN STOLEN AND SOLD ON EBAY, AliExpress, Bangood etc.! PLEASE DO NOT SUPPORT SUCH SELLERS !</strong><br> </p><p><strong>Version 2 added and tested with fw 3.11.0</strong></p><p><br>I want to have a stiffer and more robust Y-Axis Carriage on my Original Prusa MK3.</p><p>The Commercial Upgrade i've found had a few disadvantages for me and it's not very cheap.</p><p>So i've designed my own Version without the disadvantages, make it more robust and cheaper (only a quarte of price if china Rails are used)</p><p>You can follow me, or my MK3S+ with my Axis Mods on Twitch.<br><a href="https://www.twitch.tv/dasschweigenderlamer">https://www.twitch.tv/dasschweigenderlamer</a></p><p>My Design works with Standard Firmware Calibration methode. You do not lose 3mm of Height (3mm higher like the commercial Version will cause that the firmware calibration process runs into an error).</p><p>I used the Extrusion to mount the Rails rather than the original mounting holes. That's much more robust in my opinion.</p><p>In my case the used Guides and the used Guide Blocks are less noisy than the original Linear rail parts.</p><p>The Mainproblem are the Guideprofiles. Mostly you get only a length of 350mm but you need 330mm long Guidesprofiles. It not as easy to shorten the Profiles because of there material hardness. I've worn two saw blades to get it short ;-). Mean while its possible to buy 330mm profiles.</p><p>The Guides Blocks are available in two sizes (see Pictures) <strong>it's important to place the Blocks in right direction to avoid Calibration Errors. </strong><br><br><strong>Please clean and grease the Blocks ! Best result if you disassemble the Blocks completely and flood the Channels with Grease ;-).</strong></p><p> </p><h4><strong>Three long Blocks (best solution since firmware 3.x, easier to source but old Version):</strong></h4><p> </p><figure class="image"><img src="https://media.prusaprinters.org/media/prints/5620/rich_content/c7c47b15-c638-48bd-a2a3-5cb26b638b50/three_long_blocks.png#%7B%22uuid%22%3A%22f619d797-02f9-445d-a0a4-a8b196b19325%22%2C%22w%22%3A1997%2C%22h%22%3A1131%7D"></figure><p>left_rear_three_long_blocks.stl<br>left_front_three_long_blocks.stl<br>right_rear.stl<br>right_front.stl</p><p>If you have printed the older or the “Two long one short Blocks” parts, you could add the two little end stop parts to avoid calibration errors with newer firmware. The Endstop should be ~10mm at the rear and ~7mm at the front.</p><figure class="image"><img src="https://media.prusaprinters.org/media/prints/5620/rich_content/339b96c7-3514-4d7c-bead-f46f9a91872b/clipon.png#%7B%22uuid%22%3A%22862cfdf3-12c2-4569-843d-55ebd348b599%22%2C%22w%22%3A1637%2C%22h%22%3A970%7D"></figure><h4> </h4><h4> </h4><h5><strong> </strong>VERSION 2 - <strong>Three long Blocks - VERSION to use !</strong><br><br><img src="https://media.prusaprinters.org/media/prints/5620/rich_content/a4adf5ec-d650-4a51-b30b-20d7d06ae40f/v2_cad.png#%7B%22uuid%22%3A%229f79eab8-94c5-460d-86fe-58c3baed72dd%22%2C%22w%22%3A1872%2C%22h%22%3A1117%7D"><br>What's new:</h5><ul><li>The brackets are slightly longer to provide more contact surface. </li><li>The rails can now be attached with twice as many screws and t-nuts each. </li><li>Inserting the nuts (rear parts) is simplified. </li><li>Unsupported printing has been improved (no longer necessary).</li></ul><figure class="image image-style-align-center image_resized" style="width:50%;"><img src="https://media.prusaprinters.org/media/prints/5620/rich_content/7a2f983e-1f1a-4212-9ae8-14201cdd9321/20220202_203249.jpg#%7B%22uuid%22%3A%22aa0018fd-a94e-40f4-856e-4165364d7c34%22%2C%22w%22%3A4032%2C%22h%22%3A2268%7D"></figure><figure class="image image_resized" style="width:50%;"><img src="https://media.prusaprinters.org/media/prints/5620/rich_content/7febbbb1-d8b6-41b9-9f91-e46fb977f202/20220202_203304.jpg#%7B%22uuid%22%3A%225a65d4d9-88e1-490c-bb69-a53d7161ec08%22%2C%22w%22%3A4032%2C%22h%22%3A2268%7D"></figure><figure class="image image_resized" style="width:50%;"><img src="https://media.prusaprinters.org/media/prints/5620/rich_content/d84319b7-43a7-464c-9b5a-a3adf153ac4d/20220202_203335.jpg#%7B%22uuid%22%3A%22b11768c2-56a5-404d-bb04-4b760a754f7d%22%2C%22w%22%3A4032%2C%22h%22%3A2268%7D"></figure><p>v2_right_rear.stl<br>v2_left_rear.stl<br>v2_left_front.stl<br>v2_right_front.stl</p><p> </p><p>----------------------------------------------------------------------------------------------------------------</p><p> </p><h4><strong>Two long one short Blocks (old Version):</strong></h4><p><img src="https://media.prusaprinters.org/media/prints/5620/rich_content/706e1c8f-4e3a-481b-837a-79457241135c/two_long_one_short_block.png#%7B%22uuid%22%3A%224d595ec5-b54a-426c-a4d8-f41274e5256c%22%2C%22w%22%3A1833%2C%22h%22%3A1067%7D"></p><p>left_rear_two_long_one_short_blocks.stl<br>left_front_two_long_one_short_blocks.stl<br>right_rear.stl<br>right_front.stl</p><p> </p><p> </p><p><strong>After the assemly it is necessary to run the Calibration Wizard.</strong></p><p> </p><h4><strong>What you need:</strong></h4><p>2x MGN12H Linear Rail Guides 330mm - original HiWin recommended.<br>3x MGN12H Linear Guide Block (3x long) <br>OR <br>3x MGN12H/C Linear Guide Block (2x long 1x short) - original HiWin recommended.<br><br>4x T-Nut 8mm M3<br>2x M3 Lock Nut's<br>M3 Screws 10x 10mm, 2x 14mm</p><p>for V2:<br>6x T-Nut 8mm M3<br>4x M3 Lock Nut's<br>M3 Screws 14x 10mm, 2x 14mm<br> </p><p><br>The Rails and Blocks available different quality, just google for MGN12. <br><br>I recommend to use this mod/plugin too: <a href="https://plugins.octoprint.org/plugins/PrusaLevelingGuide/">https://plugins.octoprint.org/plugins/PrusaLevelingGuide/</a></p><h5><br>Update 16.09.2019</h5><p>added additional Front an Rear strut if needed. My Setup works better without additional struts.<br> </p><h5>Update 21.10.2019</h5><p>added STEP-Files<br> </p><h5>Update 28.02.2020 THX to H20Slicer (untested on my Setup)</h5><p>added Parts to avoid calibration error if only long blocks are used. The short ends of the long blocks must facing outward !<br>Left Front (long blocks calibration).stl<br>Left Rear (long blocks calibration).stl<br> </p><h5>Update 05.01.2022</h5><p>updated the description and pictures<br>updated/added parts according to the new description<br>added Folder in File Section</p><h5>Update 01.02.2022</h5><p>Version 2 parts added - BETA VERSION TESTING IN PROGRESS<br>Version 2 pictures added</p><h5>Update 26.04.2022</h5><p>V2 Beta moved to stable - V2 is the Version to go now <br>V2 tested with fw 3.11.0</p><p> </p><h4>Print instructions:</h4><p>I've printed the Parts with Prusament PETG Orange (nice Color).<br>3-4 Perimeter<br>20-30% Infill</p><p>See Picture for necessary Supports</p>
With this file you will be able to print Prusa MK3 / MK3S / MK3S+ Y-Axis Linear Rail Guide Upgrade with your 3D printer. Click on the button and save the file on your computer to work, edit or customize your design. You can also find more 3D designs for printers on Prusa MK3 / MK3S / MK3S+ Y-Axis Linear Rail Guide Upgrade.