Prusa MK3/s Dual Fan Upgrade
thingiverse
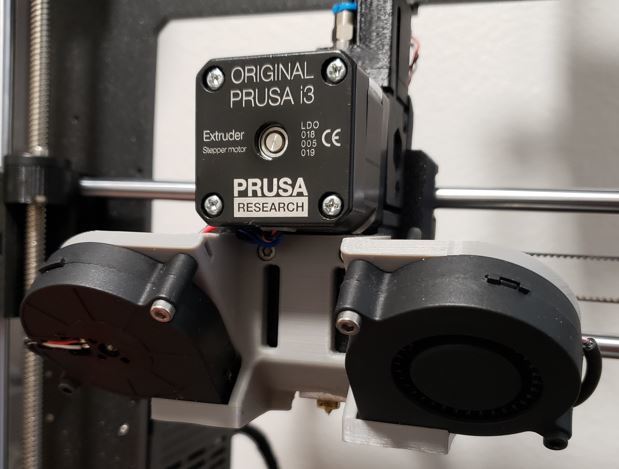
PRUSA i3 MK3/S DUAL PRINT FAN UPGRADE For full instructions and lots of pictures please refer to the instruction document. I created this upgrade for two reasons. One was to obtain better bridging capabilities and the other was so I could see the gosh darn extruder nozzle! Having the ease of access to clean and see the extruder nozzle is more than enough reason to add this upgrade. As for the bridging improvements, I can consistently make a 1.25” bridge with minimal to no droop which has greatly reduced the need for supports reducing print times and material usage. Material and Print Details: 1. PETG 2. Support from build plate ONLY 3. .2 Quality Prusa settings Parts List: Quantity Description Size 5 Socket Head Cap Screw M3x.5x20 2 Socket Head Cap Screw M3x.5x45 1 Socket Head Cap Screw M3x.5x6 6 Square Nut M3 x 1.8mm thick 1 Extruder Print Fan Same fan as original. I Bought this kit because I also wanted to replace the heat sink fan. https://a.co/d/5EIkY1T Wiring: Since there is only one location to plug the fans into I opted to splice the two fans together and use one wire with its connector to run all the way back to the controller. When splicing the wires, you simply match up the color-coded cables, I recommend soldering since the wire gauge is so small. I performed the splice in the cable bundle that routes to the top of the controller to hide the splice in the wire loom. For routing the fan cables, I tucked them in as close as possible and even super glued them into place just to make sure they would not move. See pictures and instructions below for wire routing.
With this file you will be able to print Prusa MK3/s Dual Fan Upgrade with your 3D printer. Click on the button and save the file on your computer to work, edit or customize your design. You can also find more 3D designs for printers on Prusa MK3/s Dual Fan Upgrade.