Prusa MK3S MMU2S purge bucket _NEW version
prusaprinters
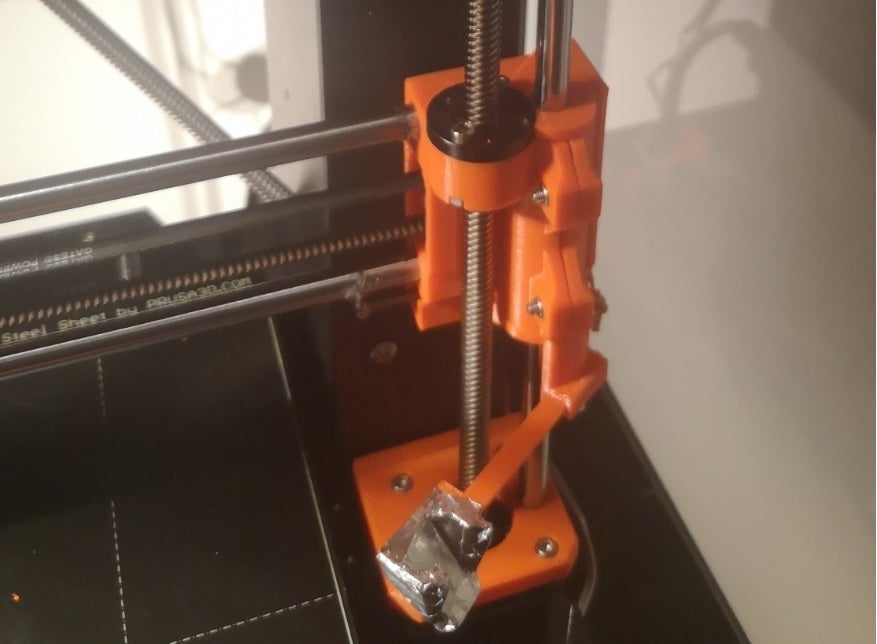
<p>It's a remix from my original design (<a href="https://www.prusaprinters.org/fr/prints/16909-prusa-mk3s-mmu2s-purge-bucket">https://www.prusaprinters.org/fr/prints/16909-prusa-mk3s-mmu2s-purge-bucket</a>)</p> <p>I redesigned the holder to match with my new X axis (<a href="https://www.thingiverse.com/thing:3670659">https://www.thingiverse.com/thing:3670659</a>)</p> <p>Now, this purge bucket can be installed on all X axis versions (stock, Bear, ...)</p> <p>Z-axis top right should be replace for that. STL is available (directly remixed from Prusa website).</p> <p>To print correctly (PETG 0.2mm 20% grid), please print these parts according to the last picture. <b> Don't print the Holder lying flat.</b></p> <p>Holder : supports everywhere<br/> Spacer: supports from build plate only<br/> Trigger: no supports<br/> Bucket: supports from build plate only</p> <h3>Materials needed: </h3><ul> <li>1 screw M3x20 for trigger, but you can use the trigger without screw with stock extruder (not tested on others)</li> <li>1 screw M3x4</li> <li><p>1 rubber band or a spring 20.6x5.1. I advise you the spring.</p> <p>Please follow this instruction list: (also available in Files with pictures, here : <a href="https://www.thingiverse.com/thing:4704964">https://www.thingiverse.com/thing:4704964</a>)</p> </li> </ul> <h3>HARDWARE PART :</h3><ol> <li>Add screw on the trigger (according to the trigger used)</li> <li>Add rubber band (or spring) between holder and spacer</li> <li>Add screw on the spacer to hold the bucket (need adjustment after the installation)</li> <li>Remove Z-axis top right</li> <li>Remove rod 8mm</li> <li>Install holder with spacer and trigger</li> <li>Put the rod 8mm (be careful with bearing)</li> <li>Replace Z-axis top right by the new part</li> <li>Check rotation if it's free. It's NOK, check that all supports on holder are removed. (I know, it's not easy...)</li> <li>Adjust position of the bucket and the screw on the trigger</li> <li><p>Perform a Calibration Z.</p> <p>It's finished for the Hardware part!</p> </li> </ol> <p><h3>SOFTWARE PART: </h3><br/> In PrusaSlicer,</p> <ol> <li>Go to "Print Settings" and uncheck "Wipe tower"</li> <li>Go to "Printer Settings" and copy/paste this script in the tool change section:</li> </ol> <p>; toolchange from [current_extruder] to [next_extruder], layer [layer_num]<br/> {if current_extruder != next_extruder}<br/> ;<em>before tool change<br/> M106 S0 ;turn off fan<br/> G92 E0 ;turn off retraction<br/> G1 E-0.8 F2100 ;retract<br/> G1 Y100 F12000 ;break filament before lifting<br/> G1 X200 F12000 ;move head to position<br/> ; G91;change in relative position<br/> {if layer_z < 25.0}<br/> G1 Z26; z-lift if lower than 25 mm<br/> {endif}<br/> G90;transition to absolute position<br/> G4 S0 ;clean up buffer movement<br/> G1 X240 F12000 ;move head to purge area<br/> G1 X250 F2000<br/> G1 X254 F1000 ;extend the buscket<br/> ;</em>end of pre-tool change gcode<br/> ; Start cleaning the filament before extraction<br/> M220 B ; turn aux v1.0.5<br/> M220 S100 ; change of loading tool</p> <p>;Begin PLA Tip shaping<br/> G1 E0.7644 F3639<br/> G1 E0.8248 F3926<br/> G1 E0.8483 F8483<br/> G1 E-15.000 F6000<br/> G1 E-24.500 F1200<br/> G1 E-7.000 F600<br/> G1 E-3.500 F360</p> <p>{if layer_num < 1}<br/> M104 S[first_layer<em>temperature</em>[next<em>extruder]] ; toolchange set the extruder temperature - first layer<br/> {else}<br/> M104 S[temperature</em>[next_extruder]] ; toolchange set the extruder temperature - other layers<br/> {endif}</p> <p>G1 E20.000 F454<br/> G1 E-20.000 F303<br/> G1 E-35.000 F2000<br/> G4 S0<br/> ;End PLA Tip shaping</p> <p>;---------------;<br/> T[next_extruder] ;tool change<br/> ;<em>start the purge after changing the tool<br/> M107 ;turn off fan<br/> G4 S0<br/> G1 E12 F1440 ;filament support<br/> G1 E42 F1011 ;acceleration for nozzle loading<br/> G1 E6 F708<br/> G1 E40 F250 ;nozzle purge<br/> G1 E60 F300 ;nozzle purge<br/> G1 E3 F350<br/> M106 S255 ;turn on fan<br/> G4 S2 ;cool the filament<br/> G92 E0 ;reset the position of the extrusion<br/> {if layer_num > 0}<br/> G1 E-[retract_length<em>toolchange</em>[next_extruder]] F1500 ;retract to avoid seepage<br/> {else}<br/> ; no retraction on first toolchange<br/> {endif}<br/> {if layer_z > .25}<br/> M106 S51<br/> {endif}<br/> G1 X240 F5000 ;bucket go back home<br/> G1 X200 F12000 ;bucket go back home<br/> M220 R ; restore speed<br/> ;</em>end of tool purge gcode<br/> {else}<br/> ; no extruder change<br/> {endif}<br/> G1 X240 F5000 ;bucket go back home<br/> G1 X200 F12000 ;bucket go back home<br/> M220 R ; restore speed<br/> ;*end of tool purge gcode<br/> {else}<br/> ; no extruder change<br/> {endif}</p> <p>This G-code is a mix from G-code from JiVo and G-code from BigBrain3d.</p> <p>It's finished for the Software part and this installation !</p> <p><b> Slice and test !</b></p> <h3>Print instructions</h3><p>To print correctly (PETG 0.2mm 20% grid), please print these parts according to the last picture. Don't print the Holder lying flat.</p> <p>Holder : supports everywhere<br/> Spacer: supports from build plate only<br/> Trigger: no supports<br/> Bucket: supports from build plate only</p>
With this file you will be able to print Prusa MK3S MMU2S purge bucket _NEW version with your 3D printer. Click on the button and save the file on your computer to work, edit or customize your design. You can also find more 3D designs for printers on Prusa MK3S MMU2S purge bucket _NEW version.