Prusa MMU2S Rear PTFE Coupler
thingiverse
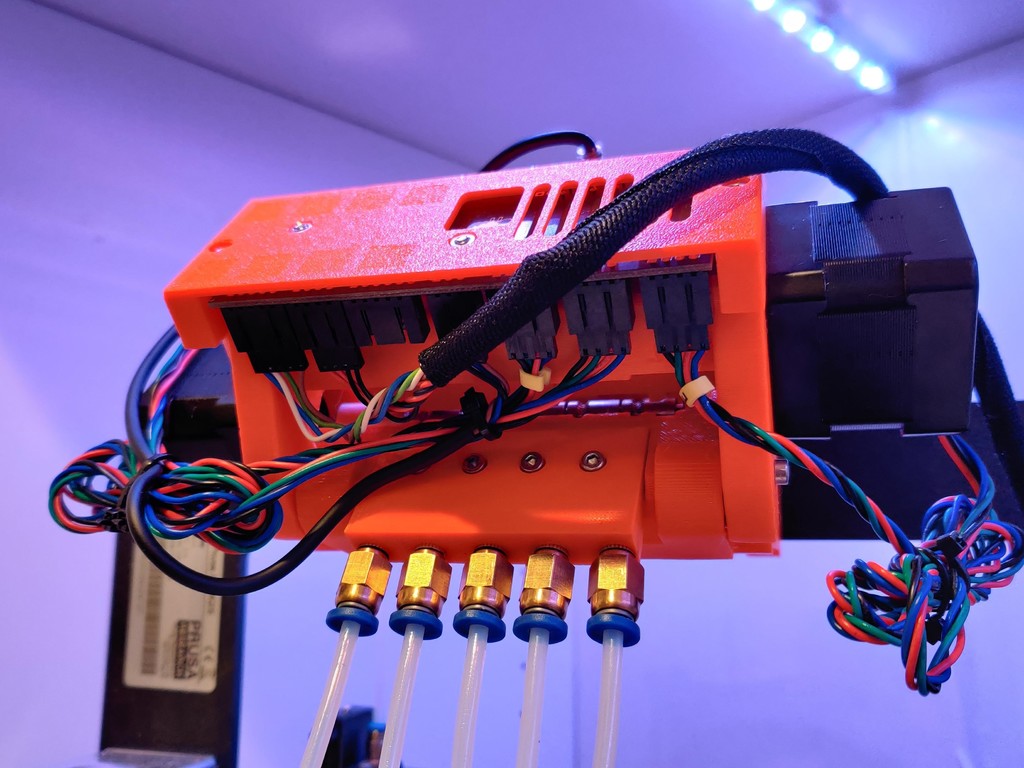
**This is a modified version of iwagner's Prusa MMU2S Rear PTFE Holder. For the original model and instructions, visit their [Thingiverse post](thingiverse.com/thing:3657251).** Like many MMU2S owners, I had a few issues with the PTFE tube setup - in particular, their "sandwich" clamp design that fails to put pressure on all 5 tubes. iwagner's excellent design worked great, but it was pretty easy to strip the modeled-in threads with the pneumatic couplers. This version uses threaded inserts to keep everything aligned well, and prevents thread stripping. So far, it's worked great, introducing only a bit of friction into the filament path. I'm sure I could reduce that in a future redesign if it becomes an issue. __Bill of materials*:__ >200mm [PTFE Tubing (2mm ID, 4mm OD)](https://www.amazon.com/dp/B019PZ5MY4) 5x [PC4-M5 Pneumatic Fittings](https://www.amazon.com/WMYCONGCONG-PC4-M5-Pneumatic-Straight-Fitting/dp/B07VDW3NN9/ref=sr_1_2_sspa?keywords=pc4m5&qid=1565066168&s=industrial&sr=1-2-spons&psc=1) 5x [M5 Threaded Inserts](https://www.amazon.com/Products-Insert-Fitting-Injection-Molding/dp/B07KNYZNWN/ref=sr_1_5?dchild=1&keywords=m5+brass+inserts&qid=1588135074&sr=8-5) **You may be able to find these parts for cheaper online. The provided links are the specific parts I had laying around.* __Printing instructions:__ This model uses [bridge-based overhang prevention](https://brentwerder.design/2019/12/14/tricking-my-printer-to-print-perfect-overhangs/) features, which allow it to be printed with no support material using the proper slicer settings. Ensure that "Detect Bridging Perimeters" is enabled, and the bridge angle is set to "automatic," or 0. The part should print vertically, with the five hole profiles against the bed. If your slicer output does not show optimal bridges as detailed in the photos, you may want to rotate the model so the flattest area of the model is against the bed. I printed my parts with 0.200mm layers and a 0.30mm nozzle, at 15% infill. I used [Prusa's unbranded PETG](https://shop.filamentpm.com/catalog/product/view/id/295/s/petg-orange-1-75-mm-1-kg/), which is why the color matches so well! __Assembly instructions**:__ 1. Use a soldering iron to add the brass inserts to the part. Make sure you put the smooth side in first. 2. Add the pneumatic fittings and check if they're square to the part. If not, you may need to push the fittings in further with your soldering iron. 3. Cut five 30mm lengths of PTFE and push them until they fit snugly into the part. As suggested by iwagner, you may need to cut these down further until they fit inside the MMU2S housing. I would also suggest testing for any friction along the filament path during this step - you may need to file out the holes in case the insert deformed the plastic. 4. After removing the original clamp, reuse the M3 screws to attach the part to the MMU2S unit. Make sure you don't strip the plastic. 5. Before putting all your tools away, double check for any friction with a length of filament. A small "bump" in the filament path is acceptable. ***For the original instructions, check out iwagner's [Thingiverse post](thingiverse.com/thing:3657251).* Enjoy! -Brent
With this file you will be able to print Prusa MMU2S Rear PTFE Coupler with your 3D printer. Click on the button and save the file on your computer to work, edit or customize your design. You can also find more 3D designs for printers on Prusa MMU2S Rear PTFE Coupler.